Hardwood Floor Repair Near You
Can’t find what you are looking for?
How It Works
-
 Answer a few questions about your home project.
 -
 Within seconds, get matched with top-rated local pros.
 -
 Compare quotes and choose the best pro for the job.
Hardwood Floor Repair In Your Area
Hardwood Floor Repair: A Guide to Restoring Your Home
Meta Description: Discover expert tips for hardwood floor repair to restore your home’s beauty. Learn how to fix scratches, dents, and water damage for stunning results.
Hardwood floors add warmth and character to any space. They can also suffer wear and tear over time. Scratches, dents, water damage, and warping are common issues.
Don’t worry – you can restore your floors’ natural beauty. With the right approach, you’ll breathe new life into your hardwood floors.
Key Takeaways
-
01
Assess the extent of the damage to determine the appropriate repair method
-
02
Repair minor surface imperfections like scratches and dents using wood filler and sanding
-
03
Address warping and buckling issues promptly to prevent further structural damage
-
04
Properly remove and replace damaged floorboards for a seamless, cohesive look
-
05
Implement a regular cleaning and maintenance routine to protect your investment
Assessing the Extent of Floor Damage
Careful evaluation of hardwood floor damage is crucial before starting repairs. This assessment helps determine the right approach. It also shows if you need professional help.
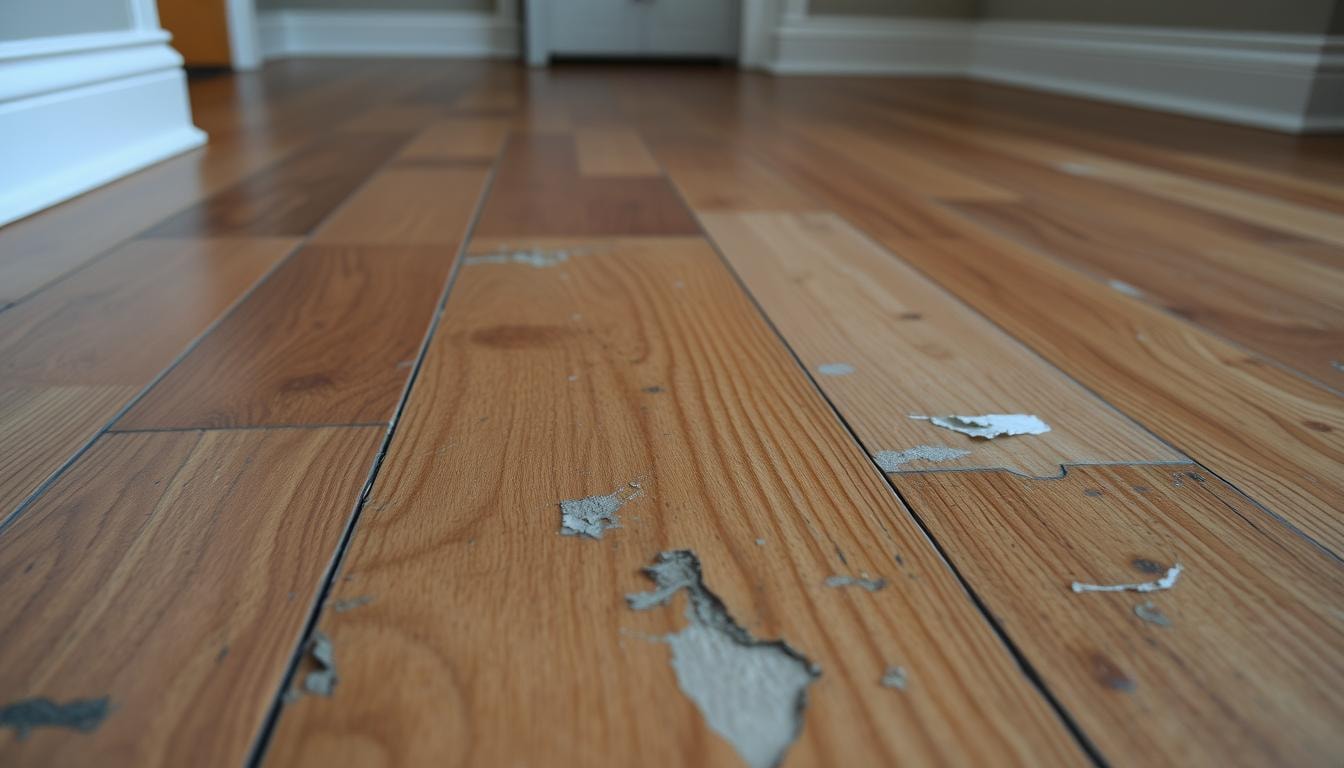
Types of Hardwood Floor Damage
Common hardwood floor issues include scratches, gouges, dents, stains, warping, and buckling. Heavy foot traffic, furniture, or pets often cause scratches and dents. Water damage or subfloor problems can lead to warping and buckling.
Identifying the Cause of the Damage
Finding the damage’s root cause is key for effective repair. Moisture, humidity, water leaks, and subfloor issues can cause severe problems. A thorough inspection helps identify the main cause.
Assessing the damage helps you decide on the best repair method. You’ll know whether to fix minor surface issues or tackle complex structural problems. This evaluation sets the stage for successful hardwood floor repairs.
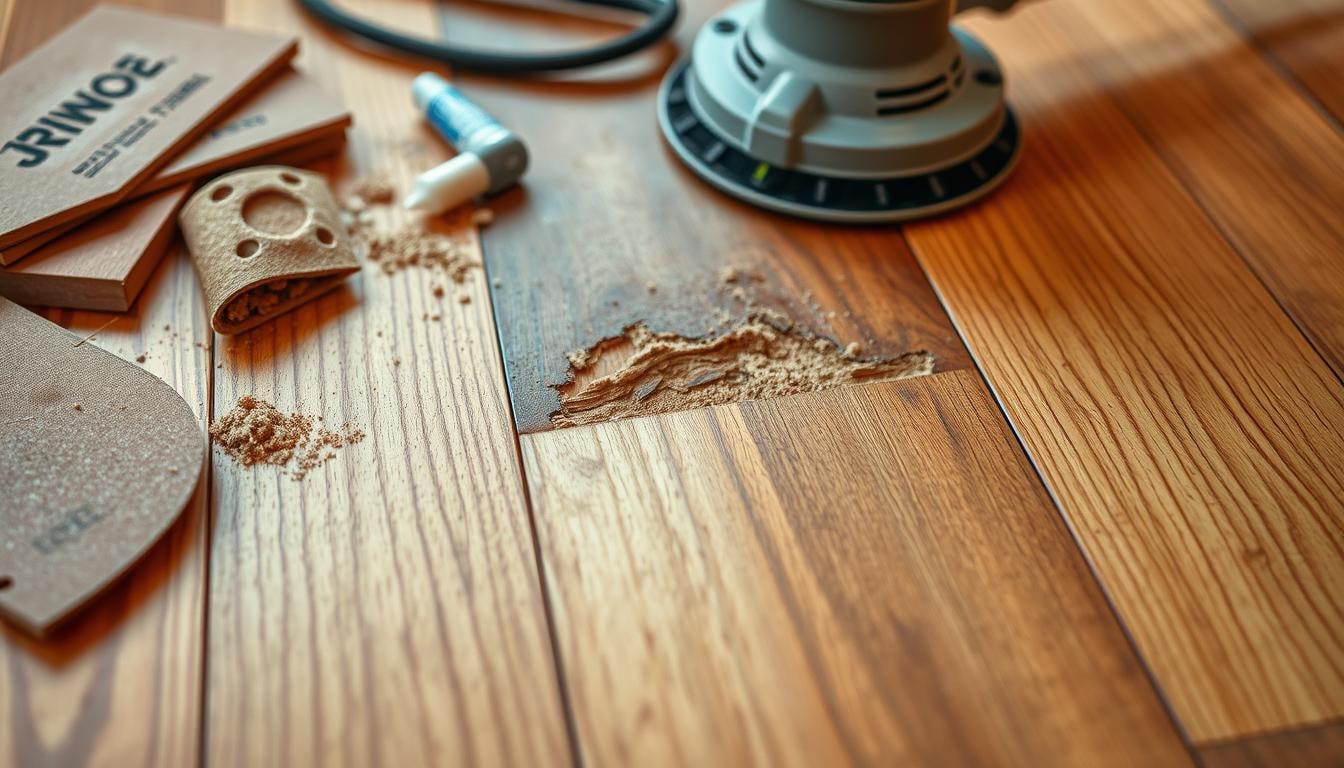
Repairing Minor Surface Imperfections
Minor scratches and dents on hardwood floors can be fixed easily. With the right tools and methods, you can bring back your floors’ original beauty.
Cleaning and Filling Scratches and Dents
Clean the damaged area thoroughly to remove dirt and loose wood. Use a putty knife to apply wood filler into scratches and dents. Ensure a smooth finish and let it dry completely.
Sanding and Finishing
After the filler dries, sand the repaired area to blend it with the floor. Start with coarse sandpaper and move to finer grits for an even surface.
Apply matching stain and finish to the sanded area. This will restore your hardwood floors’ uniform look.
Using wood filler, a putty knife, and sandpaper can effectively repair your floors. These tools help maintain the natural beauty of your hardwood floors.
Dealing with Warping and Buckling
Hardwood floors can warp and buckle, causing various issues. These problems include cracks, board separation, cupping, crowning, and lifting from the subfloor. Flooding often leads to extreme buckling, while damp environments cause other damage types.
Hardwood floors swell when exposed to moisture, resulting in warping and buckling. High humidity areas make floors more prone to these problems. Temperature changes can cause wood to expand and contract, leading to buckling.
Improper installation or damp subfloors without barriers can also cause warping. For minor buckling, placing a heavy weight on the dry area may help. Major damage might require replacing affected boards, which can be tricky to match.
Preventing future issues means addressing root causes like moisture exposure. Proper installation and ventilation are key to maintaining hardwood floors. Tackling these problems helps extend your floor’s lifespan and keep it beautiful.
- Prioritize prompt cleaning of spills and leaks to prevent moisture absorption.
- Use proper cleaners and avoid constant exposure to high-heeled shoes to maintain hardwood floors.
- Evaluate temperature and humidity conditions in a home before installing hardwood floors to ensure suitability.
- Engage professional services for full floor replacements, ensuring proper subfloor preparation and dust-free removal.
Process of Hardwood Floor Repair
Hardwood floors add beauty and durability to homes. However, they can suffer from water damage if exposed to moisture. Repairing water-damaged wood floors involves several steps to restore their appearance and integrity.
- Removing Standing Water: The first step is to quickly remove standing water from the affected area. Use towels, mops, or a wet-dry vacuum to soak up excess moisture. This helps prevent further damage to the wood.
- Drying the Affected Area: After removing water, thoroughly dry the affected area. Increase air circulation and use dehumidifiers to speed up the process. Allow sufficient time for the floor to dry completely. Proper drying is crucial to prevent mold or mildew growth. These issues can make the damage worse if left unchecked.
- Inspecting for Mold: Once the floor is dry, check for signs of mold or mildew. Address any issues right away to stop wood deterioration. This step also ensures a healthy indoor environment.
- Sanding and Refinishing: The final step is to sand and refinish the damaged area. Sand the affected section to remove discoloration, warping, or other visual flaws. Then, apply a new protective finish to blend the repaired area with the rest.
Skilled sanding and refinishing can bring back the floor’s beauty and strength. Following these steps helps homeowners fix water-damaged hardwood floors effectively.
Repairing Damaged Floorboards
Damaged floorboards may need replacement due to water damage, warping, or excessive wear. Address the root cause to prevent further damage and ensure a lasting repair.
- Removing Damaged Boards: Start by carefully removing the damaged floorboards. Use a pry bar, sharp chisel, or oscillating saw to cut out affected sections. Be careful not to harm surrounding boards during removal.
- Installing Replacement Boards: Matching new floorboards with existing ones can be tricky. Focus on wood type, grain pattern, and color. Stain and finish new boards to match exactly.
Secure new boards with wood glue and finishing nails. Make sure they’re level with surrounding flooring. This helps maintain your hardwood floor’s structural integrity.
Replacing damaged floorboards takes time and effort. If you’re unsure about your skills, consult a professional. A hardwood floor repair specialist can ensure a seamless, long-lasting fix.
Refinishing and Restoring Floors
Is your hardwood floor looking dull? It might be time for a refresh. Refinishing involves preparing, sanding, staining, and protecting the floor.
Preparation for Refinishing
Start by deep cleaning your floor. This ensures the new finish sticks well. Next, sand the surface lightly. Use different grits: 36-40 for coarse, 60 for medium, and 100 for fine sanding.
Sanding and Staining
Use a drum sander and edger on the floor. Cover 3-4 foot lengths at a time. Replace the sanding belt after 250 square feet. Vacuum thoroughly after sanding.
Choose a stain that fits your needs. Think about foot traffic and your desired look. Apply the stain evenly, following the maker’s instructions.
Applying Finish
- Apply a polyurethane finish to protect the floor. Oil-based finishes need 3 coats, water-based ones need 4.
- Use a brush for edges and a roller for even coverage.
- Let each coat dry fully before walking on it or moving furniture back.
These steps can bring your hardwood floors back to life. Use the right tools and follow instructions carefully. Your floors will thank you with renewed beauty.
Protecting Your Hardwood Floors
Hardwood floors need a proactive approach to stay beautiful. Preventive maintenance can extend their life and reduce repair costs. A routine cleaning plan and targeted protection for high-traffic areas will preserve their timeless charm.
Routine Cleaning and Maintenance
Regular cleaning is key to protecting hardwood floors. Use a microfiber mop or hardwood-specific vacuum for routine cleaning. Avoid wet mopping, as excessive moisture can damage the wood.
Pay attention to seasonal changes affecting your floors. Use a humidifier in winter and dehumidifier in summer. This helps maintain proper humidity levels and prevents warping.
Preventive Measures for High-Traffic Areas
- Place doormats at all entry points to capture dirt, grit, and debris before they can be tracked onto your hardwood floors.
- Use area rugs or runners in high-traffic zones, such as hallways, living rooms, and entryways, to shield the floors from excessive wear and tear.
- Install felt pads or furniture sliders under the legs of heavy furniture to prevent scratches and dents.
- Adopt a no-shoes policy to keep dirt, salt, and other outdoor contaminants off your hardwood floors.
These proactive steps will protect your hardwood floors for years. Regular upkeep and preventive care preserve your home’s investment. Your floors will stay beautiful with consistent attention.
Replacing the Finish
Dull hardwood floors may need a new finish. Choose the right finish based on foot traffic and desired look. Pick between water-based or oil-based polyurethane.
Step-by-Step Finish Replacement
Start by clearing the room and cleaning the floor thoroughly. Remove all dirt and grime to prepare the surface.
Lightly sand the floor to ensure proper adhesion. Apply the new finish evenly, following the manufacturer’s instructions.
Allow the recommended drying time before using the room. This will protect your floors from damage.
A new finish can revitalize your hardwood floors. It restores shine and protects against wear and tear.
Preventive Maintenance Strategies
Keeping hardwood floors beautiful requires a proactive approach. Smart strategies can extend floor life and reduce repair costs. Let’s explore some effective methods.
Scheduled Cleaning Routine
Set up a regular cleaning routine for your hardwood floors. Use a microfiber mop or hardwood-specific vacuum to remove dust and dirt. Avoid wet mopping to prevent moisture damage.
Seasonal Care for Wood Floors
Seasonal changes affect hardwood floors. Use a humidifier in winter to prevent drying and cracking. In summer, a dehumidifier controls humidity and prevents swelling.
Doormats and Area Rugs
Place doormats at entry points and area rugs in high-traffic zones. These capture dirt and reduce wear on your hardwood floors. Such measures effectively extend floor lifespan.
These strategies protect your hardwood floor investment. They help maintain the beauty of your floors for many years.
DIY vs. Professional Hardwood Floor Repair
Homeowners often debate between DIY and professional hardwood floor repair. DIY can save money, but professional help may be necessary for complex issues.
DIY works well for minor surface imperfections like scratches and small dents. However, severe problems like water damage or structural issues require professional expertise.
Professionals have specialized tools and materials for high-quality, durable finishes. They can handle larger projects efficiently, potentially saving time and money.
- Professional floor restoration experts have access to specialized tools and materials that can produce a higher-quality, more durable finish compared to the average DIYer.
- They also have the experience and knowledge to efficiently handle larger repair projects, potentially saving time and money in the long run.
- Many reputable floor restoration companies even offer warranties on their work, providing added peace of mind for homeowners.
DIY hardwood floor repair can be fulfilling for home improvement enthusiasts. With the right tools and patience, many repairs can be done at home.
Research specific techniques and safety precautions to avoid costly mistakes. Consider the damage extent, your skill level, and desired outcome when choosing between DIY and professional repair.
When to Hire a Professional
Some wood floor repairs can be DIY projects. However, certain situations call for professional help. Hire experts for water damage, subfloor issues, large repairs, or detailed patterns.
Professionals have specialized tools and materials for better results. They can match wood and finishes seamlessly. Some restoration companies even offer warranties for their work.
Expert installers can finish a standard room quickly. Many provide warranties and guarantees. This ensures customer satisfaction and peace of mind.
Proper subfloor preparation by professionals prevents future costly repairs. They understand different hardwood species well. This helps in choosing the right material for your space.
Professional installers ensure compliance with local building codes. This helps avoid legal problems. While DIY may seem cheaper, professional installation often offers greater long-term value.
Tips for Successful DIY Repairs
Repairing hardwood floors can be a rewarding DIY project. It needs proper preparation, tools, and attention to detail. Follow these tips to tackle minor floor repairs and restore your home’s beauty.
Proper Preparation is Key
Inspect the damaged area and remove the affected section. Clean the subfloor and make it ready for the new board. Gather all necessary tools and materials before starting.
You’ll need wood filler, sandpaper, stain, and a finishing product. Having everything ready avoids interruptions during the repair process.
Patience and Precision
Patience and attention to detail are crucial for professional-looking results. Take time to fit the replacement board properly. Ensure it blends seamlessly with the surrounding flooring.
Some epoxies dry quickly, so work efficiently. Place the new board correctly to avoid mistakes.
Refinishing for a Flawless Finish
Sand the affected area to make it level with the existing floor. Apply matching wood stain and finish for a uniform look. Protect surrounding areas to prevent any collateral damage.
Maintain Your Hardwood Floors
Regular cleaning and using furniture pads can prevent future DIY repairs. Address issues promptly to keep your hardwood floors looking their best. Routine maintenance is key to long-lasting beauty.
Successful DIY hardwood floor repairs are possible with the right approach. Use proper preparation, tools, materials, patience, and attention to detail. These tips will help you restore your home’s floors effectively.
Cost Considerations for Repairs

Hardwood floor repair costs vary based on damage extent and repair method. Prices range from DIY to professional services. Understanding potential expenses helps homeowners plan effective floor restoration.
The average cost of repairing hardwood flooring is about $375. However, prices can fluctuate depending on area size and repair complexity. Small room repairs may cost $6,500 to $10,500.
Surface repairs typically range from $100 to $500. Structural repairs, like fixing warped floors, can be pricier. Floor joist repairs may cost $6,000 to $10,000.
In some cases, joist repairs could reach $20,000 if jacks are needed. Replacing damaged floorboards in an entire room can cost $3,000 to $5,000.
DIY repairs save money but require time and effort. Professional services offer higher quality and efficiency. They may also provide warranties for their work.
Consider your project’s specific needs when budgeting for hardwood floor repair. This will help you make informed decisions for the best outcome.
FindPros: Your Hardwood Floor Repair Solution
Having trouble with your existing flooring, whether it’s red oak, solid piece, or the top layer? Don’t worry, most homeowners face similar challenges in multiple areas, from cabinets to tile. When it’s time to replace or repair your hardwoods, FindPros can help. Simply answer a few questions about your home project, and we’ll match you with top-rated local pros who can handle everything from small area fixes to full floor replacements. Compare quotes, choose the best oak plank, and seal the deal with the pro that’s the perfect fit. Get started today and find the solution for your hardwood floor needs.
Conclusion
Hardwood floors add timeless elegance to homes. They need careful upkeep to stay beautiful. This guide gives you tools to restore your floors’ former glory.
You’ve learned about common floor damage types. You now know proper repair methods and preventive care strategies. These insights help you make smart choices for your home.
Keeping floors healthy requires diligent care. Address issues quickly to maintain their value. Follow these tips to preserve your floors’ warmth and charm.
Your home will remain inviting for years to come. With proper care, hardwood floors will continue to enhance your living space.
Frequently Asked Questions (Hardwood Floor Repair)


MOST POPULAR CITIES
Browse by State- Alameda
- Costa Mesa
- Laguna Beach
- Orange
- Alhambra
- Culver City
- Lancaster
- Oroville
- Anaheim
- Daly City
- Livermore
- Oxnard
- Antioch
- Davis
- Lodi
- Pacific Grove
- Arcadia
- Downey
- Lompoc
- Palm Springs
- Bakersfield
- El Centro
- Long Beach
- Palmdale
- Barstow
- El Cerrito
- Los Angeles
- Palo Alto
- Belmont
- El Monte
- Malibu
- Pasadena
- Berkeley
- Escondido
- Martinez
- Petaluma
- Beverly Hills
- Eureka
- Marysville
- Pomona
- Brea
- Fairfield
- Menlo Park
- Port Hueneme
- Buena Park
- Fontana
- Merced
- Rancho Cucamonga
- Burbank
- Fremont
- Modesto
- Red Bluff
- Calexico
- Fresno
- Monterey
- Redding
- Calistoga
- Fullerton
- Mountain View
- Redlands
- Carlsbad
- Garden Grove
- Napa
- Redondo Beach
- Carmel
- Glendale
- Needles
- Redwood City
- Chico
- Hayward
- Newport Beach
- Richmond
- Chula Vista
- Hollywood
- Norwalk
- Riverside
- Claremont
- Huntington Beach
- Novato
- Roseville
- Compton
- Indio
- Oakland
- Sacramento
- Concord
- Inglewood
- Oceanside
- Salinas
- Corona
- Irvine
- Ojai
- San Bernardino
- Coronado
- La Habra
- Ontario
- San Clemente