Roofing Material Calculator

Roofing Material Calculator

Calculate your roof’s size and estimate how many bundles of shingles, rolls of felt, and squares of roofing material you need for a new roof. Add the price per square for materials to get an estimated material cost.

  • By
    FindPros

    FindPros connects consumers with professionals in over 600 different categories.

  • Reviewed by
    Jacky L.

    FindPros connects consumers with professionals in over 600 different categories.

Dimensions measured from the ground

This field is required.
Value should be positive.
This field is required.
Value should be positive.
find roof pitch

Optionally enter the price per square

$

*The average cost of materials for a standard 3-tab shingle is about $100 per square, including shingles, felt paper, and nails.

Roofing Material Estimate:
{{result.num_of_bundles}}
{{result.num_of_rolls}}

Estimated Material Cost

${{result.total_cost}}

Installation Overview

{{result.size_in_sq}}
{{result.sq_footage}}

Learn how we calculated this below

Add this calculator to your site

How to Estimate the Size of a Roof

If you’re replacing a roof, one of the first considerations you make needs to be the roof’s size so you can accurately estimate project materials.

In the US, roofs are measured in square footage, and roofing contractors typically quote projects based on the size of the roof in squares, which are equal to 100 sq. ft. If your roof measures 2,300 sq. ft, then you would need 23 squares of material.

Consequently, gathering the size of the roof in squares and square footage is the first step.

Keep in mind that there is no correlation between the size or square footage of your home and that of your roof. A 2,000 sq. ft. home may have a simple gable roof, a complex cross-gable roof, or a hipped roof, and each one of these roofs will have a different size to them.

Typically, the more slopes your roof has, the higher the total square footage will be. For example, a gable roof has two slopes, so it needs less material than a Dutch roof, which has three slopes, or a hipped roof, which has four. This is true even if the footprint and size of the home itself are identical in each case.

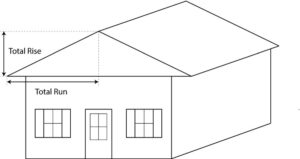
Find the Area of the Footprint of the Roof

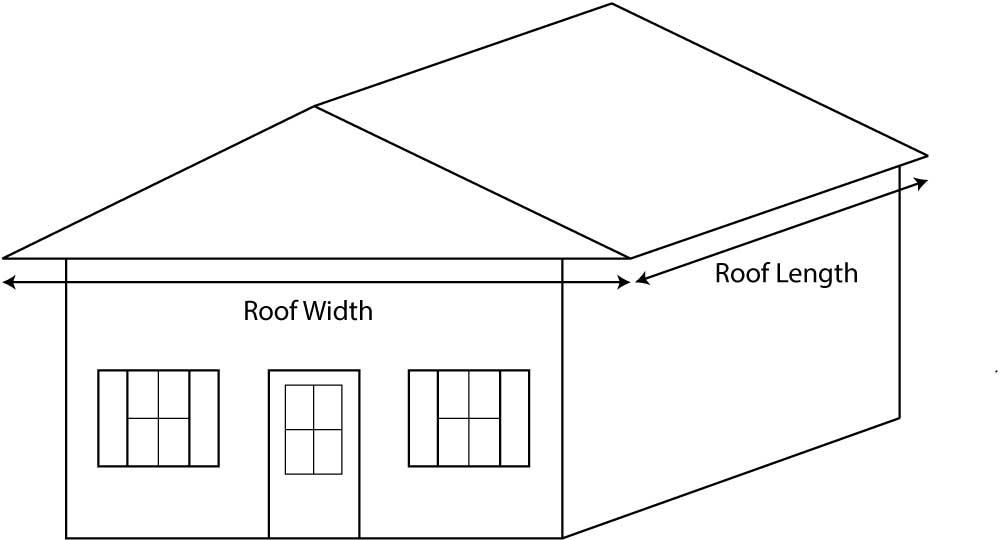
To calculate a roof’s dimensions, you need to measure the roof as if it were flat, then account for roof pitch, calculate square footage, and finally determine how many squares of material are required for the roof.

Keep in mind that you will need to do this for each section of the roof. While the illustration above shows a simple gable roof, a cross gable roof will require you to take the length and width of each individual section, and complex roofs like gambrels and mansards will have two sections of roofing to each side.

The calculator above can handle all of this; simply enter the length, width, and pitch, and it will determine the size of the roof in squares.

Start by measuring the roof’s length and width in feet as you’re standing on the ground. Remember that the length and width need to be found for the roof, not the house, so take into account that the roof overhangs the building.

Then determine the area of the roof as if it were flat. Multiply the length by the width in feet to get the area measurement.

Finding the Total Roof Area

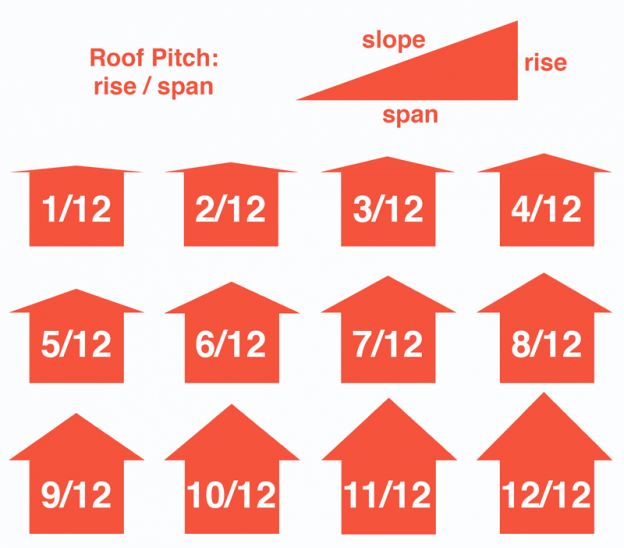
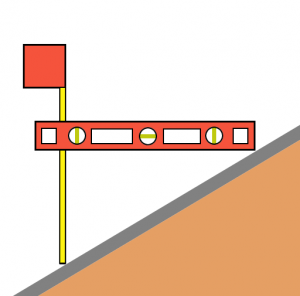
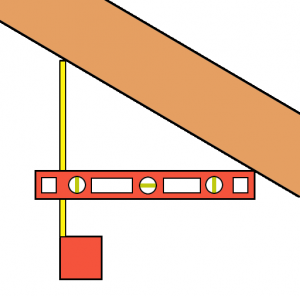
Once the area of the roof’s footprint is known, the overall roof area can be found by accounting for the roof’s pitch. The pitch of the roof is the rise over a 12-inch run.

This means that for every 12 inches horizontally, your roof will rise a specific number of inches. Most roofs will fall between a rise of 4/12 and 8/12, but a gambrel roof will likely have a section that is 20/12 and a section that is 7/12. This can mean that you need to calculate for each area separately.

It’s also important to keep in mind that each section of roofing may have its own pitch. This is true even of gable roofs, which may be what is known as a dual-pitch gable – one side of the roof will have a different pitch than the other side. You will need to calculate each side separately in this case.

Use our roof pitch calculator to find the pitch of your roof.

Next, multiply the footprint of the roof by the multiplier below for your roof pitch to find the overall roof area.

For example, a 4/12 pitch roof that is 100 square feet:

100 × 1.054 = 105.4 sq. ft.
Roof Pitch Area Multipliers

Multipliers for common roof pitches that can be used to find the total area of a roof.

Pitch Multiplier
0/12 1
1/12 1.0035
2/12 1.0138
3/12 1.0308
4/12 1.0541
5/12 1.0833
6/12 1.118
7/12 1.1577
8/12 1.2019
9/12 1.25
10/12 1.3017
11/12 1.3566
12/12 1.4142
13/12 1.4743
14/12 1.5366
15/12 1.6008
16/12 1.6667
17/12 1.7341
18/12 1.8028
19/12 1.8727
20/12 1.9437
21/12 2.0156
22/12 2.0883
23/12 2.1619
24/12 2.2361
Finding the Size of the Roof in Squares

Roofing contractors estimate projects and materials by the square, so it is crucial to find this measurement to estimate the amount of material needed accurately. A square simply refers to a 10′ x 10′ square of roofing. This is simply 100 square feet of roof.

To find the squares, divide the overall roof area by 100 and then round up. For instance, if the roof is 1550 square feet, then it is 16 squares.

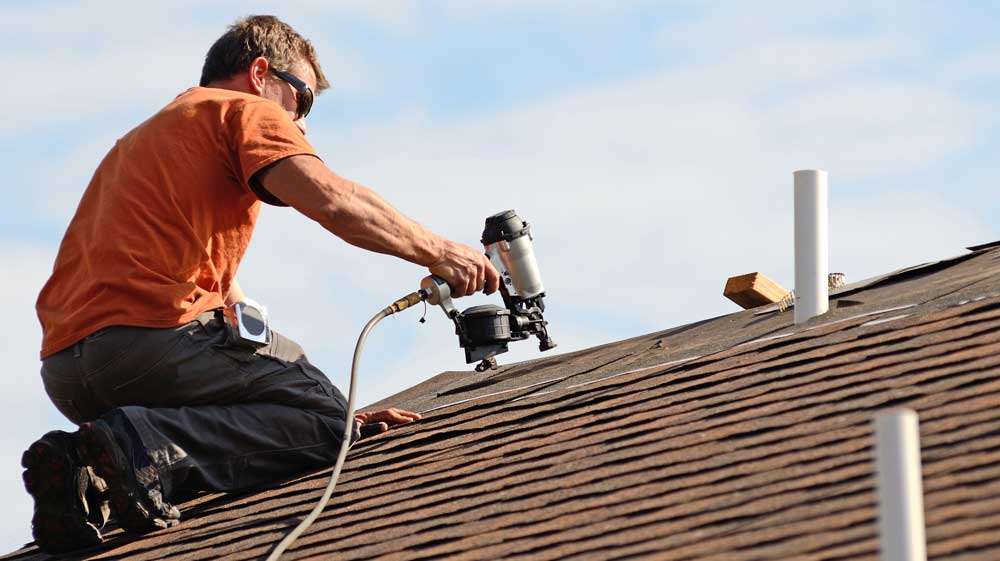
How to Estimate Roofing Materials

Although roofing projects are estimated and sold by the square, roofing material is often not sold in 1-square increments.

How Many Bundles of Shingles Will You Need

The average bundle of shingles covers 33.3 sq. ft., so three bundles of shingles are needed per square. Asphalt shingles range in price from about $25 per bundle for a standard 3-tab style to around $50-$75 or more for an upgraded architectural style.

Since transportation is a major cost factor, expect prices to vary by location. A typical bundle of shingles weighs about 75 pounds, while some premium products can weigh over 100 pounds per bundle, so consider delivery of materials.

Typically, only asphalt shingles are sold by the bundle in this way. Roofing shingles can come in other materials, including wood, metal, plastic, and slate, and that each of these materials may be packaged and sold in other ways.

How Many Rolls of Felt Will You Need

Roofing felt is sold by the roll. The average roll of 15-pound roofing felt covers about 400 sq. ft., or 4 squares, while the average roll of 30-pound roofing felt covers about 200 sq. ft. or 2 squares.

Rolls of felt are 36″ wide x 144′ long for 15# and 72′ long for 30#. Consider other underlayment options as needed, such as ice and water shield, rubber, or tar products.

The felt that your roof needs will be dictated by the roofing material. 30-pound felt is the most common and recommended type for most roofs, but a tile roof often requires 50-pound. In addition, new synthetic materials are also available, which are thinner and lighter weight while having superior performance.

Always check to see what is recommended by the manufacturer of the roofing material you are installing, or check with your roofer.

How Many Nails Will You Need

Nails will also be required for most roofing projects. The average 3-tab shingle needs four nails per shingle. High-wind areas and other types of shingles may need more. You’ll typically need 320 nails to install a square of standard 3-tab shingles, assuming four nails per shingle and 80 shingles per square.

However, architectural shingles may require 480 nails per shingle. Materials like tile, slate, and some types of metal roofing may use other fasteners as well.

Standing seam roofs, for example, do not use nails but have hidden fasteners in the seams. Always consult the manufacturer for the material you are choosing to use on your roof for the recommended fasteners and number required per square.

Other Materials

Keep in mind that a drip-edge will be needed to protect the roof’s edge from rot, vents, and other materials such as flashing or caulk. Also, consider that the fascia boards may need to be replaced depending on their condition.

Drip-edge and fascia boards are sold by the linear foot, find the perimeter of your roof in feet to find the length of drip-edge and fascia boards needed.

In addition to accurately estimating materials, it is important to make sure you order extra material when ordering. Account for about 5-10% overage on your project to make sure you have enough material if measurements are a little off or material is wasted or damaged. This is more critical for materials that are special-order or have long lead times.

We recommend getting free roofing estimates to understand material and labor costs and identify other project complexities that could affect the cost.

Other Considerations

There are some other factors to consider when installing a new roof. Learn about the costs of installing a new roof. Many localities require permits and inspections for roofing projects; check with your local inspections office and consult local building codes for more information on the requirements.

Also, consider that removing old materials is often required and will require disposing of a large amount of waste. Plan ahead for this by ordering a dumpster for the project.

Think your home might be due for a new roof? Learn the warning signs that it’s time to replace it before it leaks.

Roof Snow Load Calculator

Roof Snow Load Calculator

Calculate the snow load on a roof by entering the roof’s dimensions below along with the depth.

  • By
    FindPros

    FindPros connects consumers with professionals in over 600 different categories.

  • Reviewed by
    Jacky L.

    FindPros connects consumers with professionals in over 600 different categories.

This field is required.
Value should be positive.
This field is required.
Value should be positive.
This field is required.
Value should be positive.

Snow Load:

{{pounds_min_vol}} – {{ pounds_max_vol }} {{pounds_min_vol}}

Learn how we calculated this below

Add this calculator to your site

How to Calculate Snow Load

Snow load is the additional weight on a roof structure added by snow and ice buildup on the roof. Calculating the snow load is crucial to determining if the structure can handle the snow’s additional weight.

The ATC has a snow load hazard tool that can help you identify when a snow load presents a hazard to the structure.[1] You can calculate snow load in a few easy steps.

Step One: Calculate the Volume of the Snow on the Roof

The volume of snow on the roof directly relates to how much it will weigh. To find the snow volume, start by measuring the roof’s footprint.

Measure the Roof
We strongly recommend against walking on the roof to take these measurements for obvious safety reasons. Instead, measure the length and width roof from the ground to find the footprint; we’ll account for the pitch later. Keep all measurements in feet to simplify the formulas.

When you have the roof’s length and width as measured from the ground, multiply them together. This will give you the area of the footprint. Alternatively, you can also use a volume calculator to find this measurement.

Account for Roof Pitch
If you measured from the ground and did not measure the roof’s actual dimensions, then it’s time to account for the roof pitch. If you don’t know your roof pitch, then try our roof pitch calculator to find it.

To account for the pitch, you’ll need to multiply the area by the multiplier for the given roof pitch. You can find a list of multipliers on our roofing calculator. The calculator above applies this formula. If the roof is a flat roof, then this step is not needed..

Before moving on, multiply the area by the snow depth in feet to find the volume of snow on the roof.

Step Two: Find the Snow Density

Snow varies in weight depending on the density. Fresh powder weighs much less than wind-packed drifts. Check out our snow weight calculator to find the density of various types of snow.

Step Three: Calculate Snow Load

The final step in calculating the snow load is to multiply the volume of snow on the roof by its density. If you have a density range, then multiply the volume by each part of the range separately to find the minimum and maximum snow load.

You might also be interested in our snow to water volume calculator.

Roof Pitch Calculator

Roof Pitch Calculator

Calculate roof pitch by entering the rise and run or the angle in degrees. Learn more about measuring roof pitch and the rise and run below.

  • By
    FindPros

    FindPros connects consumers with professionals in over 600 different categories.

  • Reviewed by
    Jacky L.

    FindPros connects consumers with professionals in over 600 different categories.

Find Roof Pitch From:

This field is required.
Value should be positive.
This field is required.
Value should be positive.
This field is required.
Only numbers are allowed.
Results:
{{results.pitch }}
{{results.pitch_per_foot}}
{{results.grade}}
{{results.degrees}}
{{results.radians}}

Learn how we calculated this below

Add this calculator to your site

How to Calculate Roof Pitch

All homes and buildings have roofs. They may range from flat to very steep, some may have curves, and others may have multiple peaks and valleys. All of these roofs have one thing in common; however, they all have what is known as a pitch. Roof pitch describes the slope, or angle, of the roof.

Even flat roofs have a pitch, albeit a small one, as that slope is required to prevent rain and snow from gathering.

Knowing a roof’s pitch is essential in determining what type of material should be installed on the roof, the appropriate installation method, and how much roofing material you’ll need. It’s also an important factor in cold climates for calculating snow load.

Roof pitch, or slope, is a measure of vertical rise to horizontal run expressed in inches per foot, which is referred to as rise over run.[1] Meaning that the roof is measured 12″ in from the edge in a horizontal line, then measured from this point straight up to where the roof intersects. A roof that rises 6″ vertically for every 12″ horizontally has a 6″ per foot, or a 6 in 12 pitch.

Thus, the pitch is the ratio of the rise in inches to a 12-inch run and is often expressed using a semicolon, for example, 6:12. Sometimes, the pitch is also expressed in fraction form using a fraction with a slash, such as 6/12.

You can measure roof pitch by finding the rise and run or by converting from the angle if it is known. See the chart below for the rise and run values for standard roof pitches.

We’ll cover four methods to calculate roof pitch below.

Method One: Measure From the Roof

One method to find the pitch is to climb on the roof and measure the rise for a 12″ run. You’ll need a level that is 12″ or longer and a tape measure.

On the roof, hold the level perfectly level, and measure the height from the roof to the level 12 inches away from where the level touches the surface; this will be the rise.

For example, if the end of a level is 4″ above the roof at a point 12″ away from where it meets the surface, then the pitch is 4:12.

Method Two: Measure From the Attic

Another method to find the roof pitch is to go into the attic and measure the rise over a 12″ run of the roof rafters, allowing you to find the pitch without going on the roof.

From the attic, hold a level perfectly level and touching a rafter at one end. Measure the distance from the level to the rafter 12 inches away from where the level touches the rafter.[2]

Method Three: Measure the Total Rise and Run

If you know the total height of the peak and the roof’s width, you can also find the pitch with a little math. For example, if the peak is 4 feet and the total roof width is 20 feet, then the total rise is 4 feet (48 inches).

The total run is the distance from the peak to the edge of the roof, which in this case is the total width divided in half, which is equal to 10 feet or 120 inches.

Illustration showing how to find roof pitch by measuring the total rise and total ru, then reducing to a rise over a 12 inch run.
Since the pitch is the rise over a 12-inch run, you can divide the run by 12 to get the multiplier; in this case, 120 ÷ 12 = 10.

Then, divide the rise by the multiplier to get the pitch, e.g. 48 ÷ 10 = 4.8. The pitch of this roof is 4.8:12. The calculator above can handle much of this math.

Method Four: Measure With a Speed Square

You can also use a speed square and level to quickly measure the roof’s pitch. Set the level on the edge of the speed square as shown below, then place the heel of the speed square on a rafter or gable edge of the roof.

Holding the tools level, locate the measurement on the speed square where it meets the rafter’s bottom edge to find the angle of the roof in degrees.

How to Convert Angle in Degrees to Roof Pitch

If you know the roof’s angle in degrees, you can find the roof pitch by converting the angle in degrees to a slope, then finding the rise by multiplying the slope by 12.

First, find the slope by finding the tangent of the degrees, e.g. slope = tan(degrees). Then multiply the slope by 12 to get the rise. You can then express the pitch as inches per foot.

Example: let’s find the pitch for a roof angle of 35°.

slope = tan(35°) = 0.7002
rise = 0.7002 × 12 = 8.4
pitch = 8.4:12

How to Convert Roof Pitch to Degrees

To find the angle of a roof in degrees, convert the pitch to a slope, then convert to degrees by finding the slope’s inverse tangent, or arctangent. First, convert the pitch to a slope.

To do this, simply convert the rise and run as a fraction to a decimal form, e.g. rise/run = rise ÷ run = slope. For a pitch expressed in inches per foot, convert to a fraction first, e.g. a 4 in 12 pitch becomes 4/12, then divide.

Next, find the degrees by finding the slope’s inverse tangent, e.g. degrees = arctan(slope).

For example: let’s find the angle in degrees for a roof with a 4 in 12 pitch.

slope =
4:12 =
4
12
= .333

angle = arctan(.333)
angle = 18.4178°

Standard Roof Pitches

Most roofs have a pitch in the 4:12 to 9:12 range. A pitch over 9:12 is considered a steep-slope roof, between 2:12 and 4:12 is a low-slope roof, and less than 2:12 is a flat roof.[3]

The table below shows standard roof pitches and the equivalent grade and angle in degrees and radians for each.

Pitch Grade (slope) Degrees Radians
1/8:12 1% 0.6° 0.01
1/4:12 2.1% 1.2° 0.02
1/2:12 4.2% 2.4° 0.04
1:12 8.3% 4.8° 0.1
2:12 16.7% 9.5° 0.2
3:12 25% 14° 0.2
4:12 33.3% 18.4° 0.3
5:12 41.7% 22.6° 0.4
6:12 50% 26.6° 0.5
7:12 58.3% 30.3° 0.5
8:12 66.7% 33.7° 0.6
9:12 75% 36.9° 0.6
10:12 83.3% 39.8° 0.7
11:12 91.7% 42.5° 0.7
12:12 100% 45° 0.8
13:12 108.3% 47.3° 0.8
14:12 116.7% 49.4° 0.9
15:12 125% 51.3° 0.9
16:12 133.3% 53.1° 0.9
17:12 141.7% 54.8° 1
18:12 150% 56.3° 1
19:12 158.3% 57.7° 1
20:12 166.7% 59° 1
21:12 175% 60.3° 1.1
22:12 183.3% 61.4° 1.1
23:12 191.7% 62.4° 1.1
24:12 200% 63.4° 1.1

Table showing standard roof pitches and the equivalent grade and angle in degrees and radians.

How Pitch Affects the Cost of Roofing

The pitch of a roof will have a definite impact on the cost to install or replace it. Steeper roofs cost more to install, so bear that in mind when choosing the right pitch for your project.

A low-slope roof might cost 10% more to install than a flat roof, while a steep-slope roof might cost 20-30% more. Roofs with a very steep pitch might cost even more than that to install.

Pitch Variations and Unusual Roofs

Not every roof is going to have a perfect, easy-to-measure angle. Some homes may have two different pitches for the roof.

For example, a dual-pitch gable roof has a different pitch on each side of the home. Gambrel and Mansard roofs are considered dual-angle roofs. The lower part of the roof is actually an extension of your home’s walls. This pitch is not quite vertical, but it is close.

In addition, some Mansard roofs are concave on this lower section, which can make it seem to have a different pitch. Both sections need to have their pitch calculated separately. If the roof is concave, you will need to measure from the interior if possible, as the way the roof curves outward at the bottom will give it the illusion of a less steep pitch than it truly has.

Most Gambrel and Mansard roofs are 20/12 on the front section, with a more standard 7/12 on the upper portion.

In complex roofs, such as cross gables, which may have multiple roof areas, you may need to check the pitch of each one – never assume that each section has the same pitch, as it is common for them to vary.

If you’re considering a new roof, we suggest getting several estimates to learn more about the right pitch for your roof and understand the cost of installation. We also cover more about roof replacement costs in detail in our cost guide.

Frequently Asked Questions

A standard pitch is considered anything between 4/12 and 8/12. Anything below is considered low-slope or flat, while anything above is considered a high pitch.

Anything between 4/12 and 8/12 is usually considered a strong roof pitch. However, if you live in an area with a high snowfall, you may want to consider 9/12 or over, while if you live in an area with high winds, you want to consider 7/12, as this is the strongest pitch against high wind.

A 4/12 roof pitch is equivalent to an 18.4 degree angle.

Recommended Roofing Resources

Plywood Sheathing Calculator

Plywood Sheathing Calculator

Estimate how many sheets of 4×8 plywood are needed to sheath a roof, accounting for roof pitch.

  • By
    FindPros

    FindPros connects consumers with professionals in over 600 different categories.

  • Reviewed by
    Jacky L.

    FindPros connects consumers with professionals in over 600 different categories.

This field is required.
Value should be positive.
This field is required.
Value should be positive.
find roof pitch

Plywood Estimate:

{{total_sheets}}

Learn how we calculated this below

Add this calculator to your site

Find How Many Sheets of Plywood You Need to Sheath a Roof

Sheathing adds structure and stability to your roof. The sheath is a layer of plywood – usually sheathing or structural plywood – that is applied to the frame of the roof.

It can be made of different materials, from fir and pine to OSB, and gives a stable surface for your roofing to adhere to. All types of sheathing plywood come in sheets that measure 4′ x 8′ nominally.

To find the amount of plywood needed to cover a roof, start by finding the area of the roof. Once the area is known, divide it by the area of a 4×8 sheet to find how much sheathing is needed.

Find the Area of a Roof

Multiply the length of each section of the roof in feet by the width of the section to find the area for that section in square feet. If you have multiple sections of roof, find the area of each and add them together to find the total area.

If your roof is not flat and you cannot climb to the peak to get accurate width measurements, then you can add a multiplier for the pitch of your roof.

Use our roof pitch calculator to find the pitch of your roof or find the pitch multiplier, then multiply the area of the footprint of your roof by the multiplier to find the actual area.

Alternatively, find the area of your roof using our roofing calculator, which can also estimate shingles and material needed for your project.

If your roof has triangles and other shapes, you’ll need to use a calculator to find the square footage.

Keep in mind that different roof shapes will have different square footages, regardless of the home size. A hipped roof will be nearly twice as large as a gable roof, even if both are on a home of the same square footage.

You will need to get the area of each section of roofing and add them together for the total. This includes dormers, cupolas, valleys, and other architectural features.

For example, if your gable roof is 30 ft by 50 ft on each side, then the area for each side is 1,500 sq ft.

30 × 50 = 1,500 sq ft

Combined, this makes your roof 3,000 sq ft.

Calculate Sheathing Needed

Once you have the size of the roof area, you can divide it by the area of a sheet of plywood to find the number of sheets needed. A 4×8 sheet of plywood is 32 sq ft. So, dividing the area of the roof by 32 will give you the number of sheets needed.

For example, if your roof is 3,000 sq ft, then it will take 94 sheets of plywood to sheath it.
3,000 ÷ 32 = 93.75 sheets

You’ll need to round up to the nearest whole sheet, so in this case, you’ll need 94 sheets.

It’s usually a good idea to get an extra few sheets of plywood when ordering to allow for waste and off-cuts. Small scraps are often unusable to span joists and effectively cover the roof, so extra material will save extra trips to the hardware store.