Concrete Block Fill Calculator

Concrete Block Fill Calculator

Find the core fill volume for a concrete block wall and estimate how much grout is required to fill the block using the width and height of a wall or given a number of CMUs to fill.

  • By
    FindPros

    FindPros connects consumers with professionals in over 600 different categories.

  • Reviewed by
    Jacky L.

    FindPros connects consumers with professionals in over 600 different categories.

Estimate Fill Using Wall Dimensions

This field is required.
Value should be positive.
This field is required.
Value should be positive.

Optionally enter the price per cubic yard

$
Please enter valid price.

Estimate Fill Using Number of 16″ x 8″ Blocks

This field is required.
Only numbers are allowed.

Optionally enter the price per cubic yard

$
Please enter valid price.
Material Estimate:

Grout Needed

{{grout_cubic_yards}}
{{bags_count}}

Material Cost

{{estimated_cost}}

Learn how we calculated this below

Add this calculator to your site

How to Find Concrete Block Core Fill Volume

Concrete blocks used for construction, also known as concrete masonry units (CMUs) or cinder blocks, typically have one or two holes or voids known as cells to reduce the weight of the block. These cells are filled with concrete or grout during the installation process to strengthen and reinforce the wall. To estimate how much concrete or grout is needed to fill those cells, you need to find the volume necessary to fill each block, then multiply that by the total number of blocks in the wall.

Step 1: Find the Volume of Each Block Void

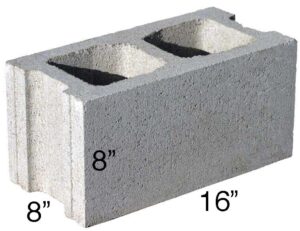
To get the volume of each block, begin by getting its total size in inches. The standard size for a CMU is 8″ x 8″ x 16″, but there are many variations.

Each CMU is made up of two “shells” along the front and back and two to three “webs”, which run from the front to the back of the block. Measure the thickness of each one, then subtract the width of the shells from the width and the width of the webs from the length of each block.

You will also need the number of cells, with two being standard. You will divide the total length by the number of cells. In a block that measures 8″ x 8″ x 16″, this will look like:

Width: 8″ – 1″ (shell) – 1″ (shell) = 6″
Length: 16″ – 1″ (web) – 1″ (web) – 1″ (web) ÷ 2 cells = 6.5″
Height: 8″

Multiply the new width and length by the height of each block to get the cubic inches for that block:

6″ × 6.5″ × 8″ = 312 cu in/block

Keep in mind that CMU measurements are nominal, meaning that they are often slightly smaller than their given measurements to account for the mortar between them. You may also have a block with custom web and shell measurements, which can change the total volume.

To get the most accurate volumes, always measure each area on the block yourself, and use those measurements when doing the calculation. Use our volume calculator to simplify this process.

Step 2: Find the Number of Blocks in the Wall

The next step is to find the number of blocks in the wall. This can be done by counting the number of blocks in the wall, or by getting the square footage of the wall and of the block you want to use and dividing the total square footage of the wall by the square footage of the block.

For an 8 x 16 block, this is 0.89 sq ft. Or, use our concrete block calculator to find how many blocks are in your wall.

Step 3: Find the Total Concrete Block Fill Volume

Multiply the cubic inches of volume for one block by the total number of blocks in the wall to get the total volume in cubic inches. Divide the final number by 46,656 to find the volume in cubic yards. A conversion calculator can make this easy.

Fill Volume for Various Block Wall Thicknesses

Below are the average fill volumes needed for a 100-square-foot wall based on the thickness of the wall. Keep in mind that these volumes can change if you are using a block with different web or shell measurements or if you are using a block that is not 8″ x 16″ in face measurements.

Block Wall Thickness Blocks Filled per Cubic Yard Concrete/Grout per 100 Block Concrete/Grout per 100 Square Feet Wall Area
6″ 120 .83 yd3 .93 yd3
8″ 100 1.0 yd3 1.12 yd3
10″ 80 1.23 yd3 1.3 yd3
12″ 65 1.54 yd3 1.73 yd3

Approximate grout fill volume and coverage for a concrete block wall.

Frequently Asked Questions

In most cases cinder blocks or CMUs do not need to be filled. Adding fill is a process referred to as grouting, and can add considerable strength to a block wall, reducing the likelihood of cracking. However, some experts argue that in cold or freezing climates, fill material can expand or contract causing the blocks to crack over time.

The most commonly used materials to fill the cells or voids in concrete blocks is mortar, concrete, sand, and gravel to add strength. These don’t offer much insulation value, but you can fill the block using insulation.

You will need one cubic yard of fill for every 100 blocks for an 8″ thick wall.

Concrete Block Calculator

Concrete Block Calculator

Calculate how many concrete blocks and bags of mortar are needed for your project by entering your wall dimensions and block size. Add the block price to get an estimated material price estimate.

  • By
    FindPros

    FindPros connects consumers with professionals in over 600 different categories.

  • Reviewed by
    Jacky L.

    FindPros connects consumers with professionals in over 600 different categories.

This field is required.
Value should be positive.
This field is required.
Value should be positive.

Optionally enter the price per block

$

Material Estimate:

{{blocks}}
{{bags_of_mortar}}
{{yd_sand}}

Estimated Material Cost:

{{block_cost}}
{{mortar_cost}}
{{sand_cost}}
{{total_cost}}

Installation Overview:

Square Footage: {{sq_ft}} ft²

Learn how we calculated this below

Add this calculator to your site

How Many Concrete Blocks Do You Need?

Concrete blocks are an affordable building material that can be used for many construction projects and are suited very well for construction walls for foundations or utility buildings.

Concrete blocks technically fall into two categories; solid blocks, which are commonly used for things like retaining walls, and CMUs, or concrete masonry units.

CMUs are hollow blocks that need to be filled with concrete during installation. Because the most common type of CMU is made of a mixture of cement and coal ash, these units are also frequently called cinder blocks.[1]

CMUs are available in many sizes, but the most common is 8″ deep x 8″ high x 16″ long.

A concrete block wall typically requires 1 1/8 blocks per square foot.

To determine how many blocks you’ll need for a project, enter the dimensions of your wall project into the calculator above, and it will figure out how many blocks you need. Alternatively, you can also follow the instructions below to calculate them manually.

Note: Retaining walls are often constructed from a different material than CMUs. If you’re building a retaining wall, then try our retaining wall calculator.

How to Calculate Concrete Blocks

There are several formulas to figure out how many concrete blocks are necessary for a wall project. Start by measuring the wall’s width and height in feet.

Step One: Find Wall Square Footage

Once you have the wall measurements, calculate the square footage of the wall by multiplying the width times the height.

wall sq ft = width × height
Step Two: Find Block Square Footage

Now you need to figure out the square footage of the block you are using. To do this, multiply the height and length of the block and divide by 144 – the number of square inches in a foot. The standard block size is 8″ high x 16″ long and has a square footage of 0.89.

block sq ft =
8 × 16
144
= 0.89 sq. ft.

Different size blocks will have different square footages; apply the formula above to find the solution. Check out our square footage calculator to determine the square footage of your block.

Step Three: Calculate Blocks

After you have found the square footage of both your wall and your block, determining the number of blocks you need is as simple as dividing the wall square footage by the block square footage.

blocks =
wall sq ft
block sq ft
blocks =
wall sq ft
0.89

We recommend adding 5%-10% additional blocks to account for broken blocks or blocks that need to be cut for the edges.

Our calculator above may indicate a different quantity of blocks needed since it uses a more precise formula, accounting for partial blocks and cutoffs automatically.

How to Estimate Mortar for a Block Wall

Calculating the amount of mortar needed for the joints in a concrete block wall will vary depending on the mortar mix you use. Mortar is a mixture of cement and sand, usually with other additives.

If you are planning on mixing your mortar yourself, you will need a yield of 1:3 cement to sand mixture. On average, it takes about three bags of cement for every 100 blocks.

Divide the number of blocks being installed by 33.3 to calculate how many bags are needed. Once you have the number of bags, you will need one cubic yard of sand for every seven bags of cement.

You can also purchase pre-mixed bags of mortar, which can come in different formulations. Each formulation and brand may vary in how many blocks the mortar will bond.

Try our mortar calculator to calculate how many bags are needed.

How to Estimate Grout or Concrete Fill

CMUs are hollow and designed to be filled with concrete during installation. Estimating the concrete needed to fill the cells in concrete block involves getting more measurements from the blocks.

When looking at a block from the top down, the areas that run front to back on the block are called “webs”, while the areas that run side to side are called the “shell”. To calculate the fill volume, you will need the number of webs, their thickness, and the thickness of the shell.

Typical measurements for webs and shells may be around 1″ or 1.25″ depending on the size of the block.

The fastest way to get an accurate volume of the cells in the CMUs is to take the length and width of the block and subtract the shell and web measurements. For a block is 8″ x 8″ x 16″, this would look like:

Width: 8″ – 1″ (shell) – 1″ (shell) = 6″
Length: 16″ – 1″ (web) – 1″ (web) – 1″ (web) ÷ 2 cells = 6.5″
Height: 8″

The volume of the core would therefore be:

6″ × 6.5″ × 8″ = 312 cu in/block

Multiply this by the total number of blocks, and divide by 46,660 to get the total number of cubic yards needed.

Use our block fill calculator to estimate the fill volume.

Tools Needed to Install a Concrete Block Wall

If you’re installing a concrete block wall, you will need several tools to correctly do the job. Here is a small list of tools that are necessary to build a wall.

  • Brick Trowel: This is used to lay an even bed of mortar when setting the blocks.
  • Mason Line: Use mason line to ensure the wall is straight and level and the blocks are set at an even height.
  • Level: Make sure you have a level on hand to verify that each block is straight and level with adjacent blocks.
  • Jointer: Use the jointer to remove excess mortar between the blocks.
  • Tape Measure: Use a tape measure to lay things out.
  • Mixing Tub: Mix mortar in a mixing tub to keep your wheelbarrow clean.

As an Amazon Associate, we may earn commissions from qualifying purchases from Amazon. Learn more

Standard Concrete Block Sizes

You’ll need to know the size of the concrete block you’ll be using to determine how many blocks you need for your project. The most common sizes are 8″ high by 8″ wide and 8″ high by 16″ wide in varying thicknesses.

The block’s thickness is not critical to finding how many blocks you need, but it is essential when estimating how much mortar and other masonry material you need. The common thicknesses are 4″, 6″, 8″, 10″, 12″, and 14″.

Refer to the tables below for standard block sizes, including the nominal dimensions. The nominal size is the block’s actual size, while the size includes a 3/8″ mortar joint and is the size that should be used when estimating material.

The standard mortar joint should be 3/8″ thick for your wall.

2″ and 3″ CMU Block Dimensions

Chart showing the dimensions of standard 2″ and 3″ blocks and the number of blocks needed per 100 sq ft of wall

Size D x H x L Nominal D x H x L Blocks per 100 ft2
2″ x 8″ x 16″ 1 58” x 7 58” x 15 58 113
3″ x 8″ x 16″ 2 58” x 7 58” x 15 58 113
4″ CMU Block Dimensions

Chart showing the dimensions of standard 4″ blocks and the number of blocks needed per 100 sq ft of wall

Size D x H x L Nominal D x H x L Blocks per 100 ft2
4″ x 8″ x 8″ 3 58” x 7 58” x 7 58 226
4″ x 8″ x 16″ 3 58” x 7 58” x 15 58 113
6″ CMU Block Dimensions

Chart showing the dimensions of standard 6″ blocks and the number of blocks needed per 100 sq ft of wall

Size D x H x L Nominal D x H x L Blocks per 100 ft2
6″ x 8″ x 8″ 5 58” x 7 58” x 7 58 226
6″ x 8″ x 16″ 5 58” x 7 58” x 15 58 113
8″ CMU Block Dimensions

Chart showing the dimensions of standard 8″ blocks and the number of blocks needed per 100 sq ft of wall

Size D x H x L Nominal D x H x L Blocks per 100 ft2
8″ x 8″ x 8″ 7 58” x 7 58” x 7 58 226
8″ x 8″ x 16″ 7 58” x 7 58” x 15 58 113
10″ CMU Block Dimensions
Chart showing the dimensions of standard 10″ blocks and the number of blocks needed per 100 sq ft of wall
Size D x H x L Nominal D x H x L Blocks per 100 ft2
10″ x 8″ x 8″ 9 58” x 7 58” x 7 58 226
10″ x 8″ x 16″ 9 58” x 7 58” x 15 58 113
12″ CMU Block Dimensions

Chart showing the dimensions of standard 12″ blocks and the number of blocks needed per 100 sq ft of wall

Size D x H x L Nominal D x H x L Blocks per 100 ft2
12″ x 8″ x 8″ 11 58” x 7 58” x 7 58 226
12″ x 8″ x 16″ 11 58” x 7 58” x 15 58 113
14″ CMU Block Dimensions
Chart showing the dimensions of standard 14″ blocks and the number of blocks needed per 100 sq ft of wall
Size D x H x L Nominal D x H x L Blocks per 100 ft2
14″ x 8″ x 8″ 13 58” x 7 58” x 7 58 226
14″ x 8″ x 16″ 13 58” x 7 58” x 15 58 113

How Much Does a Block Wall Cost?

A wall typically costs $10 – $15 to install; learn more about a wall project’s cost factors. We suggest getting several professional estimates to get the best labor cost and find the right company for your project.

Check out our concrete calculator to help with your other concrete projects.

Block Mortar Calculator

Block Mortar Calculator

Enter the number of bricks or blocks below to calculate how many bags of mortar will be needed, or how much materials will be needed to mix on-site.

  • By
    FindPros

    FindPros connects consumers with professionals in over 600 different categories.

  • Reviewed by
    Jacky L.

    FindPros connects consumers with professionals in over 600 different categories.

This field is required.
Value should be positive.

Find the number of blocks using our block calculator

This field is required.
Value should be positive.

Find the number of bricks using our brick calculator

Material Estimate:

Pre-Mixed Mortar

{{material_estimate.pre_mixed_mortar_60lb}}
{{material_estimate.pre_mixed_mortar_80lb}}

Custom Mix ({{material_estimate.custom_mix.dynamic_ratio_value}} Ratio)

Cement

{{material_estimate.custom_mix.cement}}

Hydrated Lime

{{material_estimate.custom_mix.hydrated_lime}}

Sand

{{material_estimate.custom_mix.sand}}
{{material_estimate.custom_mix.sand_yds}}

*Amounts vary based on labor practices, material & water ratios, and block/brick sizes.

Learn how we calculated this below

Add this calculator to your site

How to Estimate Mortar for Block Projects

Mortar needs to be mixed in precise amounts to ensure it’s always at the right consistency, so it’s important to estimate the correct amount for your overall project.

Follow three easy steps to estimate the amount of pre-mixed mortar needed for your concrete block project. Note that this process is a bit different than calculating a concrete mix.

Step One: Estimate Square Footage

Estimate the square footage of the wall by measuring the width and height in feet. Then, multiply the width and height to find the square footage. Try calculating square footage using a calculator if you’re not comfortable doing it by hand.

Step Two: Calculate the Number of Blocks

Next, calculate the number of blocks needed for the project by the number of blocks per square foot. A concrete block has a nominal size of 8″ x 16″ on the face, and may have widths or depths of 4″, 6″, 8″, 10″, 12″, 14″, or 16″.

The typical block is 8″ but 6″ is also very common. Most mortar estimates are based on an 8″ measurement.

An 8″ x 16″ block is roughly .89 of a square foot, so you’ll need roughly 1 1/8 standard blocks per square foot, so multiply the square footage by 1.125 to estimate the total needed. You can also use our block calculator to calculate other block sizes.

Step Three: Estimate Mortar

The final step will be to find the yield of the mortar you’re using and divide the total number of blocks by the yield. Each brand of pre-mixed mortar can cover a different number of blocks, depending on the formula used by the manufacturer.

This can vary, but a general rule of thumb is 12 blocks for an 80-pound bag of mortar. Keep in mind that this will vary, though, so always check the yield from the brand you want to use.

Once you have the yield, divide the square footage of the area by the number of blocks the mortar will cover to get the number of bags of mortar necessary.

Below is the average number of bags needed, assuming a yield of 12 blocks per 80-pound bag, assuming an average block size of 8″ x 16″ x 8″. Remember to always get the exact yield from the brand you choose to get the most accurate number.

Coverage for mortar mixes and various quantities of blocks.

Block Quantity 60 lb Bags 80 lb Bags
100 blocks 12 bags 9 bags
200 blocks 23 bags 17 bags
300 blocks 34 bags 25 bags

How to Estimate Mortar for Brick Projects

The same three steps above can be used to estimate mortar for brick projects.

Step One: Estimate Square Footage

Start by estimating the square footage of the brick wall by multiplying the width by the height together.

Step Two: Calculate the Number of Bricks

Then, calculate the number of bricks by multiplying the square footage by the number of bricks per square foot. Our brick calculator can help with this. You’ll need roughly 6.55 modular bricks per square foot, assuming an average brick size of 2 ¼” x 8″ with a depth of 3 5/8“, including the mortar between the bricks, so multiply 6.55 times the square footage to find the number of bricks needed.

Step Three: Estimate Mortar

Finally, estimate the mortar needed by dividing the total number of bricks by the yield of the mix used. On average, a mortar mix will yield 36 bricks per 80-pound bag, so divide the total number of bricks by 36 to calculate the bags needed.

As with the blocks, keep in mind that the number of bags will change by manufacturer, and can also change depending on the exact size of the bricks used. Larger bricks will require less mortar than smaller bricks.

Coverage for mortar mixes and various quantities of bricks.

Brick Quantity 60 lb Bags 80 lb Bags
500 bricks 19 bags 14 bags
1,000 bricks 38 bags 28 bags
1,500 bricks 56 bags 42 bags

Coverage for mortar mixes and various quantities of bricks.

How to Estimate by Volume

A more accurate way to determine the amount of mortar needed is by volume. This will take into account the exact size of each block, and will give you a more accurate number of blocks for the project with mortar spacing as well.

Begin by getting the length, width, and depth of the wall and the length, width, and depth of the blocks.

Multiply the length, depth, and width of the wall to get the total cubic footage of the wall.

For example, if the wall will be 14′ by 10′ with an 8″ thickness, we would multiply these together to get:

14′ × 10′ × 0.67′ (8″) = 93.24 cu ft

Now get the cubic footage of the blocks. If the blocks used are 8″ x 16″ x 8″, this would be:

0.666′ (8″) × 1.33′ (16″) × 0.666′ (8″) = 0.59 cu ft

Now we need the volume of one block with mortar, assuming that 1″ of mortar will be applied to the block’s measurements.

0.75′ (8″ + 1″) × 1.42′ (16″ + 1″) × 0.666′ (8″) = 0.71 cu ft

To get the most accurate number of blocks, divide the volume of the wall by the volume of one block with mortar.

93.24 cu ft ÷ 0.71 cu ft = 131 blocks

Multiply the number of blocks by the volume of one block without mortar to get the volume of the blocks.

131 × 0.59 = 77.29 cu ft

To get the volume of mortar, subtract the volume of the blocks from the volume of the total wall.

93.24 – 77.29 = 15.95 cu ft

This is the wet volume of mortar needed. Because the volume of mortar is actually 33% less when water is added, we need to convert from a wet volume to a dry one. To get this, multiply the volume of the mortar by 1.33.

15.95 × 1.33 = 21.21 cu ft

So, 21.21 cubic feet of dry mortar mix is required for this job.

A bag of mortar contains roughly 0.88 cubic feet, so find the number of bags by multiplying by the volume of mix needed.

0.88 × 21.21 = 18.66 bags

You can round the result up to the nearest full bag. So for a job of this size, 19 bags of mortar would be needed.

Types of Mortar

Whether you’re using a pre-mixed mortar or mixing on-site, it’s important to understand the various types there are and which is appropriate for your project. Cement to sand ratio ranges from 1 part cement to 3 to 4.5 parts sand, depending on the type of mortar being mixed and the compressive strength desired.

Most mixes also require the use of lime in various proportions as a binding agent to increase the longevity of the finished product and to increase the workability of the mix.

Type OUsed in above-ground applications that are not load-bearing, usually for interior applications, and has a compressive strength of 350psi.
Type NUsed in above-ground applications that support light loads, usually for chimneys or brick-work, and has a compressive strength of 750psi.
Type SUsed in below-ground applications for load-bearing applications, usually for foundations and retaining walls, and has a compressive strength of 1,800psi.
Type MUsed in below-ground applications for heavier load-bearing applications, usually for foundations to support, and has a compressive strength of 2,500psi.
This table shows the recommended mix proportions and compressive strength for various types of mortar.

Mortar Type Cement : Lime : Sand Ratio Compressive Strength
Type O 1:2:9 350 psi
Type N 1:1:6 750 psi
Type S 2:1:9 1,800 psi
Type M 3:1:12 2,500 psi

This table shows the recommended mix proportions and compressive strength for various types of mortar.

Try our other gravel calculator to estimate the amount of sand needed for your mix.

Recommended Masonry Resources

Wainscoting Layout Calculator

Wainscoting Layout Calculator

  • By
    FindPros

    FindPros connects consumers with professionals in over 600 different categories.

  • Reviewed by
    Jacky L.

    FindPros connects consumers with professionals in over 600 different categories.

Layout Using:

Provide the number of panels you want and we’ll calculate how wide the panels should be so they can be evenly spaced on the wall and we’ll layout the stiles for the calculated panel dimensions.

This field is required.
Value should be positive.
This field is required.
Value should be positive.
This field is required.
Value should be positive.

Provide an approximate width of a panel and we’ll calculate the closest exact panel size that can be evenly spaced on the wall and we’ll layout the stiles for the calculated wainscoting panel dimensions.

This field is required.
Value should be positive.
This field is required.
Value should be positive.
This field is required.
Value should be positive.
Layout Using Number of Panels:

Error

There are too many panels for the provided stile width, try a thinner stile or reducing the number of panels

Layout Using Approx. Panel Width:

Error

The provided stile width is too wide, try using a thinner stile

We calculated there are 2 options close to a {{(approx_panel_width != ”) ? approx_panel_width+'”‘ : ”}} panel width

Layout for {{total_number_of_panel_1}} Panels

Dimensions

{{(stile_width_display != ”) ? stile_width_display+'”‘ : ”}}

Layout Drawing

Stile Locations

Layout for {{total_number_of_panel}} Panels

Dimensions

{{(stile_width_display != ”) ? stile_width_display+'”‘ : ”}}

Layout Drawing

Stile Locations

Learn how we calculated this below

Add this calculator to your site

How to Lay Out Wainscoting

Wainscoting is a system of panels, rails, and moldings that add decoration and protection to the walls of your home. Wainscoting may be installed to waist or shoulder height and is available in many materials and styles.

The most common types of wainscoting include raised panel, flat panel, overlay panel, board and batten, and beadboard.

Let’s talk a bit about terminology for the parts that make up wainscoting. The horizontal boards at the top and bottom of the paneling are called rails, and the vertical boards that separate the panels are called stiles.

The larger boards in the middle of the rails and stiles are called panels. Panels may be installed with trim between the rails and stiles, but a flat panel or board and batten look can be achieved without installing a wood panel.

Depending on how ornate you want the installation to be, you can also use additional moldings above the panel molding rails and below the chair rail. These are often called apron moldings, but you can use a variety of styles, including pencil, dental, and screw.

Before starting a wainscoting installation, it is critical to lay out the rails, stiles, and panels. Most often, the panels are an even width, which requires some measuring to find the correct width that allows all of the panels to be consistent.

Step One: Measure Each Wall

To start laying out the panels and stiles, measure the width of each wall in inches. If measurements are in another form, such as feet, convert the measurement to inches.

Step Two: Decide The Number of Panels on Each Wall

Once you have the width of each wall, consider how many panels you would like to install on each of them.

If you are using readymade panels, or installing a click-lock beadboard, get the measurements of each panel or piece. Most panels come in sections that are either 48″ or up to 96″ in width. If you are making your own wainscot out of various pieces, you can determine the size of each panel.

To get an idea, lay out the various components on the floor in front of the wall. You can play with the width of the stiles on the panels to determine the total number of panels there will be, then measure for the final width. Depending on how you lay it out and the type and style of wainscoting, you may measure the width of the flat section inside the moldings, or you may measure the entire section from stile to stile.

You can find out how many panels you need by dividing the width of each wall by the rough panel size. You’ll probably end up with an odd number, like 3.4 panels, and that’s ok; just round to the closest whole number.

Step Three: Determine the Rail and Stile Width

If you are making your own wainscoting and you are using a flat panel style, you will need to determine the width of the rails and stiles that will surround each indented panel. These are flat pieces of lumber, but you may choose to add additional moldings inside of panels as well.

However, the rail and stile widths will influence the size of the flat panel inside of them. The larger the rail and stile, the smaller the panel.

The top rail and stiles are usually 2″-3″. The lower rail is often much wider than the top rail, usually around 7″-8″.

Step Four: Calculate the Panel Width

The next step is to find the exact width of the panels for each wall. It’s likely that the panel size will vary from wall to wall slightly, but the goal is to get them close to the same size or to a size that looks good visually.

One formula to find the panel width is to divide the wall width plus the stile width by the number of installed panels to find the width of the stile and panel together, then subtract the width of the stile to find the final width of the panel.

panel width = (wall width + stile width / number of panels) – stile width

Keep in mind that this will be the visible width of the panel, or more specifically, the distance between each stile. For panel designs that incorporate trim between the panel and the stile, the actual panel size may be smaller, and for assembled panels where the panel is installed in a groove behind the stiles, the panel may be larger.

The exact style of wainscoting will inform the actual panel width, but at this point, it’s possible to start laying out the stiles evenly on the wall.

Step Five: Determine Stile Length

To find the length of the stiles, start by determining the desired height of the wainscoting, then subtract the top rail and bottom rail width from the overall height.

stile length = wainscoting height – top rail width – bottom rail width
Step Six: Lay Out the Panels and Stiles

To start laying out the stiles, locate the first stile, which would be from 0″ to the stile width. Then add the width of the panel to find the next stile location. Continue this process along the wall to locate the placement of each stile.

If you are using panel sections that have three or four raised panel designs in them, you will need to make sure that the panels are even on the wall. Otherwise, unless your wall length is evenly divided by the panel section length, you may end up with an uneven end.

For a layout where the ends will use panels that are smaller than the rest of the wall, it’s best to start in the center of the wall and go evenly out to each side. Cut the end panels as needed; they will be even on either side for a balanced layout.

At this point, the layout is complete; the design of each wainscoting style may change the actual size of the components that need to be cut to assemble the paneling, so refer to the designs for the wainscoting you’re using to determine the final dimensions for each part.

How to Estimate Wainscoting Materials

There are a few components that need to be estimated to find the amount of material needed. Start by measuring the wall width and wainscoting height. The width of the wall will be the needed length of the top rail, bottom rail, and chair rail or cap molding.

Estimate the Amount of Wainscoting Stile Material Needed

To find the length of stile material needed, find the height of each stile and multiply by the number of panels, then add 1. For example, if a stile is 24″ and there are three panels, there will be 96″ of stile material needed.

stile length = stile height × (number of panels + 1)
Estimate the Amount of Wainscoting Panel Material Needed

To find the amount of panel material needed, multiply the height of the panel by the width of the panel to find the size of the panel, then multiply by the number of panels needed. For example, a 24″ high by 36″ wide panel is 6 square feet; if there are three panels, then 18 square feet will be needed.

panel material square footage = panel height × panel width × number of panels

You can also use a square footage calculator to find this.

Handling Inner Corners

It is almost inevitable that a wainscoting project will involve an inner corner. The inner corner adds a slight challenge because there is an overlap of the wainscoting where the walls meet.

This can cause the stile on one edge to appear thinner than the rest since a portion of the stile is buried behind the wainscoting on the adjacent wall. To account for this, use a stile on each edge that is wider by the thickness of the stiles.

Alternatively, you can miter the corners of each style. This allows them to fit together in the corner without subtracting any thickness.

To get an even panel layout, subtract the thickness of the added stile widths from the wall width before calculating. The provided stile locations may be off if the first stile is wider; consider this when laying out the stiles.

It may be necessary to add the extra stile thickness to each still start and end location to make the layout even.

Additional Carpentry Resources

Use our trim and molding calculator to estimate the linear footage of trim and moldings for a room. Our board footage calculator is great for estimating the board footage of a board, which is necessary to calculate the cost of materials. Get free wainscoting installation estimates from professional trim carpenters in your area.

Frequently Asked Questions

This will vary depending on the style. Panel interior size can range from 12″ to 36″, but wainscoting comes in many styles, including some with much tighter spacing.

The most basic rule of thumb is that wainscoting can be waist or shoulder height. However, you can purchase readymade panels that are 32″ to 48″ and combine them with baseboard and cap moldings to increase the height more to achieve the style you’re looking for.

It isn’t necessary, but in most cases, it is used. The baseboard can take the place of the bottom rail, or it can be used below it for added height and wall protection.

This can vary depending on the material it’s made from. MDF takes paint very smoothly regardless of application, while some wood moldings may need a brush to get into the various pieces.

Raised Panel Cabinet Door Calculator

Raised Panel Cabinet Door Calculator

Calculate the size of raised-panel and flat-panel cabinet doors by entering the dimensions of the cabinet opening and configuring the panel style options. See a rendered scale drawing of the your doors below.

  • By
    FindPros

    FindPros connects consumers with professionals in over 600 different categories.

  • Reviewed by
    Jacky L.

    FindPros connects consumers with professionals in over 600 different categories.

Cabinet Opening

This field is required.
Value should be positive.
This field is required.
Value should be positive.

Door Options

Style:

This field is required.
Value should be positive.
This field is required.
Value should be positive.
This field is required.
Value should be positive.

Number of Doors:

This field is required.
Value should be positive.

Panel Options

This field is required.
Value should be positive.
This field is required.
Value should be positive.

Panel Style:

Results:
  • Error:

Door Dimensions:

Cut List:

Rail and Stile Material:

  • {{results.material_requirements.rail_stile_linear_ft}}
  • {{results.material_requirements.board_feet}}
  • {{results.material_requirements.hinges_count}} hinges for overlay cabinet doors

Panel Material:

  • {{results.material_requirements.panel_material}}

Learn how we calculated this below

Add this calculator to your site

Cabinet Door Styles

Raised-panel and flat-panel doors typically consist of 5 parts: 2 rails, 2 stiles, and a panel. This is commonly referred to as a 5-piece door.

The stiles are the vertical boards that span the height of the door and the rails are the horizontal boards that fit between the stiles at the top and bottom. The rails and stiles have a groove that the panel fits into for a clean look and to accommodate changes in the size of the panel due to humidity without breaking the door.

There are several styles of cabinet doors, including inset, lipped, partial overlay, and full overlay.

Inset doors sit flush to the cabinet with a 1/16” gap around the edges.

Lipped doors have a rabbit around the edge and are partially recessed in the cabinet opening. They usually overlay the door frame by 3/8“.

Partial overlay doors sit proud of the cabinet and often overlap the frame by 1/2“.

Full overlay doors sit proud of the cabinet and often overlap the entire cabinet frame so the frame is not visible.

Because of the different overlay and clearance dimensions with the different styles knowing the style of door is the first step in calculating the size of the door.
It is also critical to get the dimensions of the doors exactly right so it fits the cabinet opening correctly.

Find the Cabinet Door Size

Find the size of the cabinet door opening by measuring the height and width. Add the dimension of the overlay or subtract the clearance needed for the selected door style to each edge of the opening.

For example, if the cabinet opening is 36″ x 40″ and you’re using a partial overlay door add 1/2″ to each side of the cabinet opening to find the required size of the cabinet door, which would be 37″ x 41″.

Find the Dimensions of the Rails and Stiles

The rails and stiles are often the same width for an even border around the door. The length of the stiles will be equal to the height of the door.

The width of the rails is equal to the width of the door, minus the width of 2 stiles, plus the depth of the panel groove / connection joint on each stile.

rail width = door width – (stile width × 2) + (panel groove depth × 2)

For example, an 18″ wide door with 2 1/4” wide stiles and a panel groove of 3/8“:

rail width = 18 – (2.25 × 2) + (.375 × 2)
rail width = 18 – 4.5 + .75 = 14.25

Find the Dimensions for Two Doors

For wider cabinet openings it is preferable to use two doors opening opposite directions. In this case the stiles are the same dimension but the rails and panels will be smaller. To find the dimensions for a cabinet opening with two doors, subtract the clearance between the doors from the overall door size and then divide by 2.

Continuing the example above of the opening that is 36″ x 40″, subtract 1/16” from the 37″ wide door and then divide by two to get the width of each door.

Once the door size is known, use the formula above to find the width of the stile for each door.

Find the Dimensions of the Panel

The panel should be larger than the space between the rails and stiles as it will fit within the groove of the door. The panel should be a little smaller than the distance between the bottom of the groove on each rail/stile to allow for some expansion due to humidity.

The formula for the panel width is the door width – the width of two stiles + the depth of 2 panel grooves – the expansion space of 2 panel grooves.

For example, the width of a panel for an 18″ wide door with 2 1/4” wide stiles, a panel groove of 3/8“, and 1/16” expansion space is:

panel width = 18 – (2.25 × 2) + (.375 × 2) – (.0625 × 2)
panel width = 18 – 4.5 + .75 – .125 = 14.125

The method to find the height of a panel is the same.

Cabinet Door Joinery

There are several styles of joinery that can be used on 5-piece cabinet doors, but the most common to use a bevel, ogee, radius, or 90° edge on the interior corners of the rails and stiles.

Some joints are possible using just a table saw blade to create a groove for a panel while others require specialized cope-and-stick router bits to create the opposing edges of the joint for the rails and stiles.

Bevel, Ogee, and Radius Corner Joints

To create a bevel, ogee, or curved radius joint we recommend getting a set of matching cope-and-stick router bits that can mill the groove for the panel on the rails and stiles and can also mil the tenon on the rails.

The router bits are often sold in sets such as this Freud 3-piece round-over door router bit set.

As an Amazon Associate, we may earn commissions from qualifying purchases from Amazon. Learn more

Shaker Style Joints

To create a shaker style door no corner treatment is necessary, but a groove to hold the panel is still needed. Use a router or table saw to create a groove that is the thickness of the panel and centered on the rails and stiles.

On the rails, create a tenon that is the same thickness and length as the groove. This style of joinery does not require specialized router bits but does require a bit more setup on the table saw.

Rafter Length Calculator

Rafter Length Calculator

Calculate the length of a rafter given the width of the building, overhang, and width of the beam, if any.

  • By
    FindPros

    FindPros connects consumers with professionals in over 600 different categories.

  • Reviewed by
    Jacky L.

    FindPros connects consumers with professionals in over 600 different categories.

This field is required.
Value should be positive.
This field is required.
Value should be positive.
This field is required.
Value should be positive.
the beam is too wide
find roof pitch

Rafter Length:

{{rafter_length_feet}}
{{rafter_length_inch}} {{sixteenths}}/16

Roof Details

{{ roof_angle }}°
{{slope_factor}}
{{hip_valley_factor}}

Learn how we calculated this below

Add this calculator to your site

How to Calculate the Length of a Rafter

A rafter is a structural member that provides support for the roof sheathing and transfers the weight of the roof to the exterior walls of a building. Calculating the length of the rafters is an essential part of framing a roof.

There are many different types of rafters, and the type you use will be influenced by the type of roof. For example, dormer roofs will require dormer rafters in addition to common rafters, while hip rafters will be required for hipped roofs.

The length of a rafter is the distance between the point where the rafter meets the beam (or opposing rafter for a truss) and the end of the overhang. Note that this is not necessarily the same as the length of the rafter board, which might need to be cut longer to account for rafter tails or an edge profile.

Each type of rafter may need to be measured differently. You can calculate the length of a common rafter in a few easy steps.

Step One: Calculate the Roof Pitch

The roof pitch is the angle of the roof and can be measured in several ways, but is most commonly expressed in rise over a standard 12-inch run. But, in order to calculate the rafter length, we need to calculate the pitch in degrees.

The angle in degrees is equal to the inverse tangent of the pitch of the roof.

angle = arctan(pitch / 12)
You can also find the angle for your roof pitch in the table below.

Roof Pitch Angle in Degrees
0/12
1/12 4.76°
2/12 9.46°
3/12 14.04°
4/12 18.43°
5/12 22.62°
6/12 26.57°
7/12 30.26°
8/12 33.69°
9/12 36.87°
10/12 39.81°
11/12 42.51°
12/12 45°

Pitch can be used to help calculate the rise. This is the total height of the roof. If you have this figure, you can use it plus the run, to get the rafter length.

The rise is also the term frequently used for the vertical beam that the rafters will butt against. You can use the following formula to get the rise:

rise = run × pitch

The run is half the measure of the roof span. You can also use our rise over run calculator to find this.

Step Two: Measure the Roof Span

The roof’s span is the total length of the roof. You’ll also need to account for the overhang beyond the building on either side.

Measure the span by measuring the width of the building using a tape measure, then add the overhang on each side to the measurement.

Step Three: Calculate the Rafter Run

The rafter’s run is the horizontal distance between the end of the rafter and where it meets the beam, which is known as the rise. To calculate the run, divide the total width of the building in half. Then, account for the beam or ridge board by subtracting half of its width from the run.

run = (total width ÷ 2) – (beam width ÷ 2)

Step Four: Calculate the Rafter Length

Now that you know the run and the angle in degrees, you can use trigonometry to calculate the rafter length. Since the cosine of an angle in a right triangle is equal to the length of the adjacent side divided by the hypotenuse, we can derive the following formula to calculate the rafter length:

rafter length = run ÷ cos(angle)

The rafter length is equal to the run divided by the cosine of the roof’s angle.

Another method is to use the rise of the roof using this formula:

rise² + run² = rafter length²

Meaning that your rafter length will equal:

rafter length = √(rise² + run²)

Remember that things like allowance, lumber size, and roof type can play into the overall length of each rafter.

You might also be interested in our roofing calculator to find how many squares of shingles you’ll need to finish it off.

Plywood Calculator

Plywood Calculator

Estimate the sheets of 4×8 plywood needed for walls, floors, and ceilings.

  • By
    FindPros

    FindPros connects consumers with professionals in over 600 different categories.

  • Reviewed by
    Jacky L.

    FindPros connects consumers with professionals in over 600 different categories.

This field is required.
Value should be positive.
This field is required.
Value should be positive.

Plywood Estimate

{{total_sheets}}

Learn how we calculated this below

Add this calculator to your site

How Many Sheets of 4×8 Plywood Do You Need?

Plywood is a versatile material made of many thin sheets of wood known as plies. It’s used for many things, from covering a home’s exterior to creating a subfloor. Plywood can come in different types, sizes, and thicknesses.

Finding the number of sheets of plywood needed for a floor, wall, ceiling, or cabinet begins with finding the area that needs to be covered. You can find an area by multiplying the length and width of the space in feet.

Find the square footage of each space and add them together to find the total square footage needed.

Divide the total square footage of the area by the square footage of a sheet of plywood to find the number of sheets required to cover the space. A 4×8 sheet of plywood is 32 sq ft.

For example, if the area to be covered in plywood is 800 sq ft, then 25 sheets of plywood will be needed to cover it.800 ÷ 32 = 25 sheets

Ordering extra sheets of plywood will allow for project waste and scrap pieces that can’t be used. It’s generally a good idea to add 10% to your total square footage, then round up to the nearest full sheet of plywood when ordering.

Common Types of Plywood

Multi-ply – Plywood is actually composed of several layers of wood glued together. Plywood is commonly composed of 3 or 5 layers.

OSB – Oriented strand board (OSB) is composed of wood strands or flakes compressed with glue. OSB is commonly used in framing to sheath roofs, floors, and walls.

MDF – Medium-density fiberboard (MDF) is composed of small wood fibers compressed with glue. The smaller fibers offer neat edges and a smooth surface. MDF is commonly used in cabinetry.

Particle Board – Particle Board is composed of small wood particles compressed with glue. The particles are bigger than the fibers used in MDF but smaller than the flakes used in OSB. Particle board is often used for floor sheathing, shelving, and furniture.

Block Board – Block board is a panel composed of boards glued edge to edge and then sandwiched between sheets of veneer. It is very strong and rigid and is often used in furniture.

Hardwood Plywood – Hardwood plywood is often used for furniture and cabinets. It often has a smooth or sanded finish and will display the grain and color of the wood used, so the surface may be finished.

Sheathing – Sheathing hardwood or structural hardwood is very strong and thick, and is used for sheathing a roof or structure. This plywood does not have a finished surface, as it’s meant to be covered.

Markerboard – A less common type of plywood is markerboard. This is used as a surface material for interior walls and furnishings. Its surface is coated in a smooth surface so that a dry-erase marker can be used on it.

Common Plywood Thickness

Plywood is often sold in 1/4″, 1/2″, and 3/4″ thicknesses, though other sizes are also available. The thickness needed will depend on the purpose and use. Thicker panels are more rigid and durable but are also heavier and more expensive.

Keep in mind that the actual thickness of plywood is often slightly thinner than the nominal thickness, learn more about the actual thickness of plywood. In most cases, this will not be an issue, but it is important to keep in mind for projects that require more precision, such as fine carpentry.

Lumber and Hardwood Weight Calculator

Lumber and Hardwood Weight Calculator

Calculate the weight of lumber and hardwood given the size of the boards or the volume of wood in board feet.

  • By
    FindPros

    FindPros connects consumers with professionals in over 600 different categories.

  • Reviewed by
    Jacky L.

    FindPros connects consumers with professionals in over 600 different categories.

This field is required.
Value should be positive.
This field is required.
Value should be positive.
This field is required.
Value should be positive.
This field is required.
Value should be positive.
find board feet
Results:

Approximate Lumber Weight

{{total_weight_range_in_lb}}
{{total_weight_range_in_kg}}

Density {{density_On_ui}}

{{total_density_range_in_lb}}
{{total_density_range_in_kg}}

Total Board feet

{{total_board_feet}}

Learn how we calculated this below

Add this calculator to your site

How to Estimate How Much Wood Weighs

While the weight of the type of wood or lumber you choose may not impact the outcome of a project, it can impact other factors. Lumber weight can influence the shipping cost for your project.

Very heavy lumber may also require additional workers to help load and move it, as well as additional help when building. In addition, very dense and heavy lumber may be more difficult to work with.

Therefore, understanding the weight of the lumber you are choosing and being able to apply that weight for the entire load can help you plan better for delivery costs and how many people you may need on the job.

The weight of wood varies by the species of wood and the moisture content of the lumber. Green lumber will weigh significantly more than kiln-dried boards due to its higher density and water content.

Find Wood Density

To find how much wood weighs, start by finding the density of the wood. Use the wood density chart below to find the approximate density for different species of wood.

Find Wood Volume

Once you have the density of the wood, find the volume of the wood in cubic feet or cubic meters. If you know the board footage of the lumber, divide it by 12 to find the volume in cubic feet. Our board footage calculator can help find the volume of your wood in board feet.]

You can also calculate the volume of lumber by measuring the length, width, and thickness in inches and multiplying them together. This will get the volume in cubic inches. Divide the volume in cubic inches by 1,728 to find the volume in cubic feet. Our cubic inches to cubic feet conversion calculator can help with this.

Find the Weight of Wood

After you have the density and the volume, multiply them together to find the total weight of that specific piece. To find the weight of the total load, you will need to get the number of pieces of lumber, then multiply this against the weight of a single piece of lumber.

For plywood, learn how to estimate the weight of plywood panels.

Density of Wood Species

The density or hardness of wood varies by species, and the value is necessary to approximate the weight of lumber by volume. In this table, the density of different species of wood is expressed as weight in pounds per cubic foot and kilograms per cubic meter.

The density will vary based on the moisture content of the wood.

Keep in mind that these numbers may vary depending on the age of the wood, moisture levels, and even the temperature. Things like general humidity and how the lumber was stored may impact total moisture content.

Wood Species 10³ kg/m³ lb/ft³
Alder 0.4 – 0.7 26 – 42
Afrormosia 0.71 44
Agba 0.51 32
Apple 0.65 – 0.85 41 – 52
Ash, White 0.65 – 0.85 40 – 53
Ash, Black 0.54 33
Ash, European 0.71 44
Aspen 0.42 26
Balsa 0.11 – 0.16 7 – 9
Bamboo 0.3 – 0.4 19 – 25
Basswood 0.3 – 0.6 20 – 37
Beech 0.7 – 0.9 32 – 56
Birch, British 0.67 42
Birch, European 0.67 42
Box 0.95 – 1.2 59 – 72
Butternut 0.38 24
Cedar of Lebanon 0.58 36
Cedar, Western Red 0.38 23
Cherry, European 0.63 – 0.9 43 – 56
Chestnut, Sweet 0.56 30
Cottonwood 0.41 25
Cypress 0.51 32
Dogwood 0.75 47
Douglas Fir 0.53 33
Ebony 1.1 – 1.3 69 – 83
Elm, American 0.57 35
Elm, English 0.55 – 0.6 34 – 37
Elm, Dutch 0.56 35
Elm, Wych 0.69 43
Elm, Rock 0.82 50
Gaboon 0.43 27
Greenheart 1.04 64.9
Gum, Black 0.59 36
Gum, Blue 0.82 50
Gum, Red 0.54 35
Hackberry 0.62 38
Hemlock, Western 0.5 31
Hickory 0.83 37 – 58
Holly 0.75 47
Iroko 0.66 41
Juniper 0.55 35
Keruing 0.74 46
Larch 0.5 – 0.55 31 – 35
Lignum Vitae 1.17 – 1.33 73 – 83
Lime, European 0.56 35
Locust 0.65 – 0.7 42 – 44
Logwood 0.9 57
Madrone 0.74 45
Magnolia 0.57 35
Mahogany, African 0.5 – 0.85 31 – 53
Mahogany, Cuban 0.66 40
Mahogany, Honduras 0.65 40
Mahogany, Spanish 0.85 53
Maple 0.6 – 0.75 39 – 47
Meranti, Dark Red 0.71 44
Myrtle 0.66 40
Oak 0.6 – 0.9 37 – 56
Oak, American Red 0.74 45
Oak, American White 0.77 47
Oak, English Brown 0.74 45
Obeche 0.39 24
Oregon Pine 0.53 33
Parana Pine 0.56 35
Pear 0.6 – 0.7 38 – 45
Pecan 0.77 47
Persimmon 0.9 55
Philippine Red Luan 0.59 36
Pine, Corsican 0.51 32
Pine, Pitch 0.67 52
Pine, Radiata 0.48 30
Pine, Scots 0.51 32
Pine, White 0.35 – 0.5 22 – 31
Pine, Yellow 0.37 – 0.59 23 – 37
Plane, European 0.64 40
Plum 0.65 – 0.8 41 – 49
Poplar 0.35 – 0.5 22 – 31
Ramin 0.67 42
Redwood, American 0.45 28
Redwood, European 0.51 32
Rosewood, Bolivian 0.82 50
Rosewood, East Indian 0.9 55
Sapele 0.64 40
Satinwood 0.95 59
Spruce 0.4 – 0.7 25 – 44
Spruce, Canadian 0.45 28
Spruce, Norway 0.43 27
Spruce, Sitka 0.45 28
Spruce, Western White 0.45 28
Sycamore 0.4 – 0.6 24 – 37
Tanguile 0.64 39
Teak, Indian 0.65 – 0.9 41 – 55
Teak, African .98 61
Teak, Burma 0.74 45
Utile 0.66 41
Walnut 0.65 – 0.7 40 – 44
Walnut, Amer Black 0.63 39
Walnut, Claro 0.49 30
Walnut, European 0.57 35
Water Gum 1 62
Whitewood, European 0.47 29
Willow 0.4 – 0.6 24 – 37
Yew 0.67 42
Zebrawood 0.79 49

Densities for various wood species measured in kilograms per cubic meter and pounds per cubic foot.

You can also learn more about the actual size of lumber.

Framing Calculator

Framing Calculator

Calculate how many studs you need to frame a wall using the framing calculator below. Plus, estimate the number of boards you need for the top and bottom plates of the wall.

  • By
    FindPros

    FindPros connects consumers with professionals in over 600 different categories.

  • Reviewed by
    Jacky L.

    FindPros connects consumers with professionals in over 600 different categories.

Board Dimensions:

This field is required.
Value should be positive.
This field is required.
Value should be positive.
stud spacing is too wide

Studs Needed:

{{studs_needed}}

Top Plate Boards

{{top_plate_boards}}

Bottom Plate Boards

{{bottom_plate_boards}}

Learn how we calculated this below

Add this calculator to your site

When framing a wall, the lumber must be positioned to support not only itself, but also the weight above. Vertical lumber supports, or studs, are an integral part of every new build.

Whether you’re constructing a shed, an addition to your home, or dividing a room in half, you need to have the right number of studs to help ensure the project will be structurally sound when you’re done.

Determining the proper placement and spacing of studs is critical when framing a wall. Studs are vertical framing members that provide structure and support to the wall, and they are often constructed from wood or steel.

The number of studs you need to frame a wall depends on the length of the wall and the spacing of the studs. The spacing of the studs depends on a variety of factors, such as the size of the wall, the type of material being used, whether it’s an interior or exterior wall, whether it’s load-bearing, and local building codes.

General stud spacing for interior walls tends to be around 16 inches on center, while exterior walls may be up to 24 inches on center. The more load a wall needs to hold, the more studs that may be required.

You can use a framing calculator like the one above to help calculate how many studs you need for your framing project, or you can figure it out by following a few easy steps.

Step One: Measure the Wall

The first step in calculating the studs needed to frame a wall is to determine the length and height of the wall. Measure the wall from one end to the other in inches using a tape measure to determine its length. If you have plans, you can consult them to determine the length of the wall.

Step Two: Determine the Stud Spacing

The spacing of the studs depends on a few factors, including the type of materials being used and local building codes. The most common spacing for wall studs is 16 inches on center (16″ OC), which means that the center of each stud is spaced exactly 16 inches apart.

It’s also common to see a 24″ OC spacing for some exterior walls or even a 12″ OC spacing for walls supporting heavy loads.

Step Three: Calculate the Number of Studs Needed

To calculate the number of studs you need, divide the length of the wall by the stud on-center spacing. For example, if you are framing a 13′ wall (156″) with a 16″ OC spacing, then divide 156″ inches by 16″, which is 9.75. 156″ ÷ 16″ = 9.75

Be sure to round up to the nearest whole stud, so in this case, you’ll round up to 10 studs. Then, add one more stud for the final corner stud, meaning you’ll need 11 studs for this wall.

Note that because center spacing is used, you can use this formula for any width stud, which means that even though a 2×4 does not measure 2″ wide, this formula still works.

Step Four: Account for Corners

For corner walls, you may need to add an extra stud on each end to provide additional support for drywall or plywood, or to add additional strength for the load of a building. Be sure to add these additional framing members to your estimate from step three above.

Step Five: Calculate Top and Bottom Plates

You’ll probably also need to account for top and bottom plates in your framing project, which are the boards on the top and bottom of the wall that the studs are attached to. For a 2×4 wall, this is usually a 2×4, and for 2×6 walls, this is usually a 2×6.

To calculate these, measure the length of the wall in inches, then divide that result by the length of the boards you’re using for the top and bottom plates.

Since it’s common to use two top plates and one or two bottom plates, you’ll need to multiply this result by three or four to get the total number of plates for the top and bottom.

Types of Studs

While most walls will contain full studs, if you have windows or doors in the wall, you may have additional types of studs as well. These are necessary to help support the wall around the opening.

In addition to the plates and the full studs, some other studs and wall framing components you may require include:

Cripple studs: Cripple studs support the bottom of a window opening and, in some cases, may also extend from the top of a doorway to the plate above. They are the same thickness as a full stud but are shorter.

Jack studs: Jack studs are used on either side of a window or door opening in the wall. This is a load-bearing vertical stud that the window or door header will rest on. You will need two or more Jack studs if you are framing an opening more than 5 feet wide. The exact number of Jack studs can vary depending on the size of the opening and the load of the wall.

King studs: The king stud sits against the Jack stud and runs floor to ceiling. While the Jack stud will terminate at the header, the king stud will frame out the exterior of the header and lend support to the Jack stud.

Header: The header is the top section of a door or window. It frames out the top of the opening and is supported on either side by the Jack stud.

Rough sill: The rough sill is the bottom frame of a window opening. The Jack stud will run on either side of the rough sill, and a cripple stud will support it from below.

Board Foot Calculator

Board Foot Calculator

Find the board footage of lumber by entering your boards’ length, width, and thickness. Add the price per board foot to estimate the cost.

  • By
    FindPros

    FindPros connects consumers with professionals in over 600 different categories.

  • Reviewed by
    Jacky L.

    FindPros connects consumers with professionals in over 600 different categories.

Board {{ $index+1 }} Dimensions:

Value should be positive.
This field is required.
Value should be positive.
This field is required.
Value should be positive.
This field is required.
Only numbers are allowed.

Optionally enter the price per board foot

$
Please enter valid price.
Results:

Total Board Feet

{{total_board_feet_display}}

Estimated Lumber Cost

${{total_estimated_lumber_cost_display}}

Board {{$index+1}}

{{form.board_feet_display}}
${{form.cost_display}}

Learn how we calculated this below

Add this calculator to your site

What is a Board Foot?

A board foot, abbreviated bd ft, is a unit of measurement for the volume of a piece of wood in feet. While square feet refers to the area of a material on two dimensions and linear feet refers to the length of an area or material, board feet takes into account the total volume of the wood, including its length, width, and depth.

Large slabs of rough wood, hardwood lumber, and exotic woods are usually measured and priced by the board foot, which accounts for the thickness, width, and length of the lumber. This allows for more accurate sizing and cost across a broader range of materials.

One board foot is equal to 144 cubic inches and is equivalent to a 1-inch thick board that is 1 square foot in size. You may see the term board foot abbreviated to bd ft, BDFT, BF, or FBM(foot, board measure).

Board footage is used to quantify how much wood a board contains since length by itself is not enough to determine how much volume the lumber contains. Boards that are wider or thicker contain more wood.

For example, a board that is 4/4 × 4″ × 8′ has the same amount of wood as a board that is 4/4 × 8″ × 4′. The board footage measurement indicates that both boards are equal in size, while using just the length measurement might make the thinner board appear larger.

Unlike 2x4s and dimensional lumber which are measured using nominal measurements, hardwood thickness is often measured in quarters of an inch, so you would refer to a 1″ board as four-quarters, expressed as 4/4.

How to Calculate Board Feet

You can calculate board footage, which is the volume of wood the board contains, using the calculator above or using a simple formula.

Using Length in Inches

You can calculate board feet by multiplying the board’s thickness in inches by the width in inches by the length in inches and then dividing the result by 144.

Thus, the formula to calculate board footage is (thickness × width × length) ÷ 144. Make sure you keep all measurements in inches, then divide by 144.

BF =
Thickness [in] × Width [in] × Length [in]
144
Using Length in Feet

You can also find the board footage of a board if your length dimension is in feet. Multiply the thickness of a board in inches by the width of the board in inches by the length of the board in feet, and then divide the result by 12.

BF =
Thickness [in] × Width [in] × Length [ft]
12

If you need help converting to inches, convert feet to inches, convert yards to inches, or convert centimeters to inches.

How to Calculate the Board Footage of a Log

There are a few methods that you can use to find the total lumber in a log, but the most common method is to use a Doyle log scale.[1]

To use a Doyle log scale, start by measuring the length of the log in feet and the smallest diameter of the log inside the bark in inches.

Then, refer to the Doyle log scale linked above to find the total number of board feet in the log.

There are several other commonly used scales for measuring logs and standing trees, including the International 1/4-inch scale and the Scribner standing tree scale.

Always use the same scale during one project in order to get consistent results. Switching between measurement scales may skew results and give inaccurate measurements.

Board Feet Charts

Refer to the charts below to quickly calculate the board feet for 4/4 and 8/4 stock.

4/4 Lumber (1″ Thick)

Board foot measurements for 4/4″ thick lumber at various widths and lengths.

4′ L 6′ L 8′ L 10′ L 12′ L 14′ L
4″ W 1.33 BF 2.0 BF 2.67 BF 3.33 BF 4.0 BF 4.67 BF
6″ W 2.0 BF 3.0 BF 4.0 BF 5.0 BF 6.0 BF 7.0 BF
8″ W 2.67 BF 4.0 BF 5.33 BF 6.67 BF 8.0 BF 9.33 BF
10″ W 3.33 BF 5.0 BF 6.67 BF 8.33 BF 10.0 BF 11.67 BF
12″ W 4.0 BF 6.0 BF 8.0 BF 10.0 BF 12.0 BF 14.0 BF

8/4 Lumber (2″ Thick)

Board foot measurements for 8/4″ thick lumber at various widths and lengths.

4′ L 6′ L 8′ L 10′ L 12′ L 14′ L
4″ W 2.67 BF 4.0 BF 5.33 BF 6.67 BF 8.0 BF 9.33 BF
6″ W 4.0 BF 6.0 BF 8.0 BF 10.0 BF 12.0 BF 14.0 BF
8″ W 5.33 BF 8.0 BF 10.67 BF 13.33 BF 16.0 BF 18.67 BF
10″ W 6.67 BF 10.0 BF 13.33 BF 16.67 BF 20.0 BF 23.33 BF
12″ W 8.0 BF 12.0 BF 16.0 BF 20.0 BF 24.0 BF 28.0 BF

Board feet take the thickness of the wood into consideration, along with length and width. This gives a more accurate measurement of the total amount of wood and cost of the lumber.

Linear feet measure distance in one direction, or the length of an area in 12″ increments. Board feet measure the volume of the wood, including the thickness, length, and width, with one board foot measuring 1″ in thickness and 1 square foot in area.

The size of a 2″ x 4″ x 8′ is 5.34 board feet.

This is directly related to the board and type of wood. There are fewer wider boards per log than there are thinner logs, and some wood species have fewer wider logs in general, making wider logs a more scarce commodity, and therefore they have a higher cost.