Calculate vinyl siding, trim, and materials needed by entering the dimensions of the building below. You’ll get a detailed bill of materials and cost estimate for your project.
Calculator Tag: Siding
Siding Material Calculator
Find the number of squares of siding material needed by entering the dimensions of the building below for a wall or gable. Optionally, include the number of doors and windows to refine the estimate.
-
By
FindPros
FindPros connects consumers with professionals in over 600 different categories.
-
Reviewed by
Jacky L.
FindPros connects consumers with professionals in over 600 different categories.


Results:
Error:
There are too many doors and windows for this sized wall
Material Needed
How to Measure for Siding
If you’re planning a siding replacement project or preparing to install a new exterior, take the time to estimate the size of the project as your first step. Doing so will help with estimating material and labor costs.
While different types of siding may come in different styles and may be installed in varying ways, they all require correct measurements for the best results.
How Much Is a Square of Siding
Siding is often estimated and priced by the square. A Square is a term used by contractors, installers, and building suppliers and is a unit of measure equal to 100 square feet of material.
Most popular types of siding, like vinyl siding, are commonly estimated by the square to determine how much labor and material is needed.
One square of siding will cover 100 square feet. Siding may be packaged and sold in varying quantities of squares. For example, an average box of vinyl siding contains two squares of material.
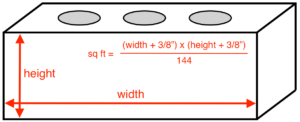
To find the number of squares of siding needed for an installation, measure the width and height of each wall in feet. Multiply the width and height to get the area of the wall in square feet.
If your walls are in a mixture of partial and total feet, round up to the nearest whole foot. For example, if one wall is 12.4 feet and one is 20.8 feet, round to 13 and 21 feet, respectively, before multiplying.
Divide the square footage by 100 to get the number of squares needed for the wall.
For example a wall that is 40 ft wide and 12 ft high will require at least 4.8 squares of material.
40 × 12 = 480
480 ÷ 100 = 4.8
Be sure to round up to the nearest square, so in this case, you’d probably need 5 full squares.
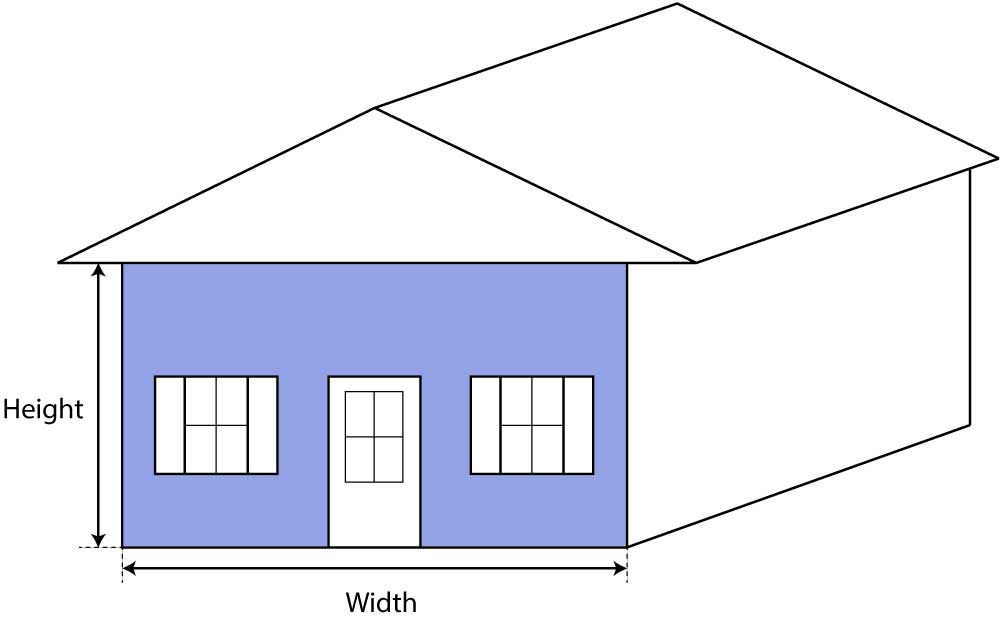
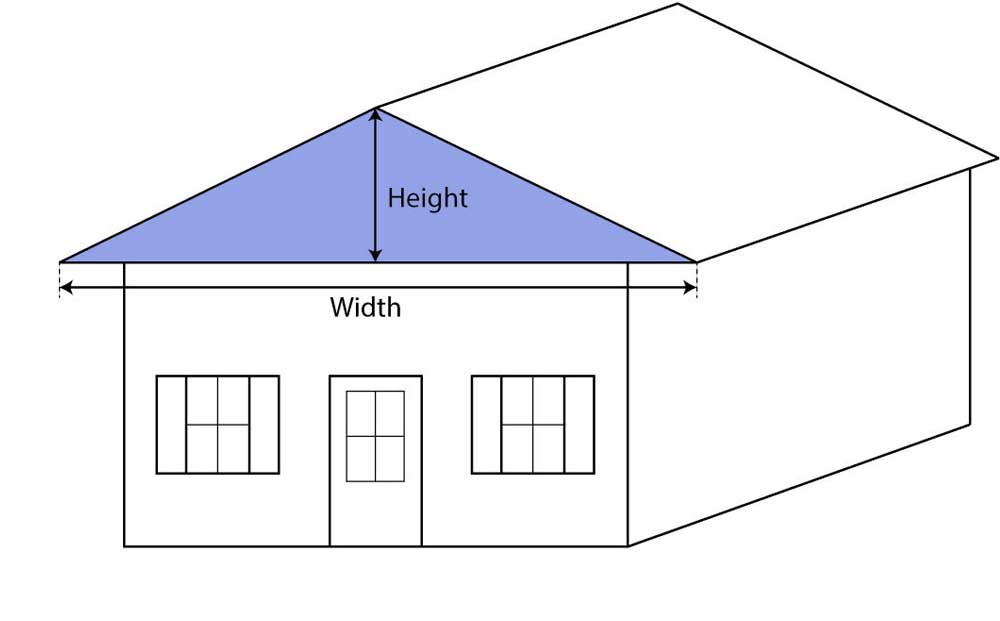
How to Measure Gable Walls
Finding the square footage of a gable wall is similar to finding the square footage of a standard wall. Measure the width of the gable and the height of the gable from the base of the triangle to the peak.
Then multiply the width and height, just like you would to find the area of a rectangle. Finally, divide the area in half to get the final square footage. Divide by 100 to get the number of squares.
For example a 20ft wide gable that is 10ft tall will require 1 square of material.
20 × 10 = 200
200 ÷ 2 = 100
100 ÷ 100 = 1
It is a good idea to order additional material to account for angle cutoffs along the edge of the gable roof.
If you have a very steep gable, such as a salt box or an A-frame, or you have a very tall home, you can get more specific measurements if desired. Measure from the ground to the lowest edge of the roof to get the height, then straight across to get the width.
This will give you the square feet of the wall below the gable. For the gable itself, you want the height from the lowest point of the roof to the highest, as well as the total width. Take the total width and divide it in half, then multiply by the height to get the square footage of the gable.
Add it to the square footage of the area below the gable to get the total square footage of the wall.
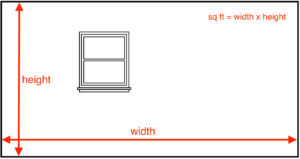
How to Account for Doors and Windows
A wall with doors and windows may require fewer squares of material to cover than a wall with no openings. To account for this overage in material, find the square footage of space that will not be covered in siding for the doors and windows and subtract that from the total square footage of the wall.
For example, an average door is 3 ft wide by 7 ft high. Subtract 21 sq ft from the total square footage to account for a door. Windows vary in size, and the square footage can be found by multiplying the length and the width.
Material Overages
Because there will inevitably be some waste due to off-cuts, measurement errors, or unintended damage, it’s always a good idea to order some extra material for the project. It is commonly recommended to order an additional 10% material to account for waste.
Having left over siding material is also a good idea since it allows you to make future repairs that will match the existing siding.
Additional Siding Measurement and Installation Resources
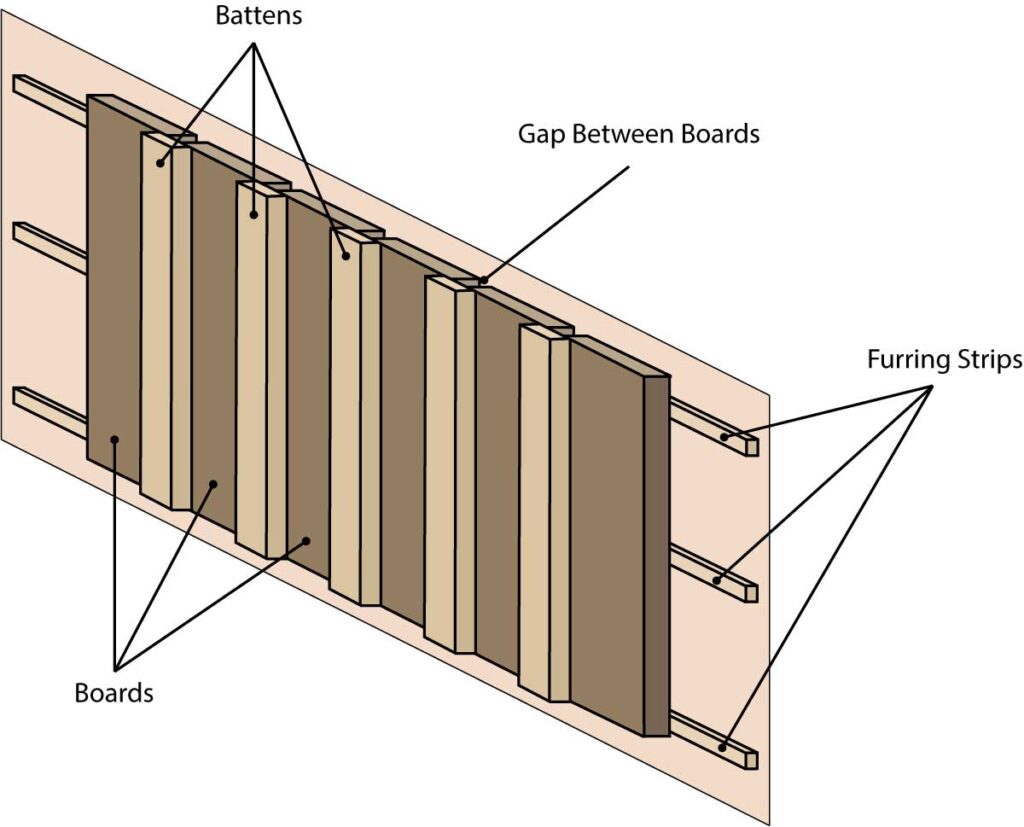
For clapboard and lap siding, use our clapboard siding calculator to find the number of boards needed to cover the home. The board and batten siding calculator can estimate the material needed for a board and batten project.
Find the cost of siding installation in your area or find qualified installers.
Recommended Siding Resources
Clapboard and Lap Board Siding Calculator
Find the number of clapboards needed using our siding board calculator. The calculator will also determine the overlap and exposure of each board, find the total number of boards needed, and is perfect for estimating cedar wood siding or Hardie fiber lap siding.
Optionally enter the number of doors and windows to refine your estimate.
-
By
FindPros
FindPros connects consumers with professionals in over 600 different categories.
-
Reviewed by
Jacky L.
FindPros connects consumers with professionals in over 600 different categories.


Results:
Error
There are too many doors and windows for this sized wall
Material
Installation Summary
On this page:
How to Estimate Siding Boards Needed
Cedar wood siding and fiber cement siding are commonly available in a clapboard or lap board style and are often sold by the 12′ board. The boards overlap each other and are only partially exposed to the elements to keep the building water-tight.
Lap boards can have different styles to them, such as a Dutch lap, which has the board cut at an angle to cast a shadow, a beaded lap, which has a decorative channel at the bottom, or the bevel, which is thinner at the top than at the bottom.
Regardless of style, you can estimate the number of boards needed in the same way. Even boards like shiplap, which lock together on the top and bottom, or tongue and groove siding are estimated the same way.
You can find the number of boards needed for a project in a few simple steps.
Get the Total Square Footage
One way of determining how much siding you need is to measure the square footage of the area you are siding. For this, you will need to get the length and width of each section in feet. Multiply these together to get the square footage.
For gable roofs, you can measure the square section to the bottom of the roof edge in the same way. Then get the height and the width of the triangular section. Multiply these together, and divide in half to get the square footage of this section.
If you choose, you can get the square footage of the windows and doors, and subtract them from the total.
Most siding is sold bundled. Some are bundled in squares – 100 sq. ft. – while others may be sold in groups of planks, such as 25 planks. In the latter example, you can find the square footage the planks will cover by multiplying the width and length in inches, and dividing by 144.
For example, a popular size for fiber cement siding planks is 6.25″ x 12′ or 144″. This makes each plank 6.25 square feet. Packaged into groups of 25, each group of 25 will cover 156 sq. ft.
While the planks will overlap one another, their full coverage of the wall won’t necessarily be affected by this. Therefore, going by square footage, adding at least 10% for waste, and rounding to the nearest bundle will generally result in an accurate siding estimate.
Find the Overlap and Exposure of the Board
Board siding is installed from the bottom up, with each board overlapping each other by a small margin. Different materials and styles of siding have varying requirements for the minimum amount of overlap needed to keep the wall water-tight and maximize the durability of the siding.
Often, the minimum amount of overlap is 1″ – 1 1/2“.
The exposure of the board is the amount of the board that is exposed to the elements. This can be found by subtracting the overlap of the boards from the actual board width.
The exposure is what will be used to determine the number of courses needed for the wall, and ultimately to find the number of linear feet of siding needed.
Cedar Board Dimensions
Common cedar board sizes and their maximum exposure.
Nominal | Actual | Exposure |
---|---|---|
4″ | 3.5″ | 2″ |
6″ | 5.5″ | 4″ |
8″ | 7.5″ | 6″ |
10″ | 9.5″ | 8″ |
12″ | 11.5″ | 10″ |
Hardie Fiber Board Dimensions
Common Hardie board sizes and their maximum exposure.
Nominal | Exposure |
---|---|
5.25″ | 4″ |
6.25″ | 5″ |
7.25″ | 6″ |
8.25″ | 7″ |
9.25″ | 8″ |
12″ | 10.75″ |
These dimensions are for average styles and materials only; refer to the siding manufacturer for exact specifications.
Estimate the Number of Courses of Siding
The number of courses of siding can be found by dividing the height of the wall in inches by the exposure of the board. Use our feet to inches conversion calculator if you know the height of the building in feet.
Siding should be kept 6″ off the ground; you’ll need to account for this when measuring and estimating material.
For example, installing siding with a 4″ exposure on a wall that is 12ft high will take 36 courses of siding.
12′ × 12″ per ft = 144″
144 ÷ 4 = 36
It’s likely that a partial course will be needed if the exposure of the board does not divide evenly into the height of the building. In that case, re-calculate the exposure slightly so that each course is even and the top course does not end up being too short.
For example, installing siding with a 7″ exposure on a wall that is 12ft high will take 20.6 courses of siding. Adjust the exposure of the board to be 6.85″ to end up with an even 21 courses.
12′ × 12″ per ft = 144″
144 ÷ 7 = 20.6
144 ÷ 20.6 = 6.85
Estimate Linear Feet
Estimate the number of linear feet of siding needed by multiplying the width of the wall in feet by the number of courses. Boards are most commonly sold in 12′ lengths, though 16′ and 20′ lengths can often be ordered.
Divide the linear footage by 12′ to find the number of boards needed to cover the wall. If you have a board with a different length, such as 16′ or 20′, you will divide by that number.
For example, installing 21 courses of siding on a 20′ wide wall will require 420 linear feet of siding, or 35 boards.
21 × 20 = 420
420 ÷ 12 = 35
Learn more about how to calculate linear feet. Always order at least 10% extra to account for cuts, breakage, and waste when installing.
How to Estimate Gable Walls
Finding the number of boards needed for the area beneath a gable roof is fairly simple. Simply multiply the height and width of the gable and estimate the linear footage like you would for a rectangle using the width and height.
Divide in half to get the linear footage needed to cover a triangular area.
For example, installing 21 courses of siding on a 20′ wide gable will require 210 linear feet of siding, or 18 boards.
21 × 20 = 420
420 ÷ 2 = 210
210 ÷ 12 = 17.5 – round up to 18
Consider ordering additional material for offcuts needed for the angle. While 10% additional may be fine for the other areas, angle cuts may require as much as 20% for this area to account for the many cuts required.
More Siding Installation Resources
Use our siding squares calculator to estimate vinyl siding square material needed. Our board and batten calculator can estimate board and batten siding materials.
Learn more about the cost of siding installation in your area and find qualified installers near you.
Recommended Siding Resources
Brick Calculator
Brick Calculator
Calculate how many bricks and bags of mortar you’ll need for a wall or masonry project by entering the wall dimensions and selecting a brick size. Optionally, estimate the cost of materials by adding the price per brick.
-
By
FindPros
FindPros connects consumers with professionals in over 600 different categories.
-
Reviewed by
Jacky L.
FindPros connects consumers with professionals in over 600 different categories.
Material Estimate:
Estimated Material Cost:
Installation Overview:
Square Footage: {{sq_footage}} ft²
How Many Bricks Do You Need?
Bricks are a versatile building material that come in many sizes, wear ratings, and colors. They are often used for exterior walls, chimneys, and fireplaces, but can also be used to create patios, stairs, or some decorative projects.
Many bricks have three or more holes in the center to reduce the weight, raw materials, and cost, while others are solid, and some may be thinner than average. These latter are known as brick veneers and are common for finishing the exterior of a structure rather than being used for support.
Bricks are commonly made of clay or shale and are kiln-baked. They are often laid in courses or rows and are held in position by laying them in a bed of mortar, which also fills the joints between them.
The type of brick you choose will determine how many you need for a wall because bricks do come in different sizes. The thickness of the mortar bed you use can also vary your material needs, as well as the spacing between the bricks.
This calculator assumes a 3/8” mortar bed.
Calculate how many bricks you need using the calculator above. You’ll also get a cost estimate for materials.
You can also refer to the coverage table below or keep reading to learn how to perform the calculations yourself.
How to Calculate How Many Bricks You Need
A wall built with a standard modular brick will require seven bricks per square foot to complete the project. Projects using different sizes may need more or fewer bricks.
Follow the steps below for an accurate estimate.
Step One: Find the Square Footage of the Wall
Start estimating the number of bricks you’ll need by determining how much area you need to cover in square feet. To do this, measure the width and height of your wall or surface.
Once you’ve measured the wall’s width and height, you can find the area in square footage by multiplying the wall’s width in feet times the wall’s height in feet.
drawing showing how to find the square footage of a wall
You can also choose to measure the wall in inches and make your calculation in inches. Once you’ve multiplied the height and width to get your total square inches, you will convert back to square feet.
Divide square inches by 144 to get the square feet. Always round up to the nearest full measurement.
area = 10′ × 8′ = 80 sq. ft.
Step Two: Find the Square Footage of Each Brick
After you know the surface area, you need to find the amount of area that each brick will cover.
The easiest way to do that is to find each brick’s area in square inches and then divide by 144 to convert square inches to square feet. Keep in mind that there will also be a 3⁄8” mortar joint between each brick.
For example, let’s find the area of a modular brick measuring 7 5⁄8” wide x 2 1⁄4” high
To get the square footage of a modular brick, add 3⁄8” to each dimension to account for the mortar joint, then use the formula (length × width) ÷ 144 = sq. ft. of the brick.
brick & mortar width = 7 5⁄8 + 3⁄8 = 8
brick & mortar height = 2 1⁄4 + 3⁄8 = 2 5⁄8
brick sq ft = (8 × 2 5⁄8) ÷ 144
brick sq ft = 21 ÷ 144 = .1458
You can also use a square feet calculator to easily find the square footage of your brick.
Step Three: Find How Many Bricks Fill the Wall
You can determine the number of bricks needed to cover your area by dividing the square footage of the area to be covered by the brick’s square footage (wall sq ft ÷ brick sq ft).
80 ÷ .1458 = 549 bricks
We strongly recommend adding 10% additional material to cover any waste and account for any broken blocks or cuts. If you plan on creating any patterns in the brick, add another 10% waste to the total.
The brick calculator above accounts for partial bricks and cutoffs automatically and may return a different number for your project.
Check out our concrete block calculator to find the number of concrete blocks needed for a project. Concrete blocks, or cinder blocks, are larger than bricks, but the strategy to find the number of bricks to cover a surface can be used to find the number of concrete blocks to cover a surface as well.
How Much Mortar Do You Need?
You can estimate mortar by referring to the coverage rate for the specific mortar used on the project. Mortar is a mixture of cement, sand, and often lime. The type of mortar you will use for your project can vary depending on location, flexibility, and the compressive strength needed. Most mortars used for bricks require one bag of cement per 100-142 bricks, depending on the size.
One bag of cement is needed for every 142 modular, 125 queen, or 100 utility bricks. This estimate assumes using a mortar that needs to be mixed with three parts sand. A 1:3 cement to sand mix will require one cubic yard of sand for every seven bags of mortar.
Pre-mixed bags of mortar are also readily available, and an 80-pound bag of mix will often yield 30-36 bricks. Divide the total number of bricks by 36 to calculate the bags needed. Try our mortar calculator to calculate mortar needs more accurately.
Brick Coverage Table
It is important to note that there are many types of bricks and many sizes as well. See some of the most common brick types and sizes below, along with an estimate of how many you’ll need per square foot (or square meter).
Brick Style | Size (D x H x W) | Weight | Coverage | |||
---|---|---|---|---|---|---|
Inches | Millimeters | Pounds | Kilograms | Bricks per Ft² | Bricks per M² | |
Modular | 3 5⁄8” x 2 1⁄4” x 7 5⁄8“ | 92mm x 57mm x 194mm | 4.2 lbs | 1.9 kg | 7 | 73 |
Queen | 3 1⁄8” x 2 3⁄4” x 7 5⁄8“ | 79mm x 70mm x 194mm | 4.1 lbs | 1.86 kg | 6 | 73 |
Closure | 3 5⁄8” x 3 5⁄8” x 7 5⁄8“ | 92mm x 92mm x 194mm | 6.8 lbs | 3.1 kg | 4.5 | 48 |
Standard | 3 5⁄8” x 2 1⁄4” x 8″ | 92mm x 57mm x 203mm | 4.5 lbs | 2 kg | 6.5 | 70 |
Jumbo Standard | 3 5⁄8” x 2 3⁄4” x 8″ | 92mm x 70mm x 203mm | 5.9 lbs | 2.7 kg | 6 | 61 |
King | 2 3⁄4” x 2 5⁄8” x 9 5⁄8“ | 79mm x 70mm x 244mm | 5.6 lbs | 2.5 kg | 4.5 | 49 |
Roman | 3 5⁄8” x 1 5⁄8” x 11 5⁄8“ | 92mm x 41mm x 295mm | 4.7 lbs | 2.1 kg | 6 | 64 |
Norman | 3 5⁄8” x 2 1⁄4” x 11 5⁄8“ | 92mm x 57mm x 295mm | 6.4 lbs | 2.9 kg | 4.5 | 49 |
Utility | 3 5⁄8” x 3 5⁄8” x 11 5⁄8“ | 92mm x 92mm x 295mm | 10.2 lbs | 4.6 kg | 3 | 32 |
Sizes and coverage rates of commonly used bricks.
Recommended Siding Resources
Board and Batten Siding Calculator
Find how many boards, battens, and furring strips are needed to install board and batten siding by entering the dimensions of the building below for a wall or gable. Optionally, refine your estimate by providing the number of doors and windows on the wall or gable.
-
By
FindPros
FindPros connects consumers with professionals in over 600 different categories.
-
Reviewed by
Jacky L.
FindPros connects consumers with professionals in over 600 different categories.


Results:
There are too many doors and windows for this sized wall
Material (in Linear Feet)
Installation Summary
How to Estimate Materials for Board and Batten Siding
Board and batten siding is the oldest type of milled siding in the U.S. Board and batten siding has a distinctive look with the boards installed vertically.
Historically, the boards were roughly 12″ wide and 1″ thick, but today, the boards can range from 6″ to 12″ in width, with 10″ to 12″ being the most common. Thin strips of wood known as battens, which are usually 1″ x 1″ are installed over the seams.
Board and batten siding is found in wood, metal, and fiber cement, as well as in some vinyl styles. For vinyl and metal, the boards and battens are not separate from one another, and they are designed to overlap and interconnect. For wood and fiber cement, the pieces are separate and need to be installed over furring strips.
The first step to estimating materials is to measure each wall’s width and height,
Illustration showing the composition of boards, battens, and furring strips that make up board and batten siding.
Estimate Furring Strips for Board and Batten Siding
Most homes are covered in plywood or OSB sheathing prior to siding. If this is the case, you can attach the boards for your new siding directly to the sheathing.
However, some older homes that are not sheathed may require furring strips prior to installing the finished siding. Likewise, if you are creating a rain screen, or if you are using certain types of insulation beneath your siding, you may require furring strips as well.
Furring strips are 2″-3″ boards that are installed horizontally every 18″-24″ on the wall. Since the building’s framing is also installed vertically, the board and batten siding will need to be attached to these strips.
To find the amount of furring strip material needed, first start by calculating the number of rows of furring strips that will need to be installed, which can be found by dividing the height of the building in feet by 2 to find the number of 24″ sections on the building.
Round the number up to the nearest whole number, then add 1 to account for adding a strip along the top or bottom edge.
number of rows = (height in feet ÷ 2) + 1)
If your wall measurements are in inches, then divide by 24 instead of 2.
number of rows = (height in inches ÷ 24) + 1)
To find the linear feet of furring strip material, multiply the width of the wall in feet by the number of rows. Learn more about how to find linear footage.
linear feet = number of rows × wall width in feet
Estimate the Number of Boards and Battens Needed
The boards used in board and batten siding are often 10″-12″, but can be any width of your choosing. The boards are wider than the battens, and the battens are installed on top of the seam between each board.
The battens are thinner than the boards, usually 1″ wide and 1″ thick, though they can be wider as well.
Most board and batten siding will have the boards butted up against one another, with the batten over the seam. This comes from the original installations where the home was not watertight, and there was often no sheathing beneath the siding; the battens helped seal up the walls.
If your material of choice is wood, then the boards should have a 1/2″ gap between them to allow for expansion and prevent buckling. Larger gaps can also be used as needed, but the battens should be 1″ wider than the gap to allow for good coverage.
To find the number of boards needed, you simply need to divide the width of the wall by the width of the board. If you are using a panel installation, such as a steel or vinyl board and batten siding, you need the total width of the panel, which is often one board and batten together, but may be as much as two boards and two battens together.
number of boards = (wall width in inches + board spacing) ÷ (board width in inches + board spacing)
To find the number of battens, simply subtract 1 from the number of boards.
number of battens = number of boards -1
Trim should also be accounted for. At least one board will be needed on either side of the wall at the edges.
number of edge trim boards = 2
Most of the time, you will want your boards, battens, and trim to be whole boards, with no joints in the verticals. Because of this, be sure to order material by the board and find boards that are long enough to cover the wall height, and try to avoid ordering material by the linear foot.
However, many homes may be taller than the planks available. To account for this, and to avoid seams in the vertical siding, a horizontal board is usually run at the top of the section of siding. The second, higher section starts on the top half of the board.
How to Lay Out Board and Batten Siding
There are many ways to lay out your board and batten siding. It is common that your exterior walls may not be evenly divided by the width of the boards. However, most homes do have trim around the edges, which can give you some leeway in how you layout and install the boards.
Getting a wider trim can help fill a space where a board may have needed to be cut to fit. Or, if you need to cut boards to fit the space, you can lay out the boards so that they begin in the center of a wall, and move out evenly to either side.
While you may have cut boards on either end, they will be the same width, and will still provide an even and symmetric installation. If your home is not perfectly square, and has interior corners, sometimes you may want to “bury” a cut piece in an inside corner, where it is less likely to be seen.
In some cases, a board may only need to be trimmed slightly. Making a board on the end of the run 10” when the rest are 12” is unlikely to be very noticeable. A very thin board, however, may be less desirable, in which case, larger trim may be the better choice.
You can use our board and batten layout calculator to perfectly lay out an even spacing between the boards and battens.
Note that this step is not required, it is only necessary when it is desirable to avoid an uneven board width on the final board.
More Siding Installation Resources
If you’re installing vinyl siding or need to estimate the amount of material in squares, our siding square calculator can estimate the squares of material needed to cover a wall. Our clapboard siding calculator can help estimate the amount of material needed for clapboard and lap siding.
Finally, you can get free estimates from local siding professionals in your area to compare costs and find a contractor.