Chimney Flue Repair

Chimney Flue Repair Near You

Can’t find what you are looking for?

How It Works

  • Answer a few questions about your home project.
  • Within seconds, get matched with top-rated local pros.
  • Compare quotes and choose the best pro for the job.

Chimney Flue Repair In Your Area

Expert Chimney Flue Repair: Restoring Your Home’s Comfort and Safety

Meta Description: Discover expert chimney flue repair services to ensure your home’s safety and efficiency. Our professional solutions tackle common issues and restore proper ventilation.

Is your chimney flue in bad shape and you don’t know what to do? As a homeowner, keeping your chimney safe and efficient is key. It stops harmful gases like carbon monoxide and keeps your family safe from chimney fires.

Chimney Flue Repair

Key Takeaways

  • Chimney liners keep dangerous gases and moisture out of your home.
  • Signs your chimney flue needs fixing include cracked tiles, too much creosote, and visible damage.
  • Chimney fires can badly damage the liner, making it less safe.
  • Keeping your chimney clean with yearly checks and cleanings is crucial for safety and efficiency.
  • Experts like Sweeps n Ladders can fix your chimney, making your home safe and cozy again.

The Importance of Chimney Maintenance

A well-maintained chimney keeps your home safe and efficient. Regular chimney maintenance stops problems before they start. It makes sure your chimney works well all year.

Why Chimney Repair Matters

Chimneys can get cracks, leaks, and blockages over time. If you ignore these, you risk serious health and safety issues. Chimney fires can happen, causing big problems.

Health and Safety Concerns

Blockages or cracks in the chimney can let harmful gases into your home. These gases can be very dangerous. So, it’s key to have regular chimney inspections and fix any problems fast.

Energy Efficiency

A working chimney helps your home use less energy. When your chimney is in good shape, your heating uses less energy. This can lower your bills and help the planet.

Choosing to maintain and fix your chimney is smart. It keeps your home, family, and wallet safe and sound.

chimney maintenance

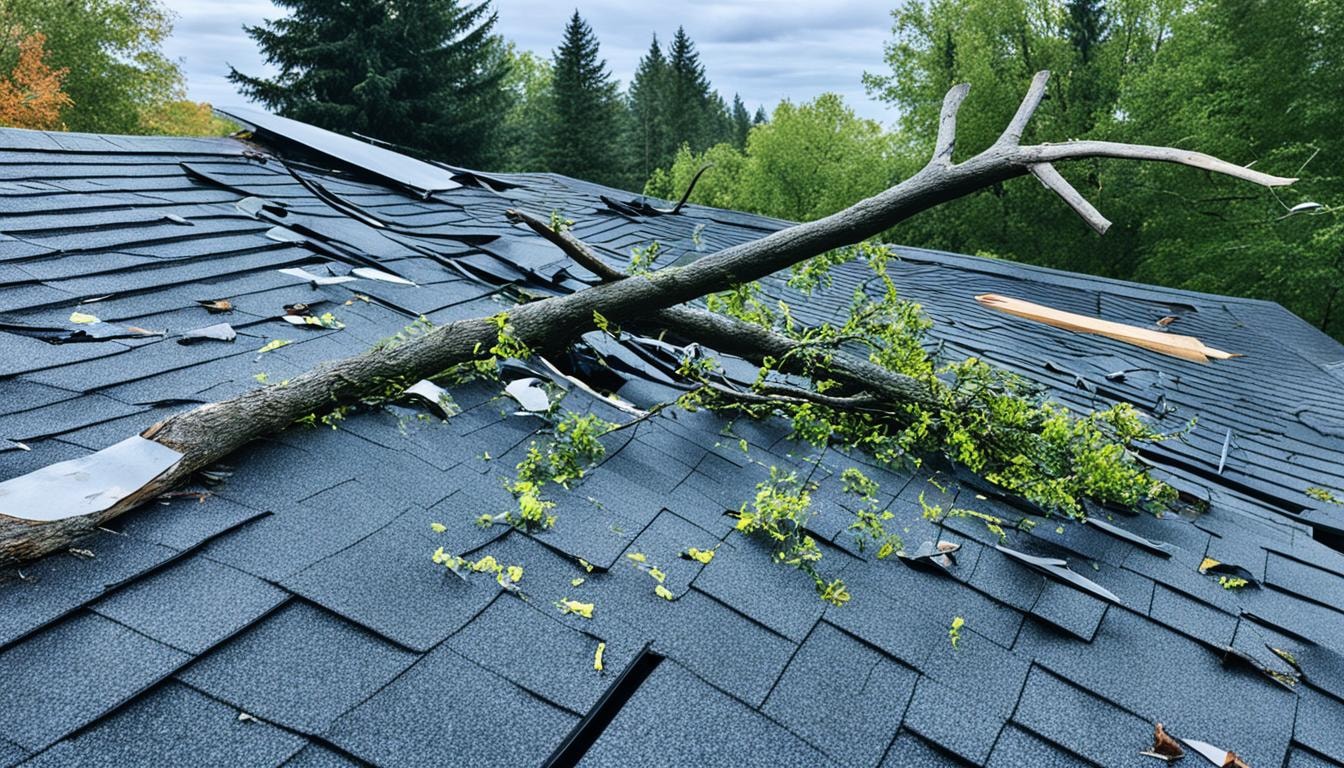
Identifying Storm Damage

Storms can cause big problems for your chimney. They might not show damage right away. Look out for missing or broken chimney caps, cracks, and water leaks. If you think a storm hurt your chimney, act fast to fix it.

Common Signs of Damage

  • Damaged or missing chimney caps
  • Cracks in the masonry
  • Water leaks or stains around the chimney
  • Unusual noises like whistling or rattling
  • Increased drafts or airflow issues

Immediate Actions to Take

If you see these signs, don’t go near the chimney. Keep back and call a pro for chimney repair right away. Waiting to fix it can make things worse and cost more later.

The Role of Professional Inspections

Getting a pro to check your chimney is key to finding storm damage. Sweeps n Ladders has the skills and tools to spot hidden problems. They’ll tell you what repairs you need and how to fix your chimney safely and well.

storm damage

Understanding Chimney Structure

Chimneys are key to a home’s heating system. They have different structures and need regular care. Masonry chimneys in older homes need constant upkeep to stop them from falling apart. Over time, the bricks and mortar can break down, causing problems and leaks.

Knowing how to care for masonry chimneys helps keep them safe and working well.

Modern homes often have prefabricated chimneys. These chimneys also need upkeep and sometimes repairs. They can get damaged in storms and wear out over time. It’s important to know how to take care of them.

Every part of a chimney, like the flue and cap, is important. Learning about these parts helps spot and fix problems early. This keeps the chimney safe and efficient.

The chimney stack’s height is key for good draft. It should be about 4.7 meters tall, straight, and well-insulated. Insulation keeps the chimney hot, helping gases rise well.

The path from the fire to the chimney top must be clear. It should be straight and vertical. Sometimes, you need to adjust the chimney’s height for turns.

Chimneys should be at least 10 feet tall to keep sparks away from flammable things. They must be at least 1-4 inches away from nearby buildings. Fireplace flue liners are also important. Bad ones can block the draft and let fire and smoke into the house.
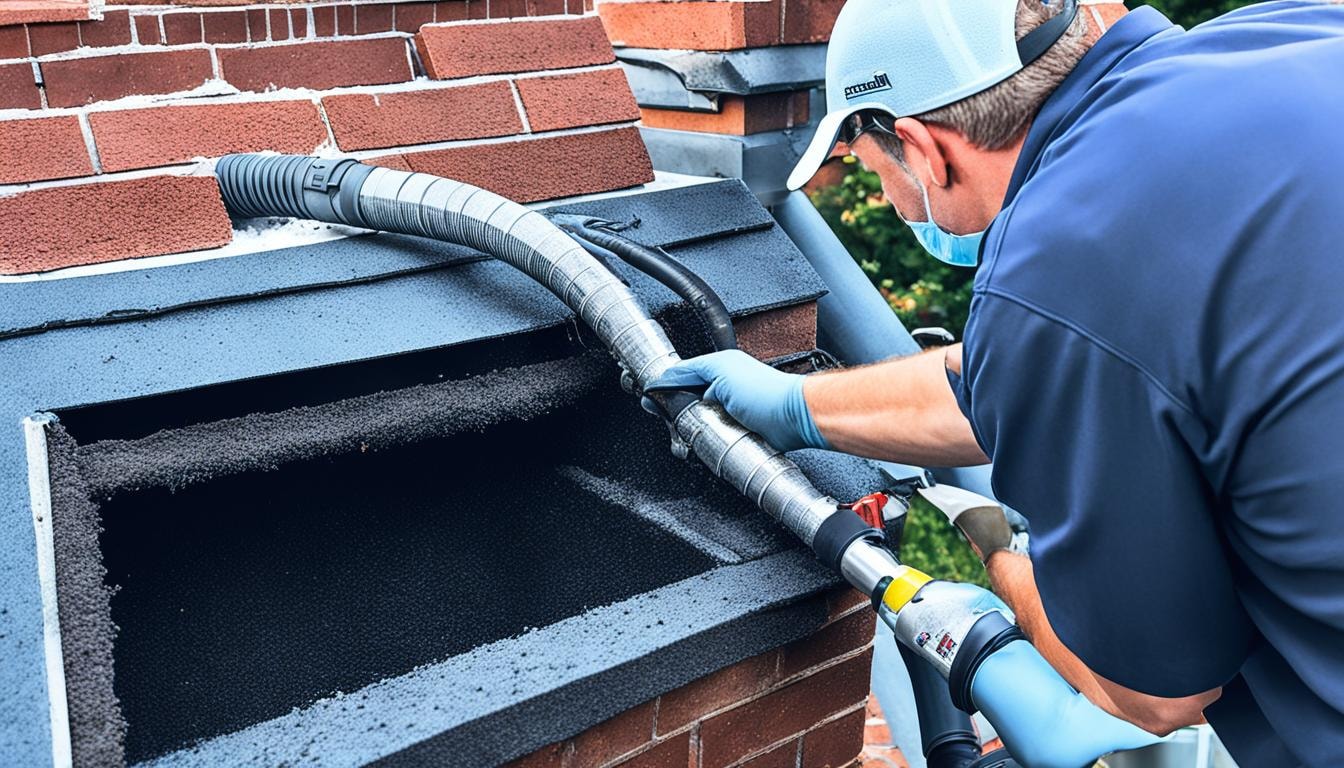
The Repair Process

Fixing your chimney is key to keeping your home safe and comfy. At Sweeps n Ladders, we start with a detailed check-up and assessment.

Inspection and Assessment

Our skilled team looks at your chimney closely. They use special tools to find any damage, visible or hidden. We check the masonry and the flue lining carefully. This way, we know exactly what your chimney needs.

Repair Solutions

After our check-up, we make a repair plan just for your chimney. This might mean fixing the masonry, the flue lining, the crown, or replacing the cap. We use top-quality materials and methods for repairs that last.

Post-Repair Maintenance

  • After fixing your chimney, keeping it in good shape is key.
  • Sweeps n Ladders offers services like regular cleanings and checks to keep your chimney safe and working right.
  • By fixing problems early, you avoid bigger issues later. This keeps your heating system efficient and safe.

At Sweeps n Ladders, we know how important a well-kept chimney is. Our experts work hard to fix your chimney right. They make sure your home is safe and comfy with a detailed repair process.

DIY vs. Professional Repairs

Homeowners often wonder if they should fix their chimneys themselves or hire experts like Sweeps n Ladders. DIY repairs might save money, but they can also lead to bigger problems.

Fixing a chimney yourself takes a lot of time, special tools, and knowledge. Without the right skills, you might make things worse. This could cause more damage, safety issues, and expensive fixes later.

Professional services like Sweeps n Ladders offer a safe and reliable fix. Their experts check the chimney, find the real problem, and fix it right. Even though it costs more upfront, it can save you money by avoiding bigger issues later.

Cost Considerations

Chimney repair costs can change a lot, based on how bad the damage is and how hard the job is. DIY might look cheaper at first, but it can get more expensive if you don’t have the right tools or make mistakes. Professional services might cost more at first, but they ensure the job is done right the first time.

The cost of fixing a chimney can be anywhere from 0 to ,000, depending on what needs to be done. DIY repairs for the chimney crown can cost 0 to ,300, but don’t forget to add in your time and effort. Think about the long-term costs and your skills before deciding between DIY or professional repairs.

When comparing DIY and professional chimney repairs, think about what’s best for your home’s safety and chimney system. Choosing professional services from trusted companies like Sweeps n Ladders might be the smart choice. It ensures your chimney is fixed right and stays safe for many years.

Chimney Flue Repair: A Comprehensive Guide

Chimneys are complex structures that can have many problems over time. It’s important to know about different chimney flue repairs. This knowledge helps fix issues safely and keeps your home efficient.

Cracked flue tiles can cause dangerous gas leaks. Fixing them quickly is key to safety. Also, if mortar joints are getting weak, you might need repointing to fix the chimney.

Chimney caps that are damaged or not in place let rain, debris, and animals in. This can cause more damage and blockages. Knowing about these repairs helps you spot problems early and save money on future fixes.

Key Chimney Flue Repair Considerations

  • Cracked flue tiles can lead to dangerous gas leaks and should be repaired promptly.
  • Deteriorating mortar joints can weaken the chimney’s structure, requiring repointing services.
  • Damaged or dislodged chimney caps can allow rain, debris, and animals to enter, causing further damage.
  • Regular maintenance and inspections can help catch issues early and prevent costly repairs.

Knowing about common chimney flue repairs helps homeowners keep their homes safe and efficient. Regular checks and quick fixes for problems ensure your chimney works well for a long time.

Preventive Maintenance Tips

Keeping your chimney in good shape needs you to act first. At Sweeps n Ladders, we stress the need for regular cleanings, checks, and safety steps. This keeps your chimney safe and working well.

Regular Cleanings

Cleaning your chimney often is key. It removes soot, creosote, and other stuff that can block airflow and raise fire risks. We suggest getting your chimney cleaned at least once a year. This is best done before you start using your fireplace again.

Routine Inspections

Getting your chimney checked by a pro once a year is a must. Our experts look at your chimney, flue, and parts to make sure they’re safe and efficient. This helps catch problems early.

Protective Measures

  • Putting chimney caps on can stop damage from weather and animals. It also makes your chimney last longer.
  • Waterproofing your chimney’s outside is key. It keeps it safe from the weather and cuts down on repair costs.

Adding these maintenance steps to your home care routine helps your chimney work well for a long time.

The Impact of Neglected Chimneys

Ignoring your chimney can be very dangerous for your home. It can cause structural damage, fire hazards, and make your home less efficient. These problems happen when people don’t keep up with chimney upkeep.

Chimneys that are not looked after can get cracks and leaks. This makes the structure weak and dangerous. Also, creosote and debris can build up, raising the risk of chimney fires.

A chimney that’s not taken care of can also make your heating system work less well. This means you might pay more for energy and feel less comfortable at home. Keeping your chimney in good shape helps it work better, so your home stays warm.

Seasons matter when it comes to chimney care. You should get your chimney ready for winter by checking it, cleaning it, and fixing any problems. Summer is a good time for maintenance and repairs too. This way, your chimney is ready for the heating season.

It’s important to protect your chimney from storms. Make sure loose parts are fixed, install caps, and fix any damage. This keeps your chimney safe from the weather and stops more problems.

Looking after your chimney regularly and fixing problems fast helps avoid big costs. It keeps your home safe and efficient for many years.

Finding the Right Experts for Your Chimney Flue Repair

At FindPros, we understand the importance of a safe and efficient chimney flue. Our platform connects you with top-rated local professionals who specialize in chimney flue repair. By completing a simple survey, you can receive multiple quotes from competing experts, ensuring you get the best pricing for your project.

Answer a few questions about your home, and within seconds, you’ll be matched with skilled pros ready to restore your chimney’s comfort and safety. Compare quotes and select the best fit for your needs, making your chimney repair process seamless and efficient.

Conclusion

Keeping your chimney maintenance up is key for your home’s safety, efficiency, and comfort. Regular checks and fixes are important. They help your chimney work well and keep your home safe.

Don’t wait for problems to start. Act early to keep your home safe and enjoy a well-kept chimney.

Chimneys are crucial for your home’s safety and efficiency. Not looking after them can cause big problems. They can handle water damage, cracks, or old parts. Their experts know how to make your chimney work great again.

Don’t let your chimney be a problem. Take care of it for your home’s safety and comfort for years.

Frequently Asked Questions (Chimney Flue Repair)

A chimney liner, such as a stainless steel chimney liner or clay flue liners, is crucial for preventing dangerous gases and moisture from leaking into the home. The flue liner helps maintain proper draft and ventilation, ensuring safe operation of the chimney.
The chimney repair cost can range from 0 to ,000, depending on the extent of the damage. Factors like replacing a damaged liner, repairing cracks in the masonry or brick chimney, and addressing issues with the chimney cap or stack can all impact the final cost.
Common signs of chimney problems include cracked flue tiles, excessive creosote buildup, and visible damage to the bricks, mortar, or chimney cap. Ignoring these issues can lead to dangerous chimney fires, poor draft, and the risk of harmful gases like carbon monoxide entering the home.
Annual chimney inspections by a professional chimney sweep are recommended, especially before the start of the heating season. During the inspection, the chimney professional will assess the condition of the flue liner, masonry, and other components, identifying any minor cracks, gaps, or other issues that may require repair.
Chimneys can be constructed from materials like brick, stone (masonry chimneys), or prefabricated metals (stainless steel liners). Brick and masonry chimneys often require more maintenance, such as tuckpointing to fill mortar joints, or even a partial rebuild if the chimney is leaning or in poor condition. Metal chimneys may need relining with a stainless steel liner over time to address draft problems or gaps.

Chain Link Fence Repair

Chimney Flue Repair Near You

Can’t find what you are looking for?

How It Works

  • Answer a few questions about your home project.
  • Within seconds, get matched with top-rated local pros.
  • Compare quotes and choose the best pro for the job.

Chain Link Fence Repair In Your Area

Choosing the Right Chain Link Fence Repair Company: A Guide

Meta Description: Find expert chain link fence repair services to restore your property’s security and appearance. Get professional advice on fixing damaged posts, rails, and fabric.

When your chain link fence gets damaged, who do you call for help? With many fence repair companies out there, picking the right one can be tough. But how do you make sure you’re choosing the best?

Chain Link Fence Repair

Key Takeaways

  • Longevity and experience in the chain link fence industry are key indicators of a reliable repair company.
  • A reputable company’s online reviews and references can reveal their level of credibility and customer satisfaction.
  • Responsiveness and clear communication are essential for a smooth repair process.
  • Assessing the quality of materials and craftsmanship used in the repair is crucial for long-term fence durability.
  • Flexibility in accommodating future fence modifications is an important consideration.

Choosing the right company for chain link fence repair is crucial. It can change how safe and good your property looks. But how do you find the experts from the ones who are just starting out? Look closely at what they can do and how well they do it. The right company will make your fence strong and look great for years.

Evaluate the Company’s Experience in Chain Link Fence Repairs

Looking for a good chain link fence repair service? It’s key to check how much experience the company has. A company with lots of years in the business knows the best ways to fix and maintain chain link fences.

Look for Longevity in the Industry

Choose a chain link fence company that has been around for a long time. This shows they can give good products and services to new and old customers. They have the resources, warranties, and knowledge to fix your fence right.

Assess their Reputation and Dependability

It’s also important to look at the company’s reputation. Ask for references from three local customers and read their online reviews. This will tell you if they are reliable and do good work. Stay away from companies that don’t answer or don’t finish what they start, as they might not be trustworthy.

chain link fence repair

Inspect the Quality of Materials and Craftsmanship

Choosing a chain link fence repair company means looking at the materials and how they’re made. This ensures the fence looks good and lasts long.

Visit places where the suppliers have put up chain link fences. Look at the fences well. Check for quality signs like:

  • Wire Diameter: Make sure the wire is thick enough to be strong and last long.
  • Mesh Size: Make sure the mesh size is right for your needs in security, seeing things, and looks.
  • Protective Coating: Check how well the fence is coated to stop rust and corrosion.

Watch out for corrosion and rust on new fences. These can mean the materials or making are not good quality. A good chain link fence should look even and clean, with no damage or wear.

Chain link fence repair

By checking the materials and making closely, you can pick a chain link fence repair company. They will give you a fence that lasts a long time and looks great.

Ensure Scalability for Future Fence Modifications

Choosing the right chain link fence provider is key. They should be able to add to or reduce your fence as needed. This keeps your fence useful for your changing needs.

Look for a chain link fence company that offers:

  • Affordable modification options to expand or reduce the size of your existing fence
  • Compatibility with your current chain link fence, allowing for easy additions or adjustments
  • Expertise in chain link fence repairs and modifications to maintain the integrity of your fencing system

Being able to change your fence size is important for the long run. Working with a provider that values flexibility helps you avoid big costs later.

With the right chain link fence provider, you can easily change your fence as your needs change. This means your fence stays useful and doesn’t cost too much for a long time.

Compare Costs and Pricing Transparency

When looking at chain link fence repairs, the cost is very important. You should choose a company that is clear about its prices. Always ask for a detailed written quote that shows the cost of materials, labor, warranty, and payment terms. This makes it easy to compare different companies.

Request Detailed Written Quotations

Make sure the quote you get is clear and easy to understand. It should list the costs, including the type of chain link fencing and the work needed. This helps you see the value of the repair.

Inquire About Free Estimates

  • A good chain link fence repair company should give free estimates with no strings attached.
  • The estimate should show you different material options and how long the fence will last.
  • This lets you pick the best option for your budget and future needs.

By looking at detailed quotes and getting free estimates, you can choose wisely. You can find a good balance between quality, cost, and how long the repair will last.

Verify Accreditations and Certifications

When picking a chain link fence repair service, check their accreditations and certifications. Companies with a good BBB rating are usually more reliable. They are seen as trustworthy.

Good chain link fence repair services should have certifications from quality agencies. These show they know their stuff, follow industry rules, and aim for top-notch work. Look for companies with AFA or other big industry group certifications.

  • Inquire about the company’s BBB accreditation and rating
  • Ask about any industry-specific certifications the company has earned
  • Verify the company’s memberships in professional industry associations
  • Ensure the company’s technicians are adequately trained and qualified

Choosing a chain link fence repair service with the right accreditations and certifications means you trust their work and services more.

Evaluate Customer Service and Communication

Choosing a chain link fence repair company means focusing on their customer service and how they communicate. You want a provider that listens to you, answers your questions, and helps you through the process. They should do this in a professional way.

The first time you talk to a sales person sets the project’s tone. Look for a company that shows:

  • Attentive and responsive customer service
  • Willingness to address all your ideas, concerns, and questions
  • Transparent and clear communication throughout the project
  • Commitment to resolving any issues that may arise in a timely fashion

Reading customer reviews can tell you a lot about a company’s service. For example, Add-A-Link Fence Co has a 5.0 rating from 133 reviews. People praised the contractor’s professionalism, honesty, and great communication. They also liked the fair prices, quality products, and the fun installation.

Caliber Fencing, LLC also got many 5-star reviews for being affordable and quick to respond. People loved their detailed, professional work. They liked how open the company was, their focus on details, and how they fixed any problems quickly.

Choosing a chain link fence repair company known for great customer service and communication means you get a smooth and easy experience. This is true from the first meeting to when the fence is installed.

Chain Link Fence Repair

Chain link fences are strong and popular for homes and businesses. But, they sometimes need repairs. Issues like a broken post, a sagging rail, or a torn fabric need quick fixes. This keeps your fence strong and looking good.

Types of Chain Link Fence Repairs

The most common types of chain link fence repairs include:

  • Fixing bent or damaged posts
  • Replacing sagging or damaged rails
  • Repairing or replacing torn or damaged fabric
  • Addressing issues caused by fallen trees or other external factors

These repairs can be simple or need more work, based on the damage and the fence size.

Factors Affecting Repair Costs

The cost of chain link fence repairs changes based on several things, like:

  1. Extent of Damage: More damage means higher costs. Fixing a small fence part is cheaper than fixing a big part.
  2. Size of Affected Area: The bigger the area, the more it costs to fix. Fixing a small area is cheaper than a big one.
  3. Materials Needed: The price of things like posts, rails, and fabric affects costs. Better materials cost more but last longer.

Labor costs and how hard the repair is can also change the price. Working with a trusted chain link fence repair pro ensures a good job and a clear cost estimate.

Choosing the Right Fence Materials

When picking a chain link fence, the steel quality and wire coating matter a lot. The hot dip method of galvanization is better than electro galvanization. It gives a thicker zinc coating for better corrosion protection.

Steel Quality and Coating

PVC-coated chain link fences are great for extra protection. They resist corrosion and weathering well.

Mesh Size and Fence Dimensions

When picking a chain link fence, think about the mesh size, height, and wire thickness. These should match your security and look needs. A US-based chain link fence maker can help pick the best for you.

Hiring a Professional Fence Contractor

Installing a chain link fence yourself might seem like a good idea. But, it’s usually better to hire a professional. They have the right skills, experience, and licenses to do the job right.

Contractor Qualifications and Licensing

Most places need a permit for putting up a fence. That’s why many homeowners hire pros to deal with permits and HOA rules. While you don’t need special qualifications to install fences, having experience in carpentry or construction is a plus.

Business licenses for fence contractors usually come under general construction laws. These laws can change from state to state.

Services Offered by Fencing Contractors

  • Fence installation
  • Fence repair
  • Fence maintenance
  • Fence design consultation
  • Utility services marking
  • Permit handling
  • Gate installation

Fencing contractors can do a lot for homeowners. They can get permits, mark where utilities are, and design custom fences. They also have access to top-quality materials. This means your fence will last longer and look better.

Hiring a pro for your fence might save you money over time. You’ll likely spend less on upkeep and repairs. With their skills and experience, pros can make sure your chain link fence turns out great.

Questions to Ask Potential Contractors

Choosing the right fencing contractor is key for your chain link fence repair or installation. Here are some important questions to ask:

  • Are you licensed and insured? This makes sure you’re protected if accidents happen or if damage occurs during the project.
  • Do you work under a general contractor, or are you the main contractor? Knowing this helps set clear expectations.
  • Do you charge by the hour or a flat rate? Knowing this helps you plan your budget.
  • Can you give me references from past customers? Checking references shows you the contractor’s quality, service, and reliability.
  • What do you expect for payment? Talk about payment terms, like deposits, progress payments, or the final payment, to avoid surprises.
  • Will you get the permits needed? Permits make sure the work meets local building codes and rules.
  • Will you call the utility locator to mark underground wires? This is important to avoid damaging wires.
  • How will you handle slopes or grades on the property? Knowing how they plan to tackle these issues helps set your expectations.
  • What’s the timeline for the project? A clear timeline helps you plan and manage the fence installation or repair.

Asking these questions helps you understand the contractor’s skills, methods, and quality focus. This ensures you pick the best team for your chain link fence project.

Choosing a Reliable Chain Link Fence Repair Partner

When it comes to restoring your chain link fence, FindPros is here to simplify your search for the right professionals. By filling out our quick survey, you can connect with top-rated local pros who specialize in fence repair. Our platform allows multiple professionals to compete for your job, ensuring you receive the best pricing available.

Plus, you can find the pros that align with your preferences, making the process smoother and more enjoyable. Answer a few questions about your home project, and within seconds, you’ll receive matched quotes that you can compare to choose the best fit for your needs. Trust FindPros to help you enhance your property’s security and appearance with expert assistance.

Conclusion

Finding the right chain link fence repair company is key for your property’s security and look. Look at their experience, reputation, materials, clear pricing, and customer service. This way, you can pick a trusted expert for your chain link fence needs.

Good chain link fence repair fixes issues like loose posts, sagging fabric, broken wires, and damaged gates. This keeps your chain link fence strong and safe. Choose a company known for great work and quick chain link fence repair service to keep your fence looking good.

If you need help with rust, bent posts, or other chain link fence problems, a skilled team can help. They offer professional advice and expert services to keep your chain link fence in top shape. By focusing on chain link fence repair, you protect your property, improve its look, and get a lasting fencing solution.

Frequently Asked Questions (Chain Link Fence Repair)

To repair chain link fabric, first locate the damaged area. Use wire ties to re-secure the fabric to the top and bottom rails. If the fabric is torn, replace the damaged section with new chain link fabric that matches the existing mesh size.
If a fence post is bent or damaged, you’ll need to replace it. Dig around the post to expose the concrete base, then use a reciprocating saw to cut the post at the base. Install a new post of the same size, ensuring it is plumb and secure in fresh concrete.
To replace a top rail, first remove any wire ties or hardware holding the existing rail in place. Slide out the old rail and measure the length needed for the replacement. Cut a new rail to size and slide it into the end fittings, securing it with new wire ties or rail couplings.
If a section is sagging, you can tighten it by adjusting the tension bands or adding additional posts. First, use an adjustable wrench to loosen the bands. Then, pull the fabric tight and retighten the bands. You may also need to install an additional post to provide more support.
To replace damaged chain link fabric, first remove the existing fabric from the top and bottom rails. Cut the new fabric to size, making sure it matches the diamond pattern and height of the original. Attach the new fabric using wire ties, starting at the corners and working your way along the top and bottom rails.

Ceramic Tile Installers

Chimney Flue Repair Near You

Can’t find what you are looking for?

How It Works

  • Answer a few questions about your home project.
  • Within seconds, get matched with top-rated local pros.
  • Compare quotes and choose the best pro for the job.

Ceramic Tile Installers In Your Area

Ceramic Tile Installers: A Guide to Hiring the Right Professional

Meta Description: Discover how to choose the right ceramic tile installers for your project. Learn about qualifications, costs, and key factors to ensure a successful installation.

Not every tile project is a good fit for DIY. If you’re dealing with complex patterns, tough applications, or a tight deadline, it’s best to hire a pro. Mistakes in tile work can be hard to hide and might mean redoing the whole project. An experienced tile installer can save you time, money, and stress by bringing the needed skills for a good install. But, how do you find the right professional for your project?

Ceramic Tile Installers

Key Takeaways

  • Recommended to hire a tile installer with at least three years of experience
  • Commercial contractors often have knowledge of the best tile installers due to their vast experience
  • Membership in the NTCA (National Tile Contractors Association) is recommended for pro-grade job quality
  • Training through the Ceramic Tile Education Foundation (CTEF) is advised to keep installers equipped with the latest techniques
  • Certified Tile Installer (CTI) certification confirms passing a third-party assessment of tile experience and knowledge

Importance of Hiring a Professional Tile Installer

Hiring a professional tile installer is key for a great job. DIY might seem easy, but it can lead to big problems. Professionals bring skills and experience for a top-notch tile job.

Why DIY Tile Installation Can Be Risky

DIY tile work is hard and can take a lot of time. Mistakes like uneven tiles or wrong grout can be hard to fix. These errors can cause cracked tiles, water damage, and quick wear, ruining your tile floors.

Benefits of Working with Experienced Professionals

  • Professionals have the training, knowledge, and skills for a lasting tile job.
  • They use proper tools and technology for efficient and precise work, saving your money.
  • They finish the job quickly, causing less disruption and letting you enjoy your new floor faster.
  • Many offer warranties or guarantees on their work, giving you peace of mind.
  • Choosing a pro installer can save you money by avoiding costly mistakes later.

Hiring a pro tile installer is a smart choice. Their skills and dedication mean a beautiful, lasting tile floor for your home or business.

professional tile installers

Ceramic Tile Installers: Qualifications and Certifications

When you’re looking for a tile installer, check their qualifications and certifications. Make sure they are licensed, insured, and bonded. This ensures they meet the needed requirements and protect you and your property.

Being a member of groups like the National Tile Contractors Association (NTCA) or getting a certificate from the Ceramic Tile Education Foundation (CTEF) shows they keep up with the latest in the field. It means they are committed to doing a great job.

Checking for Licenses and Insurance

Good tile installers have the right licenses and insurance. This makes sure they can legally work and protect your money. Check if they are licensed in your area and have liability insurance to cover any damages or injuries during the project.

Also, make sure they are bonded. This adds more financial protection for you.

Membership in Professional Organizations

Tile installers in groups like the NTCA or CTEF get training and access to resources. These memberships show they aim for excellence and keep up with new installation methods and safety rules. Look for installers who show off their memberships and certifications.

Checking the qualifications and certifications of your ceramic tile installers gives you confidence. You know they can do a top-quality job that follows industry standards and protects your investment.

tile installer credentials

Finding Reputable Tile Installers

Finding a good tile installer is key. Ask people you know for advice. Friends, family, or coworkers who’ve had good tile work done can tell you who to trust.

Talking to local tile shops, designers, or contractors is also smart. They know a lot about tile installers in your area. They can suggest good ones they’ve worked with.

Seeking Referrals and Recommendations

  • Ask friends, family, and coworkers about their tile installation experiences.
  • Get advice from local tile shops, designers, or contractors.
  • Check out online reviews and ratings for tile installers in your area.
  • Look for tile installers in professional groups like the NTCA or CTEF.

Doing your homework to find a good tile installer makes your project go smoothly. You’ll get the look you want for your home or business.

Evaluating Tile Installers’ Experience and Portfolio

When looking for ceramic tile installers, check their experience and past work. Choose installers with over two years of full-time experience. Look at their completed projects for even grout lines and tile spacing. This shows their skill level and if they can do your project.

Years of Experience in Tile Installation

Hiring qualified labor is key for a job that lasts. Tile setters or installers should know the TCNA and ANSI rules well. This ensures they do a great job.

Assessing Completed Projects and Quality of Work

Looking at an installer’s portfolio tells you about their skill. Check for projects like yours and look at the grout lines and tile spacing. Online reviews can also tell you about their work and how happy customers are.

Interviewing and Vetting Potential Hires

When hiring ceramic tile installers, the interview is key. It lets you check their skills, experience, and how they approach the job. By asking the right questions, you can learn a lot. This helps you make a choice that will lead to a great tile installation.

Important Questions to Ask Tile Installers

When talking to ceramic tile installers, make sure to ask these questions:

  • How long will the project take? Good installers give a timeline that considers the work’s size and any possible issues.
  • How much tile will be needed? Skilled installers know how many tiles you’ll need, including any cuts or pattern matching.
  • How many people will work on the project? Trustworthy contractors have a team to make sure the installation is done well and quickly.
  • Have you worked on similar projects before? Ask about their experience with projects like yours, in places like bathrooms, kitchens, or floors.

These questions help you understand the installer’s skills, how they communicate, and their focus on details. All these are key for a successful tile project.

Ceramic Tile Installers: Reviewing Quotes and Contracts

When you’re looking for ceramic tile installers, it’s key to check their quotes and contracts closely. A good quote should list the cost of materials, labor, how long it will take, and any extra fees. Watch out for quotes that seem too low, as they might mean poor work or hidden charges.

Make sure the contract has all the project details. This includes what work will be done, what materials will be used, when it will be finished, how you’ll pay, and warranty info. Paying attention to these details helps protect you and the installer during the project.

  • Look over the quote well, making sure it breaks down material and labor costs.
  • Get quotes from several tile installers to make sure you’re paying a fair price.
  • Check the contract well, making sure all terms and conditions are clear.
  • Talk about any worries or questions with the tile installer before signing the contract.

By looking at quotes and contracts closely, you can make a smart choice. This way, you can avoid unexpected costs and problems later on.

Find the Right Tile Installer with FindPros

At FindPros, we make it easy to connect with top-rated local ceramic tile installers who meet your specific needs. By filling out our simple survey about your home project, you can quickly receive multiple quotes from qualified professionals competing for your job.

This not only helps you find the best pricing but also allows you to choose installers you feel comfortable working with. In just seconds, you can compare options and select the perfect pro for your tile installation. Let us help you ensure a successful and stress-free project.

Conclusion

Finding the right ceramic tile installers is key for a great tile installation project. This guide helps you find skilled tile installers who can make your dream come true. Always check their background, ask for references, and look over their quotes and contracts carefully.

This will help you hire the best tile contractor. Doing so leads to a beautiful, lasting tile installation that boosts your home‘s look and value.

Tiles are very durable. They can take a lot of foot traffic without getting damaged. They’re great for busy spots like kitchens, bathrooms, and entryways.

Ceramic tiles are also easy to keep clean. Just wipe them with a damp cloth or mop with warm water and mild soap for deeper cleaning.

Ceramic tiles come in many styles, colors, patterns, and textures. They match both modern and traditional designs in any home décor. Even though they cost more to install than some other flooring, they save money over time.

This is because they last a long time and need less cleaning and repairs. Ceramic tiles are also good for the planet. They’re made from natural stuff and don’t have harmful chemicals.

Frequently Asked Questions (Ceramic Tile Installers)

Homeowners should look for members of professional organizations like NTCA which show the installer’s expertise to correctly install tile using mortar.
Tile installers can expand their ability and best serve consumers by getting certified and continuing their education to stay updated on the latest techniques for installing tiles like marble backsplashes.
Installing laminate is simpler than laying tile which requires more expertise to properly install using thinset mortar and grout and making sure there are no gaps in between for tiles like porcelain or ceramic.
Homeowners should ask about the installer’s experience, how long they’ve been in business, views of past clients, and ability to complete the job on time and to the homeowner’s satisfaction.
Being part of professional associations and getting certified shows tile installers commitment to the trade and that they have the matter expertise to correctly install tiles and address any installation concerns to best serve consumers and sell their services.

Central Vacuum Installers

Chimney Flue Repair Near You

Can’t find what you are looking for?

How It Works

  • Answer a few questions about your home project.
  • Within seconds, get matched with top-rated local pros.
  • Compare quotes and choose the best pro for the job.

Central Vacuum Installers In Your Area

Central Vacuum Installers: Your Guide to a Cleaner Home

Meta Description: Discover expert central vacuum installers for a cleaner, healthier home. Learn about installation, maintenance, and the benefits of central vacuum systems. Get started today!

Imagine a home that stays spotless and free from allergens with just a button push. This dream is possible with professional central vacuum installers. But what makes central vacuum systems great, and how do you get one installed easily? Get ready to learn how a central vacuum system can change your life and answer your questions.

Central Vacuum Installers

Key Takeaways

  • Discover the advantages of a central vacuum system for a cleaner, healthier home
  • Learn about the different types of central vacuum systems and how to choose the right one
  • Understand the essential steps in planning and installing a central vacuum system
  • Explore the importance of proper maintenance and troubleshooting for optimal performance
  • Uncover the cost-saving benefits of a well-maintained central vacuum system

The Importance of Central Vacuum Systems

Central vacuum systems have changed the way we clean our homes. They offer more power and ease than traditional vacuums. Knowing the benefits and types of central vacuum systems helps homeowners choose the right one for their needs.

Benefits of a Central Vacuum System

Central vacuum systems make cleaning better and air cleaner in your home. They have strong suction and can hold a lot of dirt, so you don’t have to empty them often. They also cut down on dust and allergens in your home.

These systems are easy to use and convenient. You can move around easily with their light hoses. They also don’t make much noise, making cleaning quieter.

Types of Central Vacuum Systems

There are different kinds of central vacuum systems, each with special features. Cyclonic systems are great for their strong suction. Filtered systems are cheaper and need less upkeep but you must change the filters often.

Compact central vacuum systems are perfect for small homes or apartments. They have smaller motors but still suck up well. Wet/Dry systems can clean both wet and dry messes. They’re great for places that get wet often, like garages or workshops.

central vacuum

Planning Your Central Vacuum Installation

Planning is key for a successful central vacuum setup, in new or old homes. Finding the best spot for the power unit and designing a smart tubing system are important steps.

Determining the Optimal Location for the Power Unit

The power unit should be in a warm spot, like a utility room or garage. This keeps it dry. Pick a spot that’s easy to get to but not too obvious, for upkeep.

Designing the Tubing System Layout

Put the tubing under the floor, in the attic, or along walls for the best route. This makes sure the system works well. The pipes should be 2 inches wide. Good ventilation and following the rules are also key for a safe setup.

  • Diameter of through-holes in walls for the piping system should be 2-3/16″ to 2-1/2″
  • Minimum diameter of the exhaust pipe is 2-1/8″
  • Typically, only two inlet valves are needed for installation in a house
  • Power unit is usually located in the garage in a house of similar size
  • Inlet valves are recommended to be placed in entrance halls and hallways
  • Diameter of the hole drilled in the wall for inlet valve installation is 2-3/8″

Plan well for the power unit and tubing to get a central vacuum that works great and meets the rules.

central vacuum tubing layout

Installation Processes and Techniques

Installing a central vacuum system needs special tools and safety steps. It’s important to know the process, whether you do it yourself or hire a pro. This knowledge ensures a smooth setup.

A standard central vacuum installation costs between ,200 and ,800. This method is quick, has a small wall inlet, and lets you use universal hoses. But, it means you’ll need more space to store the hose and move it to different inlets.

For ,400 to ,900, you can get a Hide-A-Hose system. It has fewer inlets and a retractable hose for easy storage. But, it’s harder to install and doesn’t work with electric vacuum brushes for carpets.

A mix of standard and Hide-A-Hose installations, costing ,400 to ,000, is great for two-story homes. It combines the best features of both.

Optional Installation Accessories

  • VacPan Automatic Dustpan (0 – 0): Makes cleaning easy by sweeping dirt into the foot switch.
  • Stretch Hose ( – ): A flexible hose for quick clean-ups in busy spots.
  • WallyFlex (0 – 0): An extra hose for detailed cleaning in small areas like the pantry or laundry room.

A 30-foot plug-in hose covers 700-1,000 square feet. A 50-foot retractable Hide-A-Hose can handle about 2,300 square feet.

For homes already built, you can update central vacuum systems with new units and accessories. This is good for new builds and updates.

The cost and process depend on your home’s size, the vacuum type, and if you install it yourself or hire someone. Knowing the techniques and tools helps you choose wisely for your needs and budget.

Maintenance and Troubleshooting

Keeping your central vacuum system working well needs regular upkeep. By sticking to a detailed routine, you can make sure it runs efficiently. This helps it last longer and keeps the air in your home clean. Let’s look at the key maintenance steps and common problems with solutions.

Routine Maintenance Checklist

  • Regularly check and clean the filters, and replace them when needed to keep the suction strong.
  • Look over the hoses for any damage, cuts, or blockages, and replace them if needed.
  • Check the connections and fittings in the system, tightening them if needed to stop air leaks.
  • Empty the collection canister or bag when it’s full to keep the suction strong.
  • Have a professional check your system every two years. This includes cleaning the vacuum lines, servicing the motor, and checking how well it works.

Common Issues and Troubleshooting Tips

Even with good maintenance, you might run into problems with your central vacuum system. Here are some common issues and how to fix them:

  • Clogged tubing:Look at the inlets farthest from the vacuum unit. Use a plumber’s snake or fish-tape to clear any blockages.
  • Less suction: Clean or change the filters, check for air leaks, and make sure the collection canister isn’t full.
  • Strange noises: Find out where the noise is coming from. It could be a blockage, a worn-out part, or a motor issue.
  • Dust in the house: Check the filters and hoses for clogs. Think about getting a professional to check your central vacuum system.

By keeping up with central vacuum maintenance and fixing problems fast, you can keep your system working well. This means you’ll have great air quality and your system will last longer. A well-kept central vacuum system can clean your home efficiently for many years.

Discover the Best Local Central Vacuum Installers

At FindPros, we connect you with top-rated local professionals who specialize in central vacuum system installation. By filling out our simple survey, you can receive multiple quotes from qualified installers competing for your project, ensuring you get the best pricing.

Our platform allows you to compare options and select the pros you feel most comfortable working with. Answer a few questions about your home project, and within seconds, you will be matched with experts ready to help you achieve a cleaner, healthier home. Let us simplify your search for the perfect central vacuum installer today.

Conclusion

Central vacuum systems make cleaning easy and keep your home healthy. Working with experts ensures a smooth setup and long-term benefits. These systems improve air quality, cut down on allergens, and boost your home’s value.

For over ten years, builders and homeowners have chosen central vacuums. They last three times longer than old models and motors can go up to 20 years with care. These vacuums need less upkeep than traditional ones, making them a smart pick for cleaning.

To get the most from your central vacuum, follow the care tips in this guide. This way, your system will work well for many years. It makes cleaning easier, safer, and more convenient. Central vacuum systems are a great way to make your home better and more valuable.

Frequently Asked Questions (Central Vacuum Installers)

It’s recommended to get your central vacuum system serviced every 2 years by professional technicians to keep it running efficiently and maintain optimal performance.
Yes, existing central vacuum systems in homes can be updated with new power units and accessories as needed. This allows older systems to benefit from modern conveniences.
Installation processes do differ between new construction projects versus existing homes. New builds have more flexibility while retrofits require special techniques to update central vac lines without damaging offices or beams.
Professional central vacuum repair companies can perform maintenance, repairs and service of systems. Their technicians are trained to efficiently address issues, perform maintenance and maintain or replace parts to keep customers’ central vacuums running efficiently.
Well-known central vacuum brands that technicians frequently provide repairs and services for include Electrolux, which is a leader in central vacuum innovations for both convenience and cleaning performance in homes.

Ceiling Tile Installation

Chimney Flue Repair Near You

Can’t find what you are looking for?

How It Works

  • Answer a few questions about your home project.
  • Within seconds, get matched with top-rated local pros.
  • Compare quotes and choose the best pro for the job.

Ceiling Tile Installation In Your Area

Hire the Best: A Guide to Ceiling Tile Installation Services

Meta Description: Discover expert ceiling tile installation services. Learn about types, costs, and benefits to transform your space with professional results. Find top installers today.

Are you tired of looking at a dull, outdated ceiling? A professional ceiling tile installation could change that. But, where do you start? This guide will help you find the best ceiling tile installation services. You’ll learn about different types of tiles, how to pick experienced contractors, and how to plan your budget.

Ceiling Tile Installation

Key Takeaways

  • Discover the advantages of professional ceiling tile installation over a DIY approach.
  • Learn about the different types of ceiling tiles, including surface mount and drop ceiling options.
  • Understand the various installation methods and the tools and materials required for a successful project.
  • Discover how to find and vet experienced ceiling tile installation contractors.
  • Explore the factors that influence the cost of ceiling tile installation and how to budget for your project.

What is Ceiling Tile Installation?

Ceiling tile installation means putting in surface mount or drop ceiling tiles. Surface mount tiles go right on the ceiling. Drop tiles fit into a grid system. Knowing the difference between these tiles is key for a successful project.

Surface Mount Ceiling Tiles

Surface mount tiles go straight on the ceiling. They’re light and made of materials like mineral fiber or vinyl. These tiles hide old or uneven ceilings. They’re great for DIY fans because they’re easy to put up and can be used in many ways.

Drop Ceiling Tiles

Drop tiles hang from the ceiling joists in a grid. They’re often seen in places like offices and schools. These tiles make it easy to get to the space above for upkeep and installing wires or HVAC systems.

surface mount and drop ceiling tiles

Benefits of Professional Ceiling Tile Installation

Choosing between DIY and a pro for ceiling tile installation can change your space a lot. Going pro can bring many benefits that make your home look and work better.

Experts in ceiling tile installation bring a lot of know-how and experience. They make sure the job is done right, giving you a beautiful finish. This makes your space look better, especially where details matter a lot.

  • Improved indoor air quality: Pros know how to pick tiles that help your home breathe better. This means cleaner air for you and your family.
  • Increased energy efficiency: The right tiles can make your home more energy-efficient. Pros can guide you to save money on bills.
  • Enhanced aesthetic appeal: Working with pros means your ceiling tiles will look great with your home’s style. This makes your space look more put together and stylish.

Choosing professional ceiling tile installation does more than just change your space’s look. It means a job done right, with less stress for you. You’ll get a result that goes beyond what you hoped for, making your ceiling tile project a smart choice.

benefits of professional ceiling tile installation

Preparing for Ceiling Tile Installation

Getting ready is key for a successful ceiling tile project. First, collect the tools and materials you need. Also, think about safety first.

Tools and Materials Needed

Having the right tools and materials helps with a smooth installation. You’ll need:

  • Utility knife for cutting tiles to size
  • Tape measure to measure the ceiling
  • Chalk line for tile placement
  • Tin snips or aviation snips for cutting
  • Hammer or nail gun for securing tiles
  • Specific nails or screws for the tile type
  • Adhesive for overhead use
  • Ladder or scaffolding for reaching the ceiling
  • Safety glasses and gloves for protection

Safety Precautions

Keeping yourself and others safe is very important. Here are some steps to follow:

  • Wear safety glasses and gloves to protect yourself.
  • Make sure the area is well-ventilated to avoid breathing in harmful particles.
  • Be careful on ladders or scaffolds, and make sure they’re secure.
  • Dispose of debris or waste properly to keep the area safe.

Preparing well and focusing on safety makes the ceiling tile installation go smoothly.

Surface Mount Ceiling Tile Installation Methods

Homeowners have two main ways to install surface mount ceiling tiles. They can use the Easy Up system or adhesive. The Easy Up system uses a hidden metal track for more stability and strength. Or, they can stick the tiles on with a strong adhesive. But, the ceiling must be smooth and dry for this method.

Easy Up Installation System

The Easy Up system is a top pick for installing surface mount ceiling tiles. It has hidden metal tracks for extra stability and strength. These tracks are easy to attach to the ceiling. They make a solid base for the tiles.

Using Adhesive

Applying a strong ceiling tile adhesive is another way to install these tiles. It’s simpler than the Easy Up system but needs a smooth ceiling. The guide says to use adhesive only on a solid, even surface. Also, test it on painted surfaces first to avoid problems.

Knowing the good and bad of each method helps homeowners pick the right one for their project. This way, they can make sure their surface mount ceiling tile installation goes well.

Drop Ceiling Tile Installation

Installing a drop ceiling is more complex than putting up surface mount tiles. It makes a grid framework that holds the ceiling tiles up. This lets you get to the space above easily.

The grid is made with metal tracks and cross-tees on the ceiling joists. The tiles fit right into the grid, making a neat look. It also lets you get to the area above for upkeep or changes.

  • Ceiling tile sizes commonly used are 24″ x 24″ and 24″ x 48″.
  • Ceiling planks typically measure 5″ x 84″ in size.
  • The grid system can be installed using either the Armstrong EASY UP Installation System or adhesive for a direct applied surface mount.
  • A minimum drop of 4″ is required when installing below drywall to allow access above the panels.

Getting ready is key for a good drop ceiling tile install. Make sure the tiles get used to the room’s temperature for at least 24 hours before putting them up. Keep them in a spot between 60°F and 80°F.

To start, hang the main beams and cross-tees well. Make sure the grid is square by checking the diagonals of the 2’x4′ openings. You’ll need the right tools like chalk lines, knives, and laser levels.

By following the best ways to install drop ceiling tiles, you can make a ceiling that looks good and is easy to get to. This is true for both homeowners and pros.

Ceiling Tile Installation Costs

Installing ceiling tiles can cost a lot, depending on many things. The price depends on the materials and the work needed to put them up.

Material Costs

Materials for ceiling tiles can be cheap or very expensive. They can cost from .97 to .26 per square foot. The type of material you pick affects the price.

Fiberboard tiles are the cheapest, costing .80 to .60 each. PVC or plastic tiles are next, priced between to each. Metal or tin tiles are pricier, costing to each. Wood tiles are the most expensive, ranging from .66 to .00 each.

Labor Costs

Labor costs for installing ceiling tiles also vary a lot. They can range from .97 to .26 per square foot. This depends on the project’s size and the workers’ skills.

A professional might charge to per hour for a new drop ceiling. Licensed contractors might ask for to 5 per hour. The time it takes to finish the job also affects the cost. A pro can install 30 to 40 square feet of tiles per hour.

When planning a ceiling tile project, remember to think about both the cost of the tiles and the work needed. Knowing these costs helps you make smart choices and have a successful project.

Hiring a Professional Ceiling Tile Installation Service

Getting a new ceiling can change your space a lot. It’s key to hire pros for a good job. Checking out different contractors and their prices helps you pick the best one.

Vetting Ceiling Tile Installation Contractors

Before you hire someone, make sure they’re right for the job. Check their licenses, insurance, and references. They should have the skills and experience needed for a great job. Always ask for proof of their qualifications.

Getting Quotes for Ceiling Tile Installation

Getting quotes from several contractors helps you find a good deal. Compare prices and what they offer. Remember, the cheapest might not always be the best choice. Quality and expertise can vary a lot.

Doing your homework to pick the right service means a smooth and great result. Think about their experience, the quality of their work, and the value they offer. This will help you make a smart choice.

Enhance Your Space with FindPros

Transforming your ceiling into a stunning focal point is just a few clicks away with FindPros. Our platform connects you with top-rated local ceiling tile installation professionals who compete for your project, ensuring you receive the best pricing available.

By answering a few simple questions about your home project, you can quickly get matched with experienced contractors who align with your vision and budget. Compare quotes and choose the installer that fits your needs best, making your ceiling renovation both seamless and satisfying. Let FindPros help you elevate your space today.

Conclusion

Ceiling tile installation changes the look and feel of any space. Choosing between surface mount or drop ceiling tiles is important. Hiring a pro can make the process smooth and ensure quality work.

It’s key to know the different ways to install and plan your budget. Also, pick a contractor carefully. This way, you can find the best service for your needs. There are many tile materials, styles, and ways to customize your ceiling.

Going for a pro service can save you time, money, and stress. They bring their skills and experience to the table. This means you get the look you want without the hassle. So, start improving your space by contacting a trusted ceiling tile installation service today.

Frequently Asked Questions (Ceiling Tile Installation)

Drop ceiling grids are a framework of metal tracks and cross-tees that hold the ceiling tiles in place, allowing easy access to the space above. Surface mount ceilings involve directly adhering the tiles to the existing ceiling.
The two main installation methods for surface mount ceiling tiles are the Easy Up system, which uses hidden metal tracks, and directly applying adhesive to the existing ceiling.
Before installing new ceiling tiles, you need to ensure the existing ceiling is smooth, clean, and dry. This may involve repairing any cracks or uneven areas in a plaster or drywall ceiling.
To install a drop ceiling, you first need to install the main ceiling grid, making sure it is level and square. Then, the ceiling tiles can be fit snugly into the grid openings. Proper measurement and cutting of the tiles is important to get the right fit.
The cost of a ceiling tile installation project depends on the type of tiles used (e.g. mineral fiber, PVC, wood), the labor required, and the size of the area being covered. Additional factors include any necessary ceiling preparation and the complexity of the installation method.

Ceiling Painters

Chimney Flue Repair Near You

Can’t find what you are looking for?

How It Works

  • Answer a few questions about your home project.
  • Within seconds, get matched with top-rated local pros.
  • Compare quotes and choose the best pro for the job.

Ceiling Painters In Your Area

Hire the Best Ceiling Painters: A Guide to Finding the Right Professional

Meta Description: Discover expert ceiling painters for your project. Learn how to choose skilled professionals, ensure quality work, and transform your space with a fresh coat of paint.

Painting your home can make it look better and increase its value. But, have you thought about finding the best ceiling painters near you? Choosing the right professional is key for a great finish and a worry-free experience.

Working with a skilled ceiling painter has many benefits. They ensure your project is done on time and within your budget. They also deliver top-notch work. But, with so many choices, picking the right one can be tough. Let’s look at what to consider to make a good choice.

Ceiling Painters

Key Takeaways

  • Painting is a fast way to boost your home’s value and look.
  • Professional ceiling painters have the skills and tools for a job well done, on time, and within budget.
  • Choosing a local painter means they know the area’s weather and can quickly respond if needed.
  • It’s important to check their licenses, insurance, and past work for quality results.
  • Getting several estimates and comparing them, not just prices, helps find the best value for your project.

Why Hire a Professional Ceiling Painter?

Hiring a pro for your ceiling painting has many benefits over doing it yourself. Local ceiling painting pros know the area well. They can get top-notch materials at lower prices. They have the right tools, experience, and safety gear to do the job right.

Benefits of Hiring a Local Ceiling Painter

Experts can pick colors to make rooms look bigger or deeper. They check your ceiling and trims to give you a fair quote. They help pick the best paint for your needs, like color, washability, and coverage.

Reasons to Avoid DIY Ceiling Painting

  • Painting your ceiling yourself can be risky and lead to bad results if you don’t have the right skills and tools.
  • It takes more time than hiring pros, who finish faster.
  • You might not have the right tools like special brushes or sprayers, which pros use for better results.
  • Pros save you 3-4 days of work, including prep, painting, and clean-up.

Hiring a pro ceiling painter brings many benefits. You save money and get a job done well and fast. With their skills and tools, you avoid DIY problems and get great results.

professional ceiling painter

How to Find Local Ceiling Painting Contractors

Finding the right ceiling painter is key for a great project. Start by doing deep online research. Check out sites like Angie’s List or HomeAdvisor for reviews and contractor reputations. This helps you see their work quality, customer service, and reliability.

Online Research and Review Sites

Looking at online reviews can show you top ceiling painters. Search for companies with lots of positive feedback and high ratings. Good reviews mean they’re skilled, professional, and pay attention to details.

Word-of-Mouth Referrals

  • Word-of-mouth is powerful. Ask friends, neighbors, or community groups for painter tips. They can point you to reliable contractors.
  • Ask your social network about their painter experiences. They can tell you about the work quality, service, and how they felt about the project’s cost and timeline.
  • Also, check with local hardware stores or community boards for painter recommendations in your area.

local ceiling painting contractors

Use online research and personal tips to make a list of good ceiling painters. They should have a history of great work and top-notch service. This helps you pick the best one for your project.

Vetting Potential Ceiling Painters

Before you hire a ceiling painter, make sure they’re a good match for your project. Check their licenses and insurance. Also, look at their past work and references.

  • Checking Licenses and Insurance: Ensure the painter has the right licenses and insurance. This keeps you safe if accidents happen during work. A skilled painter will have all the needed licenses and insurance for a safe, successful job.
  • Viewing Past Work and References: Ask for photos or samples of their past work. This shows you the quality and skill you’ll get. Also, ask for references to learn about their work habits, communication, and customer service.

Choosing a professional and experienced ceiling painter is key for a good job. By carefully vetting potential ceiling painters, you’ll know you made the right choice. This gives you peace of mind during the project.

Obtaining Estimates from Ceiling Painters

When you want your ceiling painted, it’s key to get quotes from several pros. This lets you see the costs and find the best deal. Make sure the quotes are in writing. They should cover the work, when it will be done, and how you’ll pay.

Understanding Pricing Factors

The cost to paint your ceiling changes a lot. Labor makes up 70% to 85% of the total cost. Knowing how the painter charges for their time is important. The size of the area, the ceiling’s condition, and the paint type also affect the price.

Here are some things to think about:

  • Paint can cost from to per gallon, with most around to .
  • Skilled painters buy paint at about half the price of what you or owners pay.
  • Painting a ceiling can be to per square foot or 0 to 0 for a 12′ x 12′ room.
  • Textured or popcorn ceilings add to per square foot more.
  • Adding trim and crown molding can be an extra to per foot.

Knowing these costs helps you check the quotes from ceiling painters. This way, you can make sure you’re paying a fair price for the work.

Preparing for the Ceiling Painting Project

Before you start painting your ceiling, make sure the work area is ready. This makes the process smooth and efficient. It also helps avoid disruptions and ensures the job is done well.

First, clear the work area. Move out any furniture, decor, or items that could block the painters. This lets them reach the ceiling easily and protects your things from damage.

Then, protect the remaining furniture and surfaces. Use drop cloths or plastic sheeting to cover furniture or floors you can’t move. This keeps them safe from paint spills and keeps the area clean.

Think about your household’s schedule and talk to the painters. Pick a time when your home is quiet to reduce mess and make the work go smoothly.

Last, prioritize safety as you prepare. Make sure the area is bright and safe. If you hire a pro, they know how to do the job safely and well.

These steps help set up a great ceiling painting project. They let the painters work well and give you a beautiful finish.

Evaluating the Ceiling Painting Process

A good ceiling painting job is more than just putting on paint. Pros start by fixing any cracks or holes, sanding, and cleaning the area. This makes sure the finish is smooth and looks great.

Surface Preparation and Repair

Most coating failures happen because the surface wasn’t prepared right. Things like oil, grease, and old paint can cause problems. Experts use safe cleaning methods to get the surface ready for new paint.

Priming and Painting Techniques

Priming the ceiling is key for better paint adhesion and coverage. Pros pick top-quality primers and paints for the best results. They use different tools like sprayers, brushes, and rollers, based on the job’s needs.

Watching the painting process shows you it’s done right. Skilled teams aim for a great finish and use materials wisely. This saves time and money, making clients happy.

Clean-up is done in an eco-friendly way, following laws. After finishing, experts check everything to make sure you’re happy. They answer any questions and talk about how to keep the ceiling looking new.

Assessing the Quality of Work

After the ceiling painting is done, make sure to check the work well. Look for a smooth, even finish without any spots or drips. The painters should fix any flaws to make the space look perfect.

Inspection and Touch-ups

When checking the ceiling painting, watch for these things:

  • Even paint without brush strokes or roller marks
  • Color that’s the same everywhere, with no bare spots
  • A smooth surface without drips or splatters
  • Clean lines where the ceiling meets the walls

If you see problems, tell the painters and ask them to fix them. A professional job should make you very happy with the outcome. Ask for more work until you’re completely satisfied.

By inspecting the ceiling painting and getting touch-ups, you can get a professional finish and satisfaction. Checking the work well makes you sure your money was well spent on a skilled painter.

Connect with Top Ceiling Painters Effortlessly with FindPros

Finding the right ceiling painter can significantly enhance your home’s aesthetics and value. At FindPros, we simplify this process for you. By filling out a quick survey about your home project, you can connect with top-rated local professionals who are eager to compete for your job.

This competition ensures you receive the best pricing while finding pros that align with your preferences. Within seconds, you’ll get matched with skilled painters, allowing you to compare quotes and choose the best fit for your needs. Let us help you transform your space with ease and confidence.

Conclusion

Finding the right ceiling painter is key to a great paint job. This guide helps you pick skilled pros for your ceiling. It makes your space look new and fresh.

Want to update your living room or bedroom? A new paint job can change everything. With skilled painters, your project will look amazing. They focus on details and make sure you’re happy.

Choosing the best ceiling painters changes your space for the better. They give you a paint job that lasts. So, do your homework and find the best in your area. This way, your home will look better than ever.

Frequently Asked Questions (Ceiling Painters)

Professional ceiling painters have the right skills, tools, and experience to do an excellent job. They can finish the project faster, ensure quality work, and stay within your budget.
You can start by researching online reviews, asking for referrals from friends or neighbors, and checking with local hardware stores. This will help you find reputable and skilled ceiling painters in your area.
Before the painters arrive, make sure to clear the area by moving furniture and covering the floor. This will give the crew full access to the ceiling and protect your belongings from any paint splatters.
Look for a ceiling painting company that uses high-quality paint and applies two coats for better coverage and durability. They should also take the time to properly prepare the surface, including repairing any drywall issues or stains.
A professional ceiling painting team will take care of the entire process, from prepping the area to cleaning up afterwards. They should use the right equipment and techniques to ensure a smooth, even finish that brightens up the room.

Ceiling Fan Installation

Chimney Flue Repair Near You

Can’t find what you are looking for?

How It Works

  • Answer a few questions about your home project.
  • Within seconds, get matched with top-rated local pros.
  • Compare quotes and choose the best pro for the job.

Ceiling Fan Installation In Your Area

Ceiling Fan Installation: A Guide to Hiring the Right Professional

Meta Description: Discover expert tips for hiring the right professional for your ceiling fan installation. Ensure safety, efficiency, and proper functionality in your home.

Upgrading your home with a new ceiling fan is a big step. You might wonder if you should do it yourself or hire a pro. The right choice can affect the fan’s performance and safety.

So, what makes for a good ceiling fan installation? It’s about knowing the complex parts and when to get expert help.

Ceiling Fan Installation

Key Takeaways

  • Ceiling fan installation needs careful attention to electrical safety, wiring, and mounting.
  • Getting a professional electrician ensures a smooth install and avoids risks.
  • Things like ceiling height, fan size, and wiring affect how hard the install is.
  • Some people can install a ceiling fan themselves, but it’s tricky for the unskilled or in tough homes.
  • Professional install offers perks like warranty and following building codes.

This guide will cover why hiring a pro for ceiling fan installation is smart. We’ll look at the challenges and what to think about before deciding to go DIY or get a pro. By the end, you’ll know how to pick the best option for your home’s comfort and style.

The Importance of Properly Installed Ceiling Fans

Ceiling fans are more than just pretty to look at. They are key to making a room comfy. When put in right, they look good and work well. This makes a home more beautiful and saves energy.

Aesthetic Appeal and Energy Efficiency

A good ceiling fan can be the highlight of a room. It mixes looks with usefulness. It fits well with a room’s style, making it look better.

Also, it saves energy. By moving air around, you can keep your AC a bit higher. This doesn’t mean you’ll feel hot.

Improving Indoor Air Circulation

A ceiling fan also makes air move better in a room. This means the temperature stays even. You won’t need to keep changing the AC.

This better air flow also means cleaner air. This is good for your health.

ceiling fan

Getting a ceiling fan installed right can change how you see your home. It saves energy, makes the place look nicer, and keeps the air clean. A ceiling fan is a smart choice for a comfy and stylish home.

Ceiling Fan Installation: A DIY Project or Professional Job?

There’s a special feeling when you look at what you’ve done yourself. Installing a ceiling fan can be a great DIY task. But first, you need to know the steps. If you’re good with basic wiring and electrical work, you might find it easy.

But, some jobs need a pro. Things like complex wiring, high ceilings, or if you’re not sure about the setup. You should think about safety, time and patience, and budget before deciding.

Getting a professional electrician for the job lowers the risk of mistakes. This can help prevent house fires. They also usually finish the job right the first time, saving you from future problems.

Electricians have the right tools and know-how. This can make the job go faster than if you did it yourself. You might end up spending more on tools or materials if you try it yourself and make mistakes.

Choosing between doing it yourself or hiring a pro depends on your skills, the job’s complexity, and your budget and schedule. Think about the good and bad sides to make sure you get a job done right and safely.

DIY ceiling fan installation

Understanding the Basics of Ceiling Fan Installation

Installing a ceiling fan can be a fun DIY project. But, it’s key to know the basics first. Start by checking the electrical box to make sure it’s strong, rated for fans, and can hold the fan’s weight. It’s also vital to find the ceiling joist. This will be where you attach the fan to keep it steady.

Assessing the Electrical Box and Ceiling Joists

The electrical box in the ceiling must be right for ceiling fans. Look for a “suitable for ceiling fans” stamp and a fan weight rating. This means the box can handle the fan’s weight safely. Finding the ceiling joist is also key. It’s where you’ll attach the fan’s bracket.

Matching Wires and Proper Connections

After setting up the bracket, it’s time to deal with the wiring. You’ll connect the ceiling wires to the fan wires, using wire nuts for a secure fit. If your fan has a remote, connect that too. Always follow the maker’s install and safety steps to get it right.

Knowing how to install a ceiling fan, from checking the box and joists to wiring it, helps you succeed. This way, you’ll make your home look better and save energy too.

Safety Considerations for Ceiling Fan Installation

Installing a ceiling fan needs careful safety steps. Before starting, make sure you follow important safety tips for a safe project. Here are the key steps for a secure ceiling fan setup.

Shutting Off Power and Testing Wires

First, turn off the power at the circuit breaker. This stops electrical dangers during the install. After turning off the power, check wires are dead with a voltage tester before touching them. Also, make sure the wall switch is off.

Working With a Helper and Proper Tools

Installing a ceiling fan is easier with a second person. They can hold the fan, hand you tools, or check connections. Also, have the right tools like an adjustable wrench, screwdrivers, and a ladder for safety and efficiency.

Follow these safety tips to lower electrical risks and make installing your ceiling fan go smoothly. Always put safety first when dealing with electrical systems.

Choosing the Right Ceiling Fan for Your Space

Finding the right ceiling fan is key for good air flow and looks. You need to think about the room size, blade span, ceiling height, and downrod length. These factors help you pick a fan that fits your space and improves the room’s look and feel.

Measuring Room Size and Blade Span

The room’s size helps decide the fan’s blade span. For small rooms (less than 76 square feet), a 29 to 36-inch fan is best. Medium rooms (76 to 144 square feet) need a 36 to 42-inch fan. Big rooms (over 225 square feet) should have a 54-inch or bigger fan.

Ceiling Height and Downrod Length

The ceiling height is also important. For standard ceilings (8 to 9 feet), a standard downrod works well. But for lower ceilings (under 8 feet), a flush mount is better. For high ceilings, you might need an extended downrod or an angled mount.

By measuring your room and ceiling, you can find the perfect ceiling fan. It will look good and help with air flow and saving energy.

Ceiling Fan Styles and Features

Ceiling fans come in many styles to match any room’s look. You can choose from traditional, modern, rustic, or tropical designs. They also have special features for better use.

Some fans have lights built in for air flow and light. These lights use LED bulbs and save energy and last long. You can change the fan’s direction with reversible blades.

Remote controls and smart home tech make using the fan easy. You can change the speed and settings from your chair.

The finish of the fan matters too. You can pick from brushed nickel, oil-rubbed bronze, or classic white wood. These finishes look good and make the fan last longer.

Whether you like modern or rustic styles, there’s a ceiling fan for you. Think about looks and useful features to pick the right one. This way, your home will look good and feel comfy.

In short, ceiling fans come in many styles and features. Homeowners can find one that fits their decor and makes their home better.

Preparing for Professional Ceiling Fan Installation

Some homeowners might try to install a ceiling fan by themselves. But, there are times when it’s smarter to hire a professional installation service. Things like complex wiring, tricky setups, or high ceilings make it hard. That’s when a licensed electrician should step in.

Also, some warranties need electrical work done by professionals. And, codes and regulations in your area might have special rules for electrical jobs. Knowing when a job is too hard or risky lets you finish it safely. It also keeps your warranties valid.

Before a professional ceiling fan installation, make sure you have the right tools. You’ll need a ladder, screwdriver, wire strippers, and a voltage tester. Don’t forget to turn off the power at the circuit breaker and check it’s off with a tester before starting any electrical work.

Preparing well and thinking about getting expert assistance helps. This way, you can have a safe and successful ceiling fan installation. It will also follow all local codes and regulations.

Remember, when it comes to professional installation, it’s safer to be careful. Always choose a licensed electrician for the job. This ensures it’s done safely and follows all codes and regulations.

Maintaining Your Ceiling Fan

Keeping your ceiling fan in good shape is important. It helps it work well and quietly for a long time. Clean the fan blades and housing often to stop dust and dirt from building up. This keeps the air flowing right and stops the fan from getting out of balance.

Check the fan’s balance and tighten any loose screws to stop it from wobbling. If the fan starts making strange sounds or isn’t working right, you might need to oil the motor bearings or change the blade angle. Taking care of your ceiling fan keeps it looking good and working well. It also saves energy over time.

  • Clean the fan blades and housing often to stop dust from building up.
  • Check the fan’s balance and tighten any loose screws to stop wobbling.
  • Lubricate the motor bearings if the fan starts making unusual noises.
  • Adjust the blade pitch if the fan seems to be losing efficiency.

By following these easy tips, your ceiling fan will keep moving air efficiently and save energy in your home. Regular care means your fan will work well for many years.

When to Hire a Professional for Ceiling Fan Installation

Installing a ceiling fan can be fun for some homeowners as a DIY project. But, there are times when it’s smarter to get a pro. If the wiring is complex or you’re not sure about the electrical setup, a licensed electrician is your best bet. They have the expertise to tackle these tricky situations.

High or vaulted ceilings can be tricky and risky. They might need special equipment for a safe install. If you have a warranty that needs professional installation, or you must follow local codes and regulations, an expert is a must.

Knowing your limits and choosing professional help can give you peace of mind. It ensures the job is done right and safely. A skilled electrician can prevent problems like wrong wiring, a shaky fan, or electrical dangers from DIY mistakes.

Complex Wiring or Electrical Situations

Right wiring is key for a ceiling fan’s safety and efficiency. If your home’s electrical system is complex or you don’t know much about wiring setups, get a pro. They’ll make sure the fan is safely connected and grounded. This lowers the chance of safety issues or problems later.

High or Vaulted Ceilings

Ceiling fans in high or vaulted ceilings need special equipment and skills for a solid install. A pro with the right tools and expertise can avoid safety risks. These risks include the fan falling or the ceiling getting damaged during install.

By understanding your limits and choosing a pro for your ceiling fan install, you get many benefits. You’ll enjoy better air flow, save energy, and make your room look better. All without the dangers of doing it yourself.

Enhance Your Home with FindPros

When it comes to ceiling fan installation, choosing the right professional can make all the difference. At FindPros, we connect you with top-rated local experts who understand the nuances of proper installation, ensuring your fan operates safely and efficiently. By filling out our simple survey, you can quickly receive multiple quotes from competing professionals, allowing you to compare pricing and find the best match for your project.

This competitive environment not only helps you secure the best pricing but also ensures you find a pro you feel comfortable working with. Start your journey to a more comfortable home today by answering a few questions about your project, and let us match you with the right professionals in seconds.

Conclusion

Installing a ceiling fan can be a fun DIY project for homeowners. But, it’s key to know the steps and the possible issues. This guide has shown you how to pick the right fan and install it right. Always put safety first when dealing with electrical stuff.

Sometimes, it’s best to hire a pro electrician. This is true for tricky wiring, high ceilings, or to meet local codes and keep warranties valid. Whether you do it yourself or get help, you’ll end up with a ceiling fan that makes your home more comfy, efficient, and stylish.

Think about your room’s size, ceiling height, and how energy-efficient you want to be. This helps pick the best ceiling fan for you. With the right install, whether you do it or hire someone, you’ll get better air flow, lower energy bills, and a stylish look in your home.

Frequently Asked Questions (Ceiling Fan Installation)

If your existing light fixture needs to be replaced, you’ll need to remove the existing fixture and electrical box. Install a new fan-rated electrical box that can properly support the weight of the ceiling fan.
When connecting the wires, match the corresponding wires from the ceiling fan to the existing wiring in the electrical box. Connect the green/ground wires, white/neutral wires, and black/hot wires using wire nuts, following the manufacturer’s instructions.
Yes, many ceiling fans come with a separate light kit that requires its own switch. You may need to install a new switch or use an existing one to control the fan’s light fixture independently from the fan’s operation.
Always turn off power to the circuit at the circuit breaker before working on any electrical project. Use a voltage tester to ensure the power is off. Wear proper safety gear like gloves and follow all safety guidelines in the manufacturer’s instructions.
Outdoor ceiling fans are specifically designed to withstand the elements. The installation process may vary, as you’ll need to use an outdoor-rated electrical box and follow any additional wiring or safety precautions outlined by the manufacturer.

Carport Repair

Chimney Flue Repair Near You

Can’t find what you are looking for?

How It Works

  • Answer a few questions about your home project.
  • Within seconds, get matched with top-rated local pros.
  • Compare quotes and choose the best pro for the job.

All Service Pros

Mountain View, CA

See only Pros that service your area.

    Carport Repair In Your Area

    Carport Repair: Expert Tips for a Safe and Sturdy Structure

    Meta Description: Discover expert tips for carport repair to ensure a safe, sturdy structure. Learn how to assess damage, choose materials, and maintain your covered parking area effectively.

    Is your metal carport showing signs of wear and tear? Don’t let a small issue become a big problem. It’s important to maintain and repair your carport on time. This keeps it safe and reliable for many years.

    But how do you start with carport repair? We’ll cover the basics of keeping your carport in great shape. You’ll learn how to maintain your metal carport and keep it looking good.

    Carport Repair

    Key Takeaways

    • Regular inspections and maintenance are vital for the longevity of metal carports.
    • Understanding the early signs of potential issues can help prevent more extensive damage.
    • DIY carport repairs, such as rust removal and concrete patching, can be manageable for some homeowners.
    • Seeking professional assistance is recommended for major structural damage or extensive corrosion.
    • Proper weatherproofing and protection strategies are crucial for maintaining wooden carports.

    Understanding the Importance of Metal Carport Maintenance

    Metal carports are a top choice for many in the Pacific Northwest. They stand strong against the weather. They keep vehicles safe from rain, wind, and snow. But, keeping them in good shape is key.

    Why Regular Carport Inspections Matter

    Checking metal carports often is vital. It helps spot and fix problems early. This way, owners and managers can keep their carports safe and strong. It also saves money on big repairs later.

    Signs of Potential Issues to Watch For

    • Rust on the metal can weaken it over time.
    • Cracks or holes let water in and cause more harm.
    • Foundation problems can make the carport unstable.
    • Loose or broken connections threaten the carport’s strength.

    Fixing these issues quickly keeps the carport safe and sturdy. This is important for commercial or multi-familyproperties.

    Metal carport inspection

    DIY Carport Maintenance and Repairs

    Keeping your metal carport in good shape is easy with regular cleaning and quick fixes. This way, you avoid big repairs and make your carport last longer. Let’s look at how to keep your carport looking great with simple maintenance and repairs.

    Routine Cleaning and Inspection

    Clean your carport once a year to keep it in top condition. Use a mild detergent and water to clean the metal. This removes dirt, debris, and bird droppings. Make sure to clear the roof often to stop moisture from building up and causing rust.

    Check the metal for rust or damage often. Fix any problems right away to stop them from getting worse.

    Step-by-Step Guide to Carport Repair

    • Look for cracks or shifts in the concrete foundation. Use a concrete filler and sealant to fix them.
    • Scrub off rust spots on the metal, then coat them to stop rust from coming back.
    • Check the roof for leaks and seal them with a weatherproof sealant to keep out water.
    • Make sure your carport is securely anchored, especially in windy areas, to keep it strong.

    Choosing the Right Materials and Techniques

    For DIY carport repairs, pick the right materials and methods. Steel and concrete are good because they don’t rot or catch fire easily. Don’t let water or wet leaves sit on your carport as they can cause rust. Talk to a local hardware store or carport expert to make sure you’re using the right stuff and ways for your carport.

    Minor Repairs: Rust Removal, Concrete Patching, and Leak Sealing

    • Use special products to remove rust and coat the metal to stop rust from coming back.
    • Fill in cracks and holes in the concrete with the right filler and sealant.
    • Find and seal any leaks in the carport’s roof or structure to stop water damage.

    carport maintenance

    Regular cleaning, checking, and small repairs keep your carport in great shape. This saves you from big, expensive problems later. A well-kept carport looks better, keeps your property safe, and makes your investment last longer.

    When to Call in Professional Carport Repair Services

    Some carport problems can be fixed by yourself. But, some issues need experts. If your carport has big dents, bent supports, or is not stable, get help from pros.

    Major Structural Damage and Extensive Corrosion

    Big rust or corrosion can hurt your carport’s strength. This means it’s time for experts. They know how to fix it right.

    Trying to fix big damage or rust yourself is risky. It could make your carport unsafe. Calling pros ensures it’s fixed right and safe to use.

    Experts have the right skills and tools. They can check the damage and fix it. This keeps your carport safe and stable.

    Maintaining Your Wooden Carport

    Wooden carports are great for keeping your car safe from the weather. They look good too. But, they need care to last a long time. Picking the right wood like cedar, redwood, or pressure-treated pine helps fight rot, decay, and bugs.

    Weatherproofing and Long-Term Wood Protection

    Using a water-resistant sealant or stain is key to keeping your carport safe. It stops moisture from causing harm. This keeps the carport strong and looking good. Checking it often helps spot and fix problems early.

    • Use a high-quality water-repellent wood preservative to protect against moisture, rot, and insect damage.
    • Apply a UV-resistant sealant or stain to shield the wood from the sun’s harmful rays and prevent fading.
    • Regularly clean the carport to remove dirt, debris, and any signs of mold or mildew growth.

    With these steps, your wooden carport will stay strong, last long, and look great for many years.

    Let FindPros Help with Your Carport Repair Needs

    Looking for reliable and affordable carport repair services? Look no further than FindPros. Our platform connects you with top-rated local professionals who specialize in carport maintenance and repair. Simply answer a few questions about your project, and within seconds, you’ll be matched with the best pros for the job.

    Get competitive quotes from multiple providers and choose the one that fits your budget and personality best. With FindPros, you can rest assured that your carport will be in good hands, thanks to our rigorous vetting process and customer satisfaction guarantees. Don’t let a small issue turn into a big problem – let FindPros help you find the perfect pro for your carport repair needs today.

    Conclusion

    Keeping metal and wooden carports in good shape is key for homes and businesses. By following a regular maintenance plan, fixing small repair issues fast, and getting expert help when needed, you can keep your carport strong and useful for many years.

    Whether your carport is metal or wooden, it’s important to protect your investment. This means taking care of it to keep your vehicles and stuff safe. With the right care, your carport will keep doing its job and make your property look better and worth more.

    By using the advice from this article, you can make your carport last longer and work better. Regular inspections, quick repairs, and being proactive with maintenance can save you money over time. It also makes sure the space is safe and secure for everyone who uses it.

    Frequently Asked Questions (Carport Repair)

    Look for rust, cracks, holes, loose connections, and foundation problems. These can weaken the carport’s structure over time.
    For small issues like rust removal, concrete patching, and sealing leaks, DIY repairs may be manageable. But for major structural damage or extensive corrosion, it’s best to hire a carport services contractor.
    Use a high-quality water-repellent wood preservative and UV-resistant sealant or stain. This will help prevent rot, decay, and fading from the sun’s rays.
    Not necessarily. Evaluate the extent of the damage with a carport construction expert. They can assess whether the carport can be repaired or if replacement is necessary to ensure future stability and safety.
    It’s a good idea to have your carport evaluated by a contractor periodically, at least once a year. They can identify any issues and provide recommendations to extend the life and appearance of your carport.

    Carpet Stretching

    Chimney Flue Repair Near You

    Can’t find what you are looking for?

    How It Works

    • Answer a few questions about your home project.
    • Within seconds, get matched with top-rated local pros.
    • Compare quotes and choose the best pro for the job.

    Carpet Stretching In Your Area

    Professional Carpet Stretching: Restore Your Home’s Elegance

    Meta Description: Revitalize your home’s flooring with professional carpet stretching. Eliminate wrinkles, improve appearance, and extend carpet life. Get expert service today.

    Could a simple carpet stretching service change how your living space looks and feels? Carpets get wrinkles and waves as they get older. These make a room look bad and can be dangerous. But, there’s a way to make your carpets look new again without spending a lot of money. This is professional carpet stretching – a service that makes your floors look great and your home more elegant.

    Carpet Stretching

    Key Takeaways

    • Professional carpet stretching can restore the original beauty and elegance of carpets, enhancing their looks significantly.
    • Proper carpet stretching can extend the lifespan of carpets, maintaining them in top condition and boosting their longevity.
    • Carpet stretching can smooth out wrinkles and ripples, reducing the risk of falls and slips in the household.
    • Experienced carpet repair and stretching experts offer a 3-year guarantee on their work, ensuring long-lasting results.
    • Carpet stretching is a cost-effective solution that can save homeowners from the expense of installing a new carpet.

    Introduction to Carpet Stretching

    Carpet stretching makes wall-to-wall carpets look smooth and even. Over time, carpets get wrinkles and ripples from heavy foot traffic and furniture. These issues can make a room look bad and be a safety risk.

    What is Carpet Stretching?

    This process pulls the carpet tight and attaches it to tack strips. It gets rid of slack and makes the carpet look new. Experts use tools like a power stretcher and knee kicker for a good job.

    Benefits of Professional Carpet Stretching

    • It makes the room look better by removing wrinkles and ripples.
    • It makes the floor safer by getting rid of tripping spots.
    • It makes the carpet last longer by reducing wear in busy areas.
    • It makes the carpet more comfortable and helps with sound.
    • It makes cleaning the carpet easier.

    Hiring pros for carpet stretching brings many benefits. Homeowners get better looks, safety, and a carpet that lasts longer and feels softer. This process is key to keeping carpets looking great.

    Signs Your Carpet Needs Stretching

    It’s important to spot early signs that your carpet needs stretching. Wrinkles, waves, or ripples are big clues. They come from foot traffic, heavy furniture, or not installing it right. These issues mess up the look and can be dangerous.

    Wrinkles, Waves, and Ripples

    Carpet gets wrinkled or lumpy over time. This happens from moving heavy things or using it a lot. Signs like bubbles or ripples mean it’s time for carpet stretching.

    Loose or Detached Carpet Edges

    If your carpet edges are coming loose, it’s a sign it needs help. This means it’s stretched out from wear or environmental changes. Fixing it quickly keeps your carpet looking good.

    Getting carpet stretching done by pros can make your carpet last longer. It keeps it tight and looking great in your space.

    Wrinkled Carpet

    Enhancing Aesthetics with Carpet Stretching

    Carpet stretching makes your living spaces look better. It fixes wrinkles, waves, and ripples, making carpets smooth and even. This makes your home look nicer and could even raise its value.

    Getting a pro to stretch your carpet is a smart move. It makes your home look polished and well-kept. It also makes floors safer, especially for kids or the elderly, by being flat and smooth.

    Stretching your carpet is cheaper than getting a new one. It keeps your carpet looking new longer. This saves money and helps the planet by using less energy.

    Carpet stretching

    Experts in carpet stretching give you great results that last. They have the right tools and know-how for many carpet problems, like:

    • Fixing wrinkles, waves, and ripples
    • Securing loose or detached carpet edges
    • Keeping the padding under the carpet safe
    • Trimming extra carpet for a neat look

    Choosing carpet stretching pros can make your home look better. It also makes your carpets last longer and your home safer and cozier for everyone.

    Extending the Lifespan of Your Carpet

    Professional carpet stretching does more than make your floor look better. It also helps your carpet last longer. Fixing wrinkles and waves early stops more damage. This keeps your carpet from wearing out too fast.

    Stretching your carpet tightens it to the tack strips. This keeps your carpet feeling soft and looking great. Getting expert carpet stretching services is a smart move to keep your carpet in top shape.

    Studies show that carpet stretching can add years to your carpet’s life. It’s cheaper than getting new flooring. Plus, it keeps your home or office safe from accidents caused by loose carpet.

    Using professional carpet stretching services makes your floors look better. Regular care and stretching mean you won’t need big repairs or new flooring later. This saves you time and money.

    To make your carpet last even longer, get it professionally cleaned once or twice a year. Keep the humidity in your home between 30% and 50%. And ask people to remove their shoes inside to keep your carpets clean.

    Carpet Stretching Process

    Restoring your home’s carpets is a detailed process done by pros. They start by moving all furniture out of the way. This makes room for the tools they need.

    They use a power stretcher to stretch the carpet back to its original shape. This tool helps fix wrinkles and bulges. The technician adjusts the stretcher to fit the carpet fibers right.

    Smaller rooms need less force, while big rooms need more. This makes sure the carpet is tight everywhere.

    • The carpet is then secured tightly to the tack strips along the room’s edges. This makes the floor flat and smooth.
    • Any extra carpet is cut off, and the carpet meets other floors well.

    This careful work makes the carpet look great and safe. It also makes the carpet last longer. It cuts down on damage or wear.

    Stretching a carpet usually takes a few hours, based on the room size and job details. Pros offer a free estimate. They work hard to remove wrinkles, pull the carpet tightly, and fix the flooring to its original condition.

    Improved Comfort and Sound Absorption

    Professional carpet stretching does more than make your space look better. It also makes it more comfortable and helps with sound. By getting rid of wrinkles, your carpet feels smooth and even. This means you won’t feel any bumps or uneven spots when you walk.

    Carpets are great at soaking up sound, making your home quieter. When stretched right, they keep doing this. This is great for rooms you want to be quiet, like bedrooms or living rooms.

    A stretched carpet is also super comfy, especially in busy areas like hallways. It absorbs the shock from footsteps, easing strain on your joints. Plus, you can pick from many colors and patterns to match your home’s style.

    To get the best comfort and sound absorption, hire carpet stretching pros. They make sure your carpet looks good and feels great. This creates a peaceful and comfy place for you and your family.

    Maintaining Your Stretched Carpet

    Keeping your stretched carpet in good shape is key to making it last longer and look uniform. Regular vacuuming helps get rid of dirt on the surface. This stops dirt from going deeper into the fibers.

    Quickly cleaning spills with the right cleaners stops stains from setting in. This can damage your . It’s smart to get professional deep cleaning once a year, especially in busy areas or homes with pets and kids. This deep clean removes deep dirt and keeps your looking good for a long time.

    Regular Vacuuming

    It’s important to vacuum your often to keep it looking new. Vacuuming gets rid of dirt and debris on the surface. This stops it from getting ground into the and causing damage or wear.

    Prompt Spill Cleanup

    Act fast when you spill something on your . Blot the area with a clean cloth or paper towels right away. This helps stop the spill from going deep into the and causing stains. Then, use the right cleaner to make sure your stays in great shape.

    Stick to a regular carpet stretching routine and clean up spills quickly. This way, you can make your last longer and keep it looking great.

    Finding Quality Carpet Stretching Services

    Choosing the right carpet stretching service is key to making your carpets look great and work well. Look for companies with a good history of fixing and stretching carpets. They should use the newest tools and methods. Make sure the pros are trained and certified to fix tough carpet problems.

    Picking a top-notch service means your carpet will look amazing. It will get rid of wrinkles, waves, and ripples. This makes your existing carpet or new carpet look better and feel softer.

    When looking at carpet stretching services, think about these things:

    • How much experience they have with carpet stretching and repair
    • If they use professional tools like the power stretcher, tack strip, and utility knife
    • If they can fix problems like loose carpet, detached carpet edges, and carpet damage from heavy foot traffic
    • What people say about their work and if they make customers happy
    • If their prices are fair and they give clear estimates
    • If they offer quick, professional, and friendly service

    Choosing a trusted carpet stretching service keeps your carpets looking the same. It makes them last longer and keeps your floors comfy and damage-free. Do your homework and compare services to find the best one for your needs.

    Discover the Right Pros for Your Carpet Needs

    At FindPros, we connect you with top-rated local professionals who specialize in carpet stretching and repair. By filling out a simple survey about your home project, you can receive multiple quotes from competing experts, ensuring you get the best pricing. Our platform allows you to compare options and choose the pros you feel most comfortable with, all within seconds. Enhance your living space today with the right help from FindPros.

    Conclusion

    Professional carpet stretching can make your home look new again. It fixes wrinkles, waves, and loose edges. This service brings back the carpet’s beauty and makes your home safer.

    It also makes your carpet last longer. If your carpet is old or was put in wrong, stretching can save you money. You won’t need to replace it as soon.

    With skilled professionals, your home will be more inviting and comfortable. Carpets that are stretched right don’t wear out as fast. They also help prevent accidents.

    Stretching is cheaper than getting new carpet. It’s a smart way to save money.

    Carpet stretching is quick, taking only 1-2 hours. Cleaning your carpet once a year helps it last longer. Stretching reduces wear and tear.

    But, don’t stretch carpets over 10 years old. It might not work well. By choosing carpet stretching, you make your home look great again.

    Frequently Asked Questions (Carpet Stretching)

    The carpet pad is the layer under the carpet that provides cushioning and support. It helps the carpet last longer and feel more comfortable underfoot.
    A professional carpet stretcher uses a tool called a power stretcher to pull the carpet tightly and attach it to the tack strips along the walls. This removes any wrinkles or waves in the carpet.
    If there is excess carpet after stretching, the professional will trim off the excess to create a neat, uniform appearance along the walls and edges.
    The cost of professional carpet stretching can vary based on factors like the size of the room, the type of carpet, and any additional repairs needed. Most homeowners can expect to pay between 0-0 per room for this service.
    Moving furniture out of the way allows the carpet stretching professional to access the entire floor and apply the necessary physical effort to pull the carpet tight. This ensures the carpet is stretched evenly across the entire space.

    Carpet Shampooer

    Chimney Flue Repair Near You

    Can’t find what you are looking for?

    How It Works

    • Answer a few questions about your home project.
    • Within seconds, get matched with top-rated local pros.
    • Compare quotes and choose the best pro for the job.

    Carpet Shampooer In Your Area

    Why Hire a Professional Carpet Shampooer? Benefits and Tips

    Meta Description: Discover the advantages of hiring a professional carpet shampooer. Learn about deep cleaning benefits, stain removal techniques, and tips for maintaining pristine carpets.

    Many think hiring a pro for carpet cleaning is too pricey. But, the perks of getting a pro far beat the cost. Wonder what makes a pro cleaner better than you or a DIY fan?

    Experts have the skills, special gear, and top-notch cleaners for amazing results. They get rid of hard stains, bad smells, and pull out allergens deep in the carpet. Regular pro cleaning keeps your carpets looking great and makes them last longer, saving you money.

    Also, a clean carpet makes your place feel welcoming, looks pro, and helps everyone work better and feel comfy. So, if you’re unsure about getting a pro for your carpet, let’s look at the benefits and tips to help you decide.

    Carpet Shampooer

    Key Takeaways:

    • Professional carpet cleaners have the expertise and specialized equipment to deliver exceptional results.
    • Regular professional cleaning extends the lifespan of your carpets, saving you money in the long run.
    • A clean and well-maintained carpet can create a welcoming ambiance and contribute to a professional image.
    • Professional cleaning can remove tough stains, eliminate foul odors, and improve indoor air quality.
    • Hiring a professional carpet shampooer is a wise investment for a clean, healthy, and visually appealing living or work environment.

    Importance of Clean Carpets

    Clean carpets make a space feel welcoming and look professional. If carpets are dirty or worn, the area looks dull and not nice. Clean carpets make a big difference, making a space look better and leaving a good impression.

    For businesses, clean carpets show you care about details. They make a professional environment. Regular carpet cleaning keeps the carpet looking great. This makes your space feel clean, comfortable, and well-kept.

    Creating a Welcoming Ambiance

    Clean, fresh carpets change a space for the better. They make it warm and inviting. People feel more at ease in a place with clean carpets. This makes a big difference in how people see your business or home. It makes them feel comfortable.

    Maintaining a Professional Image

    In a professional setting, clean carpets are key for a polished image. If carpets are dirty or worn, it looks like you don’t care. Regular carpet cleaning keeps your carpets looking great. This makes your space look healthy and quality, which is good for your business.

    clean carpets

    Health Benefits of Professional Carpet Cleaning

    Keeping our homes clean is key to our health. Professional carpet cleaning is a big part of this. It helps more than just look good.

    Removing Allergens and Bacteria

    Carpets can hide dust mites, mold, and other bad stuff. These can make breathing hard, especially for those with allergies or asthma. A pro carpet cleaner uses special tools to get rid of these pests.

    This makes the air cleaner and safer. It helps prevent breathing problems and makes spaces healthier.

    Improving Air Quality

    A clean carpet does more than look nice. It also makes the air inside better. By removing dirt and pollutants, it helps air move freely and keeps germs away.

    This leads to fewer illnesses and better health overall. Experts say to clean carpets once a year for best results. Vacuuming often in between helps too. Professional carpet cleaning means a cleaner, safer, and cozier place to live or work.

    Carpet Cleaning Allergens

    Professional Look and Comfortable Feel

    Keeping a professional look and a comfy feel is key in any space. This is true for offices, stores, or homes. But, dirty or worn-out carpets can ruin this balance, making the area look and feel bad.

    Carpet gets dirty over time with dust and dirt. This makes it look old and feel hard. It makes the space less welcoming and less comfy for everyone.

    Professional carpet cleaning can fix this. It makes carpets look new and feel soft again. A good carpet cleaner removes deep dirt and makes the carpet fibers fresh. This keeps your space looking great and feeling cozy.

    • Ensure a professional look with high-quality carpet cleaning
    • Maintain a comfortable, welcoming ambiance for your space
    • Revitalize worn, matted carpets to their original quality feel
    • Create a visually appealing and pleasant environment for visitors

    Professional carpet cleaning can change your space. It makes it look professional and comfy. If you want to impress clients, make your home cozy, or keep your carpets looking new, a deep clean is key.

    Eliminating Foul Odors

    Carpets can get dirty from spills, stains, and messes, leading to bad smells. Things like coffee spills, ink stains, pet accidents, and dirt can make a carpet look bad. But, a professional carpet shampooer can remove tough stains and get rid of bad smells.

    A study found the 7 worst smells from carpets, like pet accidents and coffee spills. To fix these, pros use special cleaners and methods. They go deep into the carpet to remove hard stains.

    Deep cleaning by a pro can make your carpet smell fresh and look great. There are three main types of carpet deodorizers: powder, spray, and shampoo. Baking soda is a top choice for getting rid of smells. Other good options include white vinegar, club soda, and vodka.

    For pet urine stains, there are steps to follow in two situations. Vacuuming your carpet once a week is also key to keeping it fresh and odor-free.

    Choosing a professional carpet shampooer means your carpets will be clean and welcoming. They’ll be free from bad smells and stains. This cleaning not only makes your space look better but also helps keep it healthier.

    Easier Carpet Maintenance

    Keeping carpets clean can be hard, especially if you don’t get them cleaned often by pros. Dirt, dust, and debris build up over time, making them hard to clean. But, getting regular professional carpet cleaning makes it easier.

    Regular Cleaning for Effortless Upkeep

    Experts know how to clean and sanitize carpets well. This makes keeping them looking good easier. With regular cleaning, you can quickly deal with spills and dirt, keeping your carpets looking great.

    Using professional cleaning and good vacuum and mop tools makes carpet care easy. You’ll keep your carpets looking great without the hard work of cleaning dirty carpets.

    Eliminating Carpet Mites and Bacteria

    Dirty carpets can hide tiny pests like carpet mites and bacteria. These pests can cause allergies and breathing problems. They live in the fibers of dirty carpets, spreading allergens and irritants in the air.

    Professional carpet cleaning gets rid of these pests. It uses special equipment and solutions to clean and disinfect the carpet. This makes the indoor air healthier.

    Research shows norovirus can last over 12 days in vacuumed carpets. Carpets catch dirt, dust, and germs from the air. To kill norovirus, steam clean at 158° F for five minutes or 212° F for one minute.

    Regular professional cleaning keeps carpets free from harmful pests. This means better air quality and peace of mind. The CDC says cleaning dirty surfaces and then disinfecting helps stop COVID-19 from spreading at home.

    Vacuuming often is good, but it’s not enough to get rid of all dirt and germs. Professional carpet cleaning and extraction once a year is best. Steam cleaning is a top way to fight germs on carpets, says the NHS.

    Extending Carpet Lifespan

    Keeping carpets clean and maintained can make them last longer. Professional cleaners use special methods and tools to deep clean and sanitize carpets. This keeps them looking new and stops them from wearing out too fast. It saves you money by not needing to replace them too soon.

    Regular cleaning also keeps your carpet warranties valid. These warranties cover wear, manufacturing, and stains. By cleaning your carpets right, you protect your investment. Your carpets will stay looking and feeling great for many years.

    • Vacuuming once a week helps reduce wear and tear. If you have pets or a busy home, you might need to vacuum more.
    • Move your furniture around to spread out traffic on the carpet. This makes it last longer.
    • Steam cleaning your carpets once a year keeps them clean for a longer time.
    • Use special carpet cleaning products like spot removers to keep your carpet in top shape.
    • Adding carpet protectant seals fibers to prevent dirt from getting in. This makes carpets last longer.
    • Good carpet padding protects your carpets from shock and makes them last longer.
    • Don’t put rugs directly on your carpets. This can make the carpet fibers crush and change color.

    Follow these tips and get professional carpet cleaning. This way, your carpets will last longer and look great for years.

    Benefits of Hiring Professionals

    Hiring professional carpet cleaners has many perks that DIY cleaning can’t match. They use special equipment and solutions for a deeper clean. This means your carpets get cleaner than you can do yourself.

    Time-Saving Convenience

    Many people are too busy to clean their carpets well. Professional cleaners save you time by doing the hard work. This lets you focus on what’s important while they make your carpets look new.

    Deep Cleaning with Advanced Equipment

    Experts know how to get rid of tough stains and allergens. They use special tools and solutions to clean deep into your carpet. This makes your home healthier and your carpets look great.

    Choosing professional cleaners means you get a thorough and efficient clean. Your carpets will stay in top shape for a long time.

    Choosing the Right Carpet Shampooer

    Choosing the right carpet shampooer is key to keeping your carpets looking great. When you start looking, think about what matters most. This will help you find a professional carpet cleaning service that does a great job.

    Experience and Reputation

    Experience and reputation are very important. Look for a company with a good history of success. They should have many positive customer reviews and references.

    Experts can handle tough stains and dirt. They make your carpets look new again.

    Environmentally Friendly Solutions

    It’s also key to check the cleaning products and equipment used. Choose a company that uses environmentally friendly methods. This is good for the planet and your peace of mind.

    Good customer service is vital too. A company that talks to you and listens makes the process easy and worry-free.

    Think about these things to pick the best carpet shampooer. You’ll keep your carpets looking good and feel good about your choice.

    Maintaining Carpets Between Cleanings

    Keeping your carpets clean between professional cleanings is key. It helps them look great and last longer. By using a few easy steps, you can keep your carpets clean longer and save your money.

    Regular Vacuuming and Spot Cleaning

    Vacuuming often is key to keeping carpets in good shape. Try to vacuum your carpets once a week, or more if you have a lot of foot traffic. This removes dirt, debris, and small particles that can harm the fibers.

    Quickly cleaning spills and stains is also important. This stops them from setting in and getting harder to clean later.

    For tough stains, use a gentle cleaner and a soft brush to clean the area. Then, dry the area with a clean cloth to stop moisture from getting into the carpet backing.

    Putting door mats and runners in busy areas can also help. They catch dirt and debris before it goes deeper into the room.

    By following these easy steps, you can keep your carpets looking great. They will stay in good shape until it’s time for the next professional cleaning.

    Discover the Right Professionals for Your Carpet Cleaning Needs

    At FindPros, we connect you with top-rated local carpet cleaning experts who can revitalize your carpets and enhance your space. By filling out our simple survey, you can quickly compare quotes from multiple professionals competing for your job, ensuring you get the best pricing. You’ll also have the opportunity to find pros that align with your preferences and needs.

    Answer a few questions about your home project, and within seconds, you’ll be matched with the ideal carpet cleaning professionals ready to deliver exceptional results. Choose FindPros for a seamless, efficient, and cost-effective carpet cleaning experience.

    Conclusion

    Hiring a professional carpet shampooer brings many benefits. It makes your clean carpets look new and feel soft. It also helps keep the air clean by removing allergens and bacteria.

    Regular professional cleaning also makes your carpets last longer. This saves money by avoiding early replacement. By using the tips from this article, you can pick the best carpet shampooer. Enjoy a clean, healthy, and well-maintained carpeted space.

    Choosing professional carpet cleaning is smart and saves money. It protects your floors and keeps your space healthy and comfortable. With experts and their top-notch gear, your carpets will get a deep clean. You’ll see a long-lasting improvement in how they look and feel.

    Frequently Asked Questions (Carpet Shampooer)

    Upright carpet cleaners are generally more powerful and can deep clean large areas of carpeting. They have strong suction to remove more dirt, pet hair, and ground-in grime compared to portable models. Upright carpet cleaners are ideal for whole-room or whole-home carpet cleaning.
    Carpet cleaning machines with specialized cleaning solutions and brush heads can effectively tackle pet stains and odors. The cleaning solution helps break down and lift stubborn pet messes, while the rotating brushes agitate the carpet to remove ground-in dirt and odors. This leaves carpets looking and smelling fresh again.
    Some key features to consider are suction power, water tank capacity, number of cleaning modes, and accessory tools. Look for models with strong suction to lift out deep-down dirt, large water tanks to minimize refilling, and multiple cleaning modes for versatility. Attachments like hoses and tools can help clean stairs, upholstery, and other hard-to-reach areas.
    Regular vacuuming is key to removing surface dirt and debris between deep cleanings. Spot-cleaning spills and stains right away with carpet cleaning solution can also help prevent them from setting in. Using doormats in high-traffic areas can reduce the amount of dirt being tracked onto your carpets.
    Professional carpet shampooers have access to more powerful, commercial-grade equipment and cleaning solutions. They are trained to use the machines effectively and safely to provide a deeper, more thorough clean. Professional services also eliminate the hassle of renting, setting up, and operating the equipment yourself.