Fence Calculator

Fence Calculator

To estimate the fence posts, rails, pickets, and hardware you need, enter your fence length, number of rails, and picket dimensions. You’ll also get a cost estimate for pressure-treated wood, cedar, and redwood.

See below for information on various types of fences to help you and to learn how to calculate wood fence materials.

  • By
    FindPros

    FindPros connects consumers with professionals in over 600 different categories.

  • Reviewed by
    Jacky L.

    FindPros connects consumers with professionals in over 600 different categories.

This field is required.
Value should be positive.
This field is required.
Value should be positive.

Pickets

This field is required.
Value should be positive.
This field is required.
Value should be positive.

Material Estimate:

{{posts}}
{{rails}}
{{pickets}}
{{bags_concrete}}
{{small_screws}} lbs
{{large_screws}} lbs

Estimated Material Cost:

${{total_pressure_treated_min_cost}} – ${{total_pressure_treated_max_cost}} $
${{total_cedar_treated_min_cost}} – ${{total_cedar_treated_max_cost}} $
${{total_redwood_treated_min_cost}} – ${{total_redwood_treated_max_cost}} $

Installation Overview:

{{total_length}}
{{number_post}}
{{post_centers}}
{{rails_per_section}}
{{picket_width}}
{{picket_spacing}}

*Estimates only – costs vary by location/vendor, selected material, and quantities.

Learn how we calculated this below

Add this calculator to your site

How to Estimate Privacy Fence Materials

Fences are a great way to add privacy, security, and decor to your property. They can be constructed from a variety of materials, including wood, metal, vinyl, and stone.

Wood is one of the most common fence materials. Wood fences come in many styles, and can be built from several types of wood, including pressure-treated lumber, and softwoods like cedar or redwood.

This calculator will help you determine the amount of materials you’ll need to build a wood fence without relying on readymade panels.

Interested in installing a vinyl fence? Our vinyl fence calculator can help calculate materials.

When building a wood fence, you need to determine the amount of lumber and hardware you’ll need before you begin. For most wood fences, you need posts, rails, pickets or boards, and nails or screws.

You may also need gate hardware, post caps, stain or paint, lighting, or other materials depending on the style you choose.

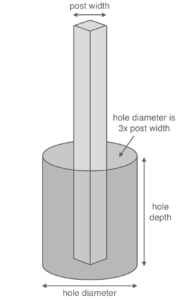
Some concrete and the tools to mix and pour it will also be needed to set the posts. Use our post concrete calculator to estimate the amount of concrete you need to set your fence posts.

The amount of material you need to build your fence depends on the style. Wood fences come in many types, including stockade, dog-ear, and shadowbox.

Some styles, such as a board-on-board fence, offer superior privacy but require more material. Others, like a side-by-side fence, use less material and can be oriented vertically or horizontally.

Once you’ve chosen a style, you can enter your total length and rail and picket or board specs into the wood fence calculator above to get an estimated bill of materials.

The calculator will estimate how much lumber you need to construct your fence, including the number of posts, rails, pickets, concrete, and nails/screws.

Continue reading to learn how to make the calculations yourself.

How Many Fence Posts Do You Need?

The first step in figuring out how much wood is needed to build a fence is to measure the length of the total fence run in feet. Given the total length, you can estimate the number of posts you need.

Posts for wood fences are typically 8 feet apart; if you are using other materials, keep in mind that posts can be placed up to 25′ apart. To calculate the number of posts for a wood fence, divide the length by 8′ and round up to get the number of sections. Then, add 1 to account for the last post.

For example, let’s find how many posts are needed for a fence with a planned length of 100 feet.

(length in ft. ÷ 8′) + 1 = posts
(100′ ÷ 8′) + 1 = posts
(12.5) + 1 = 13.5 posts

Round up to get 14 posts needed.

How Many Fence Rails Do You Need?

Rails are the horizontal boards that run between the posts that the fence boards or pickets are affixed to. To calculate rails, decide the number of rails you want.

This will vary by the style and height of the fence, but there should be at least two. Privacy fences are generally at least 6′ tall, but may go as high as 12′. The general rule of thumb for rails is to have one rail for every 24″ of height in your fence.

For a 6′ high fence, this means 3 rails. For a 12′ high fence, this means 6 rails. If you are building a shorter fence, you may only need 2 rails.

Multiply the number of sections by the number of rails per section to find the total rails needed. The number of sections is equal to the number of posts in the previous step, minus 1.

For example, let’s find how many rails will be needed for a 100′ fence with 14 posts that is 6′ high. There will be three rails per section.

14 posts – 1 = 13 sections

13 sections × 3 rails = 39 total rails

How Many Pickets Do You Need?

Depending on the style of fence you are building, you may need pickets or boards to complete the fence. Pickets or boards can be spaced closer together to create a privacy fence, or spaced more widely for decorative fences.

A fence board is completely flat and typically 5-½” wide, while a picket is often much thinner at around 2-½” wide. Stockade fences are a good example of a fence using pickets, while a board-on-board fence will usually use flat boards.

Both are calculated the same way: you need the width of the picket or board and any spacing between them.

For example, stockade and dog ear fences have no spacing between the pickets or boards. But a picket-style, decorative fence will space the pickets a few inches apart from one another.

To calculate the number of pickets or boards, add the width of the board and the space between them. For some fences, this will only be the width of the board.

Change the length of your fence to inches to match the picket/board measurements. Divide the fence length by the total picket/board width to get the number of pickets needed.

For example, let’s find the number of pickets needed for a 100′ fence using a 5-½” picket with a 2″ spacing.

5.5″ picket width + 2″ spacing = 7.5″ combined width

100′ length × 12″ = 1200″ length

1200″ length ÷ 7.5″ combined width = 160 pickets

Tips For Estimating Fence Lumber

We recommend ordering 10% extra lumber to account for cutoffs and waste. Posts are commonly constructed using 4×4 dimensional lumber, and rails are often 2×4.

Plan on ordering lumber to build gates as needed, including additional posts and hardware. Gate posts are usually 4×4 or 6×6 dimensional lumber.

How to Estimate Fence Price

The average fence costs $2000 to $8000 to install, depending on material, style, and length. Wood is often chosen for its durability, aesthetics, and affordability.

To determine a solid price estimate, decide on the fence style and type of wood you want and accurately estimate the amount of material needed. Common wood choices are pressure-treated wood, cedar, or redwood, and they vary in price considerably.

Use the calculator above to estimate quantities and costs for all three materials at once.

A home center or lumberyard can provide you with your local material costs. Ask for prices on 4×4s, 2×4s, and pickets or boards in each wood you are considering. Also, don’t forget to check the price of exterior screws and post-setting concrete.

Multiply the prices by the amount of material needed, then add them together to get a total estimated cost. We also suggest finding a local contractor to get a professional estimate for your project to find out precisely what it will cost.

Types of Lumber Needed For a Wood Privacy Fence

The types of lumber needed for a wood privacy fence will vary by type and style. Board-on-board fences typically use more lumber, while side-by-side fences use less. Use the following measurements for quick estimations of lumber amounts.

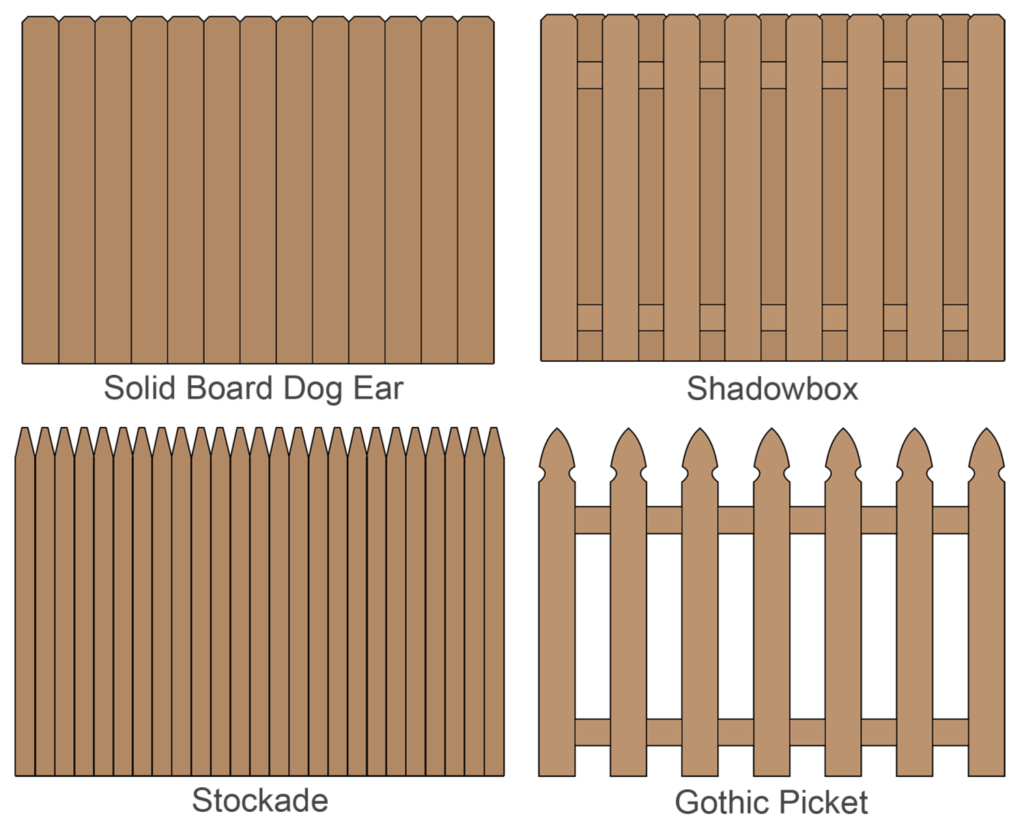
Estimate Solid Board Privacy Fence Material

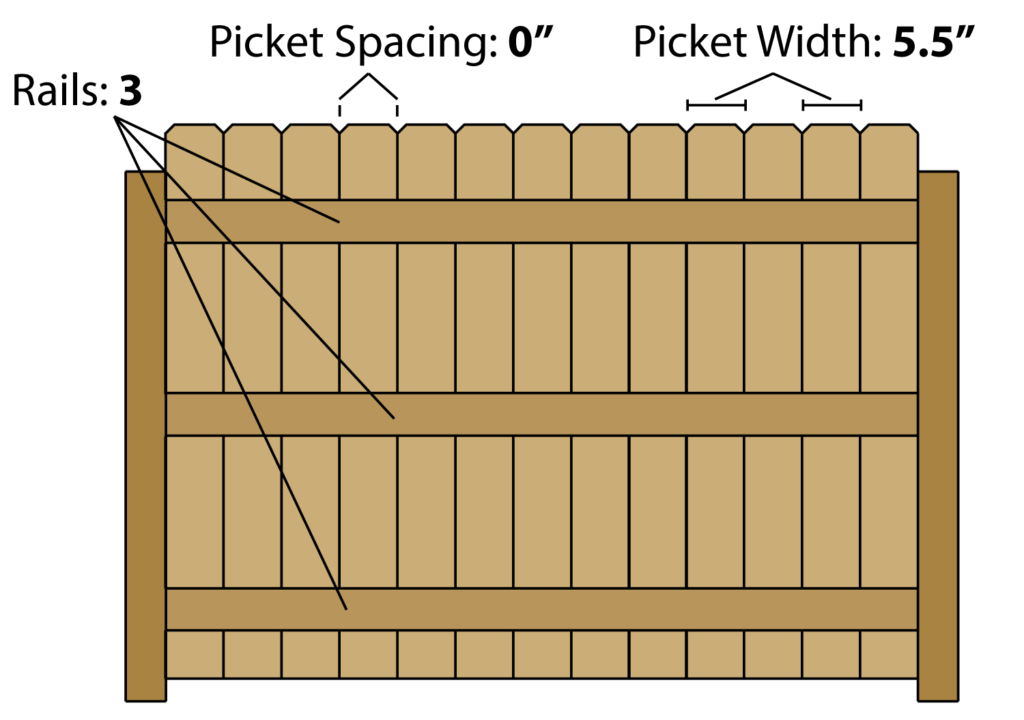
A solid board privacy fence consists of at least 3 rails connected to posts with attached pickets or boards with no gaps between them. Boards are usually 5-½” wide (thinner pickets are called “stockade” style; see below).

All the boards are installed on one side of the rails. So, you can see the rails on one side of the fence but not the other. The rail side is usually installed facing in. The other side is smooth and is usually public facing.

The exception is the framed style, where the rails are located at the very top and bottom to “frame” the boards. These rails are usually public facing. See popular solid board styles.

Use the following values for the form above to estimate:

  • Length: fence length
  • Rails per Section: 3 or more
  • Picket Spacing: 0
  • Picket Width: 5.5″
  • See popular solid board styles.

Estimate Shadowbox Fence Material

A shadowbox fence is similar to the solid-board style, except the pickets are installed on both sides of the rails with a gap between them. The pickets from one side are spaced so that they cover the space between the pickets from the other side. This creates a solid visual barrier.

Shadowbox fences are a subtype of the board-on-board style of fencing, and need more lumber to complete. Because pickets are mounted on both sides, the shadowbox style looks the same on each side.

Use the following values for the form above to estimate:

  • Length: fence length
  • Rails per Section: 3 or more
  • Picket Spacing: -1″
  • Picket Width: 5.5″

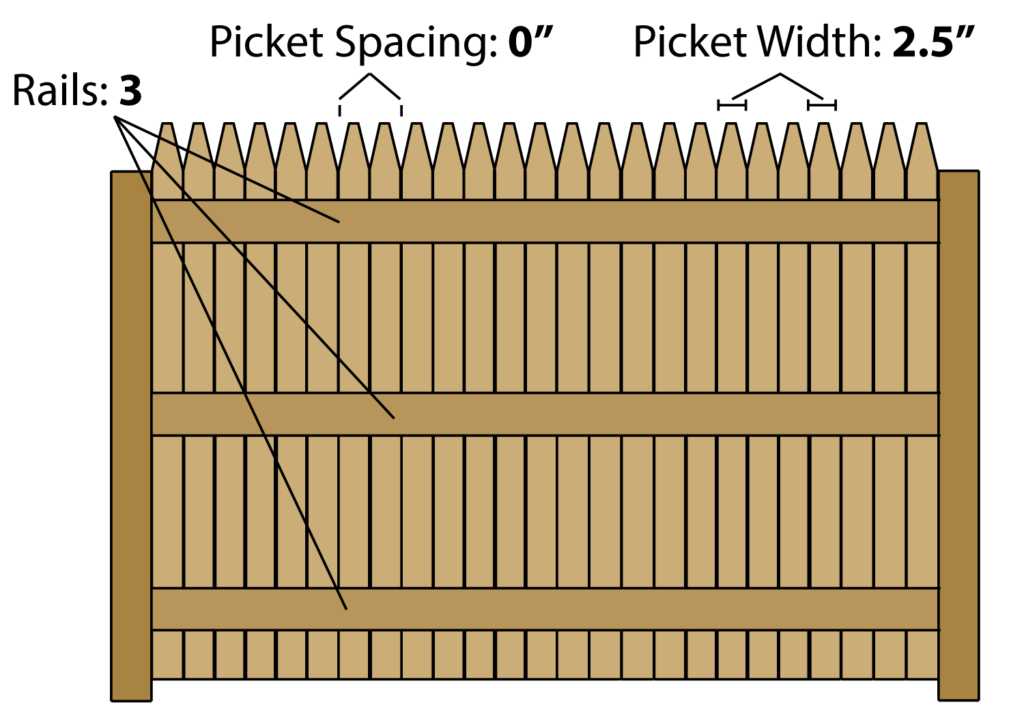
Estimate Stockade Fence Material

A stockade style fence is a style of side-by-side solid privacy fencing, using pickets that are 2-½” to 3-½” wide to achieve the stockade look. Like all solid-board fences, you will want to consider on which side you want the railings to show.

Use the following values for the form above to estimate:

  • Length: fence length
  • Rails per Section: 2 or 3
  • Picket Spacing: 0
  • Picket Width: 2.5″

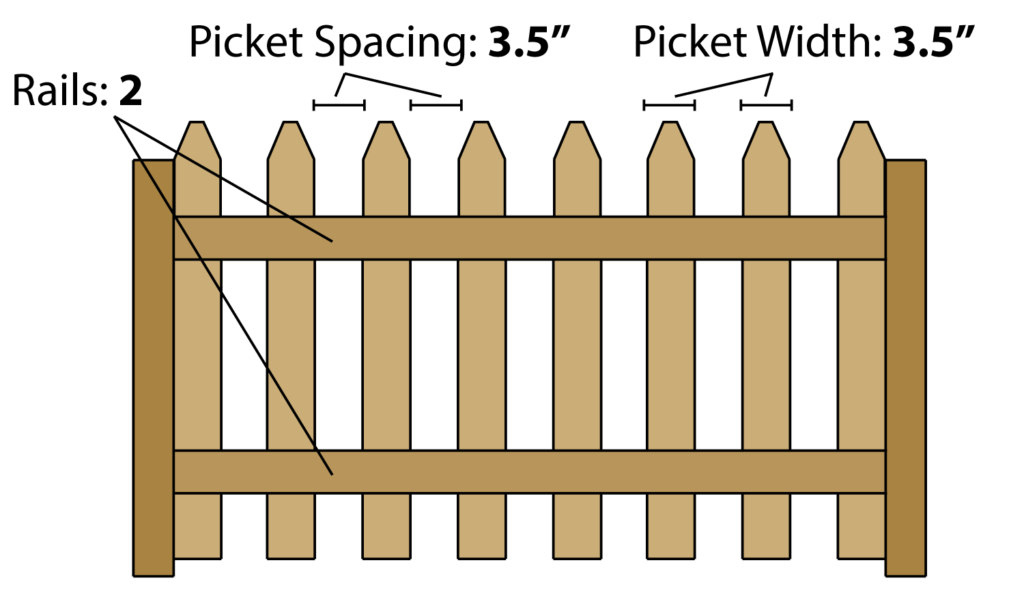
Estimate Picket Fence Material

A spaced picket fence consists of posts with 2 rails and 2-½”-wide pickets that are spaced evenly with a gap. The gap is usually the width of a picket, though this can vary. All pickets are installed on the same side of the rails, typically on the public-facing side. There are many patterns for picket styles and spacing. See popular picket styles.

Use the following values for the form above to estimate:

  • Length: fence length
  • Rails per Section: 2 or 3
  • Picket Spacing: 3.5″
  • Picket Width: 3.5″

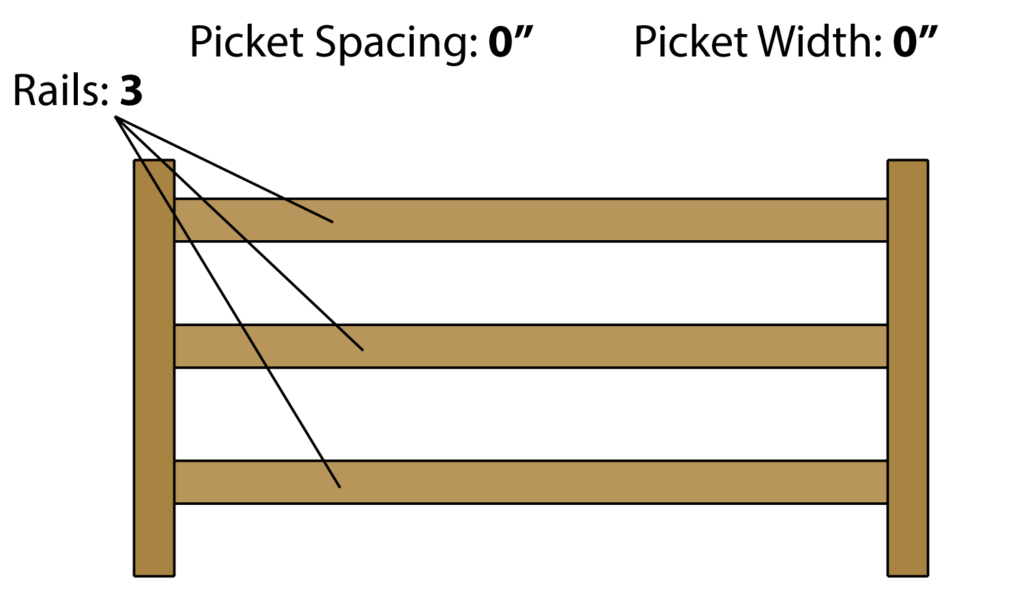
Estimate Rail Fence Material

Rail fences are wood fences that are used mostly for boundaries or livestock. They do not provide any privacy or security for pets or children.

They consist of horizontal rails between posts, with no vertical boards or pickets. The number of rails will increase as the height of the fence increases, but you can also add additional rails if you want to make the fence more secure for livestock.

There are two general types: a standard rail fence uses milled lumber between the posts. The lumber is usually nailed into place, but if using round milled rails, they may be inserted into the posts using pegs.

A split-rail fence uses non-milled lumber between the posts, and has a more rustic appearance. The lumber may be irregular, or can be made up of split tree branches.

Because there are no boards or pickets, these fences are usually cheaper to install.

Use the following values for the form above to estimate:

  • Length: fence length
  • Rails per Section: 3
  • Picket Spacing (inches): 0
  • Picket Width (inches): 0

Next Step – After estimating materials, it’s time to begin laying things out. Learn how to lay out a fence safely and efficiently to get the best results.

Frequently Asked Questions

For most wood, vinyl, and metal fences, 8 feet is the standard spacing, but depending on the fence type, posts can range from between 8 and 25 feet apart.

For most fences, 8 feet is the standard spacing, although, for some chainlink and wire fences, the spacing can be much longer. Divide the total length of fencing you need by the space between the posts – 8′ being average – to get the number of posts needed.

The typical fence post should be set at least ⅓ the height of the fence in the ground. This means that if your fence is 6′ high, you’ll need 8′ long posts so that they can be set 2′ in the ground.

For a privacy fence, the standard height is 6′, but may go as high as 12′ in certain circumstances. For decorative fences and pet fences, 4′ is generally standard.

A linear foot is a horizontal measurement of the fence, or the total length of the fence, measured in feet. Learn more about how to calculate linear feet.

The square footage of a fence is equal to the total length in linear feet times the height in feet.

Note that most fences are sold and installed by the linear foot, or the length of the fence in feet. However, when estimating paint, stain, or other finishing, you may need to measure the area of the fence in square feet.

Post Hole Concrete Calculator

Post Hole Concrete Calculator

Calculate how many yards or how many bags of concrete you’ll need for a set of post holes by entering the post diameter and hole size.

If you’re not sure what size hole to dig, a rule of thumb is to use a hole diameter three times the post diameter and ⅓ as deep as the post height.

  • By
    FindPros

    FindPros connects consumers with professionals in over 600 different categories.

  • Reviewed by
    Jacky L.

    FindPros connects consumers with professionals in over 600 different categories.

Post Dimensions

This field is required.
Value should be positive.

Hole Dimensions

This field is required.
Value should be positive.
This field is required.
Value should be positive.
This field is required.
Only numbers are allowed.

Optionally enter the price per cubic yard

$
Please enter valid price.

Results:

{{concrete_volume_cb_ya}}
{{concrete_volume_cb_m}}

Pre-mixed Bags

{{bags_50lb}}
{{bags_60lb}}
{{bags_80lb}}

Estimated Concrete Cost

{{ cost }} $

Learn how we calculated this below

Add this calculator to your site

How to Use the Post Hole Calculator

Fence posts must be sunk into the ground and secured using concrete in order to create a stable and long-lasting fence. Concrete can be purchased ready to pour in large amounts or in dry bags for smaller amounts.

To calculate the amount of concrete you will need to set fence posts, use this post hole estimator. Enter your post and hole dimensions in any units, and the calculator will give you the results in cubic yards and the number of pre-mixed, dry bags of concrete needed.

Fence posts must be set into the ground at a depth that is a minimum of ⅓ the total height of the fence. For a 6′ fence, this would mean the hole must be a minimum of 2′ deep. The width of this hole should be three times the width of the post. If your fence posts are made of 4″ x 4″ boards or are round with a 4″ diameter, these have an actual width or diameter of 3-½”. This would make the width or diameter of the hole 10.5′.

It’s a good idea to order roughly 10% additional material to account for settling and spillage. If you don’t have many posts to set, it may be more cost-effective to purchase dry concrete, mix it with water, and set the posts yourself.

If, however, you need a cubic yard or more of concrete total, you may find it easier to have it delivered pre-mixed and ready for pouring.

Concrete contractors can provide estimates for delivering and installing cement for your post project.

Illustration showing a post hole with a diameter that is three times the post’s diameter and with a depth that is 1/3 the height of the post.

How Much Concrete Do You Need Per Fence Post?

Concrete is sold ready-mixed (and usually delivered) by the cubic yard or in dry, pre-mixed bags by weight.

To calculate how much concrete you need, you need to know the post size you are going to use and how many posts you are installing. Your post diameter if it is round, or length and width if it’s square, and height determine how big each hole needs to be.

As stated above, fence post holes should be three times the diameter or width of your post and ⅓ as deep as your fence is tall.

First, you need to calculate the volume for the post hole. Then calculate the volume for the part of the post that will be submerged in the hole. Make sure all your units of measurement are the same, meaning that if you measure the width in inches, you should also measure the length and depth in inches.

To easily use the table above, convert your units to feet if they aren’t already. Use our calculators to quickly convert inches, yards, or meters to feet.

Or, if you are using inches for your calculations, you can convert to cubic yards by dividing the inches by 46,660 – the number of cubic inches in a cubic yard.

Post Hole Volume Formulas

Your post holes may be round, meaning cylindrical, or they may be rectangular, depending on how the post hole is dug. Likewise, your post itself may be round or square in shape.

Depending on the shape of the post and the hole, this may change the formula used to calculate the volume. Use the following formulas to calculate volume. For other types of round holes, use our cylinder cubic yardage calculator.
Rectangle:

volume = length × width × depth

Cylinder:

volume = radius2 × π × depth (π = 3.14)
Calculate Concrete Volume

Unlike a typical concrete pier, you need to account for the space that the post takes up in the hole when estimating. So, with the volume of the submerged post and the volume of the hole figured out, subtract the post volume from the hole volume, and you will have the volume of concrete needed for each hole.

Simply multiply that amount times the number of posts to get the total quantity. Don’t forget to add in some extra for spillage and waste.

If you have multiple different size post holes to fill, calculate each set with matching dimensions separately, then add the totals together.

Example Fence Post Concrete Calculation

Let’s use an example to illustrate what we covered above. Let’s assume you’re installing a 6-foot high fence, where 2 feet of the post will be in the ground, and you will need twenty (20) 4″ nominal round posts.

Note that 4″ posts are actually 3 ½ in diameter. Use the formulas above for volume.

Calculate the post volume
Divide by 12 to convert the post diameter to feet:

3.5″ ÷ 12 = 0.2917′

Next, find the radius (½ of the diameter):

0.2917′ ÷ 2 = 0.1458′

Finally, use the cylinder formula to find the volume of a round post:

(0.1458′)² × π × 2′ = 0.1336 cubic ft.

Calculate the hole volume
Find the hole radius (3x post radius):

3 x 0.1458′ = 0.4374′

Find the volume of the post hole using the cylinder volume formula:

(0.4374′)² × π × 2′ = 1.2026 cubic ft.


Calculate concrete volume

To find the concrete needed, start by subtracting the volume of the post from the volume of the hole:

1.2026 – 0.1336 = 1.069 cubic ft. per post

Then multiply by the number of posts to find the total amount of concrete needed for the project:

1.069 cubic ft × 20 posts = 21.38 cubic ft.

Finally, convert it to cubic yards:

21.38 cubic ft. ÷ 27 = 0.79 cubic yards

Hint: you can also use a concrete calculator for this step.

Most people find it easier to find cubic feet first, then convert it to cubic yards; if so, divide the cubic footage by 27.

If you are using square posts of the same measurements, the formula will look like this:

Divide by 12 to convert the post width to feet:

3.5 ÷ 12 = 0.292 feet

Take the length and width of the post and multiply those times the depth of the post to get the cubic volume of the post:

0.292′ × 0.292′ × 2′ = 0.17 cubic feet

Calculate the hole volume using 3 times the width of the post or 10.5″ or 0.88 feet:

0.88′ × 0.88′ × 2′ depth = 1.55 cubic feet

Subtract the post volume from the hole volume:

1.55 – 0.17 = 1.38 cubic feet per post hole

Multiply times the total number of posts:

1.38 × 20 posts = 27.6 cubic feet

Add 10% for waste = 30.36 cubic feet

Divide by 27 to get the number of cubic yards – 1.12 cubic yards of concrete needed.

How Many Bags of Concrete Do You Need Per Fence Post

Most concrete suppliers will not sell fractions of a yard of concrete, though it is worth asking about. So, in many cases, you will need to purchase bags.

For the first example above, we can use the table below, to find the number of bags. In this case, you would need to buy at least eight 80 lb. bags and one 40 lb. bag (yielding a total of 5.1 cubic feet) of concrete to allow enough for extra.

Dry, Pre-Mixes Bag Concrete Yield

The following table shows the approximate yield of mixed concrete for common bag weights.

Bag Concrete Weight Mixed Concrete Yield (approximate)
40 lb (18.1 kg) 0.30 cu ft (8.5 L)
60 lb (27.2 kg) 0.45 cu ft (12.7 L)
80 lb (36.3 kg) 0.60 cu ft (17 L)

Approximate yield for various bags of concrete

Tips For Ordering Concrete

Consider these tips to ensure your concrete installation goes smoothly.

Type of Concrete and its Proper Installation

The type of concrete you use and its application will vary depending on your climate. Colder temperatures need longer curing times; sandy soils need different shaped holes; more extreme freeze/thaw cycles need higher strength concrete than more temperate regions.

Your concrete supplier can advise you on the proper mix to use for your project and region.

Additional Costs

For ready-mix concrete delivery, there are typically additional fees for delivery, weekend service, small loads, and overtime for long unloading times. Discuss these issues with your concrete supplier ahead of time so that you have a clear understanding of costs and can plan accordingly.

Additional Concrete

Order extra concrete (overage) for your project. The amount of overage you plan for will vary based on your quantity, but plan for at least 10% overage to accommodate spillage, settling, and grading inconsistencies.

This will save you from a bad pour (concrete installed in parts resulting in a separated, weak mass) in the event that your estimates are even slightly off.

Allocate Enough Time

Finally, digging can be hard, time-consuming work. Allow plenty of time to dig all the post holes for the project before the concrete is delivered or mixed.

Mixed concrete that must sit before being poured into place can partially or even fully set. This can result in significant waste from hardened, unused concrete or create air pockets and compromised strength from pouring concrete that is too thick.

Fence Stain Calculator

Fence Stain Calculator

Use the calculator below to estimate how much material you’ll need to paint or stain a fence.

  • By
    FindPros

    FindPros connects consumers with professionals in over 600 different categories.

  • Reviewed by
    Jacky L.

    FindPros connects consumers with professionals in over 600 different categories.

Fence Size

This field is required.
Value should be positive.
This field is required.
Value should be positive.

Picket Layout

This field is required.
Value should be positive.
This field is required.
Value should be positive.

Paint or Stain Details

This field is required.
Value should be positive.
This field is required.
Value should be positive.
Paint/Stain Estimate:
{{stain_needed}}
{{stain_needed_per_quote}}
{{total_sq_ft_area}}

Learn how we calculated this below

Add this calculator to your site

How to Estimate Paint or Stain for a Fence

Over time, a wooden fence can become weathered and dull, and you’ll need to paint or stain it to restore its beauty and protection. Both paint and stain need to be reapplied periodically to help protect your fence from the elements and UV rays. Stain ideally needs to be reapplied every other year, while paint may last three to five years, although there is some flexibility for both.

Before you start the painting or staining process, it’s crucial to estimate how much paint or stain you’ll need to complete the project.

There are a few things you need to do to estimate paint or stain.

Step One: Measure the Fence

Measure the length and height in feet of each fence panel, then multiply them together to find the total square footage of the fence. Repeat this process for each section of the fence, remembering to measure the gates as well.

If you’re finishing both sides of the fence, you’ll need to double your square footage measurement. Keep in mind that your fence style can influence the amount of paint.

Picket fences with a lot of spaces between the pickets will require less paint than a solid fence, while fences that have a lot of extra posts, rails, and decorative areas may require more paint.

Because paint and stain can have a range of coverage, keep in mind that for fences that have more surface area to cover, you will be at the lower end of the coverage range, while fences with less area to cover may be at the higher end.

Step Two: Note the Type of Wood

The type of wood you’re trying to finish will determine how much paint or stain you need to cover it fully. Softwoods, such as pine or cedar, will absorb more paint or stain than hardwoods, such as oak or mahogany.

Most fences are made of softwoods, with the most common materials being redwood, cypress, pine, and cedar. However, some fences can be made of oak, teak, or mahogany. It is important to know the material of your fence, if possible, as it can affect not only how much paint or stain it absorbs, but also whether a primer is necessary as well.

A new fence constructed using new, unfinished lumber will also absorb more finish than one that has already been finished, painted, or primed. Some fence installers recommend letting your fence weather for a season before applying stain or paint for this reason.

The age of the fence will also play a role. Significant weathering causes the grain of the wood to open and will require much more paint or stain to get full coverage than wood that is not heavily weathered.

Most experts also suggest using a semi-transparent or solid stain for wood that is weathered to avoid a blotchy, uneven look that results from using clear or translucent stains.

If there are any sections of the fence that are beyond repair, then it’s best to replace them before you apply the new finish so they blend with the rest of the fence. Learn more about how much it costs to repair a fence.

Step Three: Choose a Paint or Stain Product

The color and type of paint or stain you use also affects how much is needed to fully cover the fence. For example, very light or very dark colors may require additional coats to evenly and completely cover the fence.

This is particularly true if you are changing the color of the fence. Going from dark to light or light to dark may require additional coats of paint or stain.

Each type of paint or stain varies in how much square footage it will cover per coat. Check the can to find the coverage rate for the specific product you intend to use.

Typically, one gallon of paint or stain covers 250-350 square feet of fence. Your coverage rate will vary depending on the type of wood, its condition, and the type and style of fence. Fences that have more surface area to cover, such as a shadowbox fence will need more material to cover than a panel fence, for example.

Step Four: Calculate the Amount of Paint or Stain Needed

Once you have the measurements of the fence and the coverage rate for the product you’re using, it’s time to calculate how much paint or stain you need.

Start by dividing the square footage of the fence from step one by the coverage rate of the product you’re using.

Then, multiply that by the number of coats you want to apply. Typically, two coats are required to get a good finish, but keep in mind that very light or dark colors may require an additional coat.

If the wood is new and has not been finished before, or if it’s very weathered, then you’ll need to account for this and add a bit to your estimate.

You should also consider adding an extra 10% of additional paint or stain to account for spillage, overspray, etc.

In general, refreshing a fence with a few coats of paint or stain is a cost-effective way to restore its beauty and protect it from the elements. Over time, these costs can add up, however, which is an important consideration when choosing a new fence, and why many choose to install a vinyl fence instead of wood.

You might also be interested in calculating the amount of stain needed for a deck.