Acreage Calculator

Acreage Calculator

Calculate an area in acres by entering the length and width. For more complex shapes, use the map to calculate acreage by placing pins on the edges of the land to be measured.

  • By
    FindPros

    FindPros connects consumers with professionals in over 600 different categories.

  • Reviewed by
    Jacky L.

    FindPros connects consumers with professionals in over 600 different categories.

This field is required.
Value should be positive.
This field is required.
Value should be positive.
Total Acreage:
{{total_acreage_acres}}
{{total_acreage_hectares}}
{{total_acreage_square_foot}}
{{total_acreage_sqm}}
{{total_acreage_square_miles}}
{{total_acreage_square_km}}
{{total_acreage_perimeter_feet}}
{{total_acreage_perimeter_meters}}

Learn how we calculated this below

What is an Acre?

An acre is a measurement of land area used in the Imperial measurement system (U.S. and informally in the U.K. and its former colonies). It was originally the amount of land a yoke of oxen could plow in a day.

Now, it is defined as an area measuring one chain by one furlong — not entirely more useful units either!

We’ll discuss how much an acre is in a more reasonable way below. But, know that an acre is still a common land area measurement used in the U.S., especially in real estate and government land transactions.

How Big is an Acre?

So having a dimension of one chain by one furlong, you might be wondering how big an acre is. One acre is equal to 43,560 square feet,[1] which is just a little bit smaller than a football field and about the same size as a soccer field.

The dimensions of an acre have been historically defined as being equal to an area that is 66 feet (1 chain) by 660 feet (1 furlong).

Defining the size in acreage this way allowed farmers to more easily determine how much land they could plow per day. The furlong was originally the distance an oxen team could plow without rest. So they defined the acre in terms of how many furrows (the length of the furlong) could be plowed in a single day.

Outside of land surveys, these units of measure are rarely used. Refer to the table below to see how big an acre is relative to more commonly used measurements.

Size of One Acre

Here’s a quick reference table showing the size of an acre.

Unit of Measure Dimension Equal to 1 Acre
Hectares 0.4047 hectares
Meters 4,047 m²
Miles 0.0015625 miles² (640 acres = 1 mile²)
Yards 4,840 yds²
Square Feet 43,560 ft²
Square Inches 6,272,640 in²
Perches 160 perches (1 perch = 1 rod)
Rods 160 rod² (1 rod = 16 ½ feet)

Chart showing the dimensions of one acre in various units of area measurement.

You can also use our acreage converter to convert the area in acres to another unit of measure.

How to Calculate Acres

The easiest way to calculate the number of acres in your land is to use the calculator above. If you know the length and width, simply enter them. The calculator will provide the number of acres, as well as the area in other units.

To calculate acres by hand, multiply your length and width (in feet) to get square feet. Try our length converter if needed. Then divide by 43,560 to determine the size of the land in acres.

Example: Your city house lot is 33′ wide by 102′ long. How many acres do you have?

33′ × 102′ = 3,366 sq ft
3,366 sq ft ÷ 43,560 = 0.077 acres

You can quickly find the square footage of an area using our square footage calculator.

Unfortunately, property is not always divided into perfect squares, and finding the acreage of irregular shapes can be a little more challenging.

The trick to finding the size of these irregular plots in acres is to break down the land into smaller geometric shapes first. Find the size of those smaller spaces separately, and then add them together.

Another great way to find the area of irregular shapes is to use the interactive map above to determine the actual size in acres.

Keep in mind that sometimes property lines can be vague or off by several feet. If you need precise measurements for something like fencing, always measure the land directly and do not go off of reported acreage. While your plot may have been purchased as 1 acre, your actual property lines could make it slightly bigger or smaller depending on how and when it was surveyed.

In addition, when installing things like fences, sometimes trees, large rocks, and other landscaping irregularities will change the path of the fence. Always get precise measurements before purchasing materials.

Acre Lot Portions

While acreage is the most common method for measuring large plots of land, it’s also sometimes used for home lots as well. The average home is on a ⅓ acre lot, but it’s also common to have a total lot that is ½ or ⅔ acre.

While it’s best to measure the area to get the most accurate measurements, the following chart breaks down partial acres into square footage and the perimeter in linear footage.

Lot Size Area in Square Feet Perimeter in Linear Feet
¼ acre 10,890 sq ft 209 ft
⅓ acre 14,520 sq ft 279 ft
½ acre 21,780 sq ft 418 ft
⅔ acre 29,040 sq ft 558 ft
¾ acre 32,670 sq ft 627 ft

Chart showing the dimensions of one acre in various units of area measurement.

How to Calculate the Perimeter of an Acre

The calculator above will also give you the perimeter in linear feet, which you’ll need if you plan on fencing in your property, as this is the most common way that fences are sold and installed. The average acre has 835 linear feet around the perimeter for which to fence.

Note that this measurement can vary depending on your exact parcel size. To calculate this by hand, you can measure each of the four sides individually in feet, and add them together.

To calculate the perimeter by hand, you can measure each of the sides individually, then add them together. If you measured in feet, the result will be the perimeter in linear feet.

Frequently Asked Questions

Acres have become a common measurement in the US for an area measuring 43,560 sq ft. The unit of measurement came from the number of furrows an oxen could likely plow in one day – about 66, each one measuring 660 feet long.

An acre is roughly the size of a soccer field or a little smaller than the size of a football field.

The average home in the US sits on a total of ⅓ of an acre, which would make three homes per acre the average. However, average lot sizes have decreased; the former average size was ½ acre, which would mean two homes on large-sized lots, while homes can sit on smaller lots of ¼ acre comfortably, which would make four homes per acre.

Farm acreage depends on the use and can range from ½ acre for a small farm to 40 acres for a large farm. Ranches may have legal definitions of size by state, with a small range being defined as around 100 acres in most areas.

There are 640 acres in one square mile.

Tile Calculator and Cost Estimator

Tile Calculator and Cost Estimator

Calculate the tile material needed for your floor, wall, or backsplash project by entering your project dimensions. Estimate the cost of materials by entering the price per below.

  • By
    FindPros

    FindPros connects consumers with professionals in over 600 different categories.

  • Reviewed by
    Jacky L.

    FindPros connects consumers with professionals in over 600 different categories.

Project Dimensions

This field is required.
Value should be positive.
This field is required.
Value should be positive.

Tile Size

This field is required.
Value should be positive.
This field is required.
Value should be positive.
This field is required.
Value should be positive.

Optionally enter the number of tiles in a box to calculate the boxes needed

This field is required.
Only numbers are allowed.

Optionally enter the price per tile, box, square foot, or square meter

$
Please enter valid price.

Project Area

This field is required.
Only numbers are allowed.

Tile Size

This field is required.
Value should be positive.
This field is required.
Value should be positive.
This field is required.
Value should be positive.

Optionally enter the number of tiles in a box to calculate the boxes needed

This field is required.
Only numbers are allowed.

Optionally enter the price per tile, box, square foot, or square meter

$
Please enter valid price.

Material Estimate:

{{tiles_needed}}
{{box_needed}}

Material Cost

{{estimated_price}} $

Price does not include mortar, mastic, backer board, grout, spacers, or other supplies.

Total Area

{{total_sqft}} sq ft
{{total_sqmeters}} sq m

Learn how we calculated this below

Add this calculator to your site

How to Calculate How Much Tile You Need

Tile is a very popular option for flooring and backsplash projects. Tiles are durable, easy to clean, and have endless design possibilities.

They are available in many sizes and materials, including glass, ceramic, porcelain, and natural stone. They can be used anywhere in and around the home, with bathrooms, backsplashes, and flooring being the most common areas.

Because tiles come in so many sizes and there are so many installed patterns available, it can seem complicated to estimate how much tile you may need for a project. Tile estimates are fairly simple to calculate, though, once you have a few pieces of information.

You can calculate how much tile you need in just a few easy steps.

Step One: Calculate the Floor or Backsplash Area

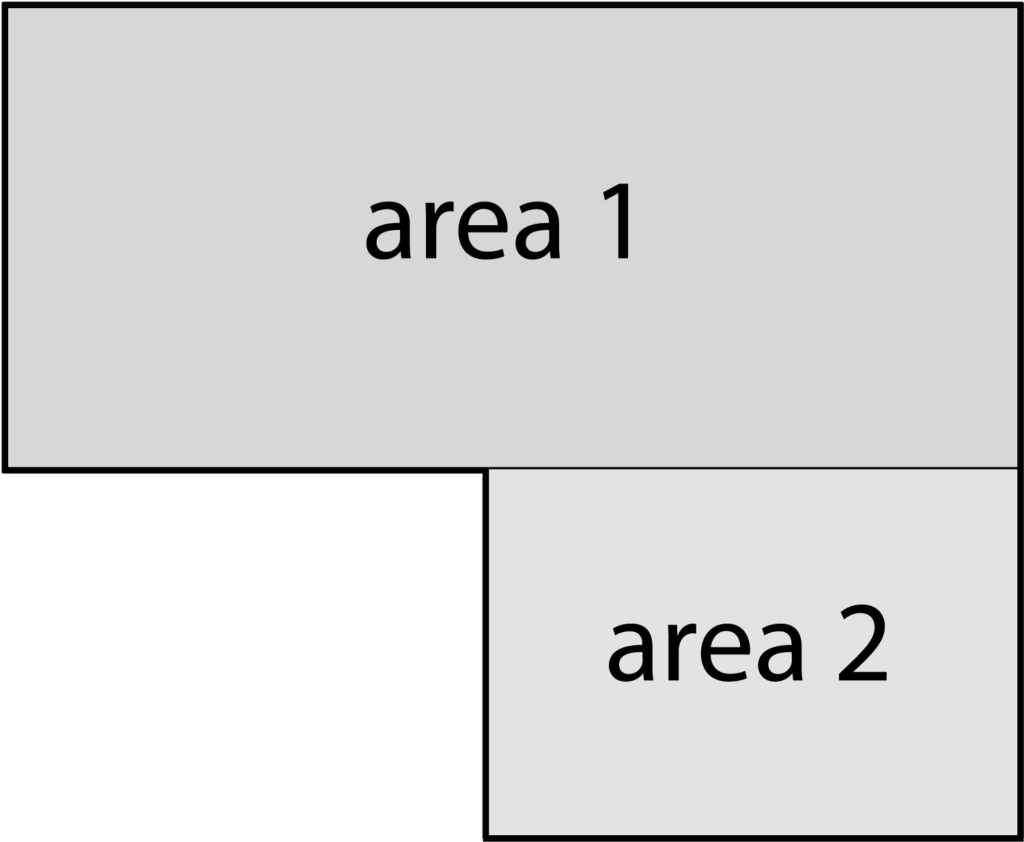
The first step is to know how large of an area you want to cover. Begin by measuring the room or wall lengths and widths in feet, then multiply these measurements together to get the area in square feet.

To measure like a pro, learn pro tips for measuring irregular rooms.

For smaller spaces, such as a kitchen backsplash, you may find it easier to measure in inches. Inches are easier to use for smaller spaces because, in most cases, these will fall somewhere between even feet measurements.

If you measured in inches, then multiply the length and width of each area in inches together to get the square inches of that area. Divide by 144 to convert to square feet.

Measure smaller areas individually. Then, add all your areas together. Plug the total lengths and widths into the calculator above.

You can easily find the square footage of your project using our square footage calculator.

In some cases, tile is sold by the square foot. If that’s the case for the tile you’re ordering, then you can use the square footage of the space to order your material.

Most tiles are sold by the box, which may contain varying amounts of square feet. Keep reading to see how to determine how many tiles you may need for a flooring or backsplash project.

Step Two: Calculate the Area of the Tile

Tiles come in many sizes, and costs vary widely. Some can be purchased individually or in individual sheets, and some by the box. Boxes and sheets cover different square foot areas as well.

If you know what tiles you would like to use, enter the size into the calculator above. Don’t forget to enter how much square footage the box covers if you use that method.

If you are using sheets, enter the sheet size. The calculator will also give you a cost estimate if you know the price per tile, sheet, or box.

To do this calculation yourself, take your tile size in square inches and divide it by 144 (12in. x 12in.). This gives you the tile size in sq ft.

Step Three: Estimate Tile Quantity

Once you know the area you need to cover and the area of each tile, divide the total area by the tile size in sq ft. This will give you the number of tiles you need for your space.

For boxes, divide the area by the sq ft coverage for the box.

Use the result to order your tiles, keeping in mind that ordering an extra 10% to 20% is a good idea to allow for cuts and waste. 10% is standard for straight-set installations; if you are using a pattern or laying the tiles on the diagonal, 15% to 20% extra is recommended.

For example, to estimate tile for a kitchen backsplash area that is 12′ long and 18″ deep using a 4″ x 4″ tile.

Step one: measure the area to cover:

Convert inches to feet: 18″ ÷ 12 = 1.5 ft
Find total area: 1.5′ × 12′ = 18 sq ft

Step two: measure tile area:

Calculate tile size in sq ft: (4″ × 4″) ÷ 144 = 0.111 sq ft

Step three: estimate tile

Find the total number of tiles needed: 18 sq ft ÷ 0.111 sq ft × 1.1 (overage) = 178

How to Estimate Tile Patterns

Kitchen and bath tile is often installed in a pattern using different sizes. To estimate the amount of tile you’ll need, you can find the square footage of the repeating pattern and then estimate how many instances of that pattern are needed, then multiply by the number needed to create the pattern.

For instance, if your pattern requires one 6×6 and two 3×6 tiles, then add the square footage of both tiles together to find the square footage of the pattern. Then divide the floor ft2 by the tile ft2.


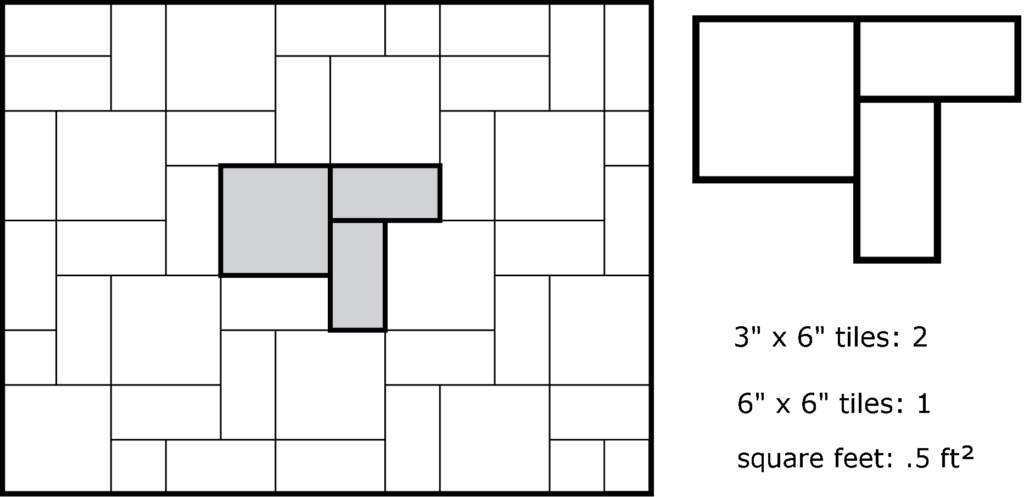
Keep in mind, however, that if the tile is not sold as a packaged pattern, you will need to determine the square footage of each tile separately, and order that amount, then piece the tiles together in the pattern.

For example, using the above tile sizes, you would need equal amounts of both tiles – simply divide the total square footage in half, add 20% for waste, and order equal amounts of each size. However, for other tile sizes and patterns, you may need more square footage of one tile than another, so the tiles will need to be calculated separately.

Some layout patterns that use the same size tiles, such as a herringbone, subway pattern, or diagonal pattern, may also influence how much material will be required since there will be varying amounts of cuts and waste when using different layouts.

While some patterns result in more waste than others, a good rule of thumb is when installing tile at an angle, consider ordering 20% additional material to account for more cuts and waste

How to Estimate Thinset or Mastic

You’ll need to choose either thinset or mastic to adhere your tiles, the which you choose depends on your tiling application. Some tile materials, such as stone or glass, will dictate that you use a latex-modified, white thinset mortar.

Ceramic and porcelain tiles may use thinset on the floor and mastic on the walls, however, if you are choosing to use a large format tile on the walls, you will also need a latex-modified thinset mortar to hold the weight of the larger tiles.

Calculating how much thinset or mastic you need requires choosing a trowel size for your project. Larger and smaller notch trowels require more or less thinset.

Different thinset and mastic products will cover different amounts, and most will have a coverage chart on the bag indicating how many square feet the product covers for your trowel. If you don’t have access to the coverage chart, you can learn how to estimate thinset material.

Other Materials Needed

In addition to tile and thinset, you’ll need some additional material for your project.

First is a solid backer board to properly support the surface and prevent cracking. This can be found in 3′ x 5′ sheets at your local home center and comes in 1/4″ and 1/2″ thicknesses.

We also recommend getting some good grout spacers to set an even spacing between each tile.

Never butt tiles against one another, as this can cause cracking and damage to the edges of the tile. The more even the tile is, the thinner the grout joint. Handmade tiles and rustic tiles will require larger grout joints than rectified porcelain tiles.

You’ll also need to get grout, which is available in sanded and unsanded varieties. Choose unsanded grout if your spacing is 1/8″ or less, unless otherwise specified, such as with glass tile.

Grout amounts will vary by the size of the tile. A large format tile will need less grout than a mosaic, for example. If installing a deep tile or rounded tile, such as a river rock mosaic, you will need two to four times the amount of grout as with a flat tile.

Common Tile Sizes and Coverage

Common tile sizes for flooring and wall applications in inches and centimeters and the amount needed to cover a 100 ft2 area

Tile Size in Inches Tile Size in Centimeters Tiles per 100 ft2
4″ x 4″ 10 cm x 10 cm 900
3″ x 6″ 7.5 cm x 15 cm 800
6″ x 6″ 15 cm x 15 cm 400
4″ x 24″ 10 cm x 61 cm 150
12″ x 12″ 30 cm x 30 cm 100
16″ x 16″ 41 cm x 41 cm 57
18″ x 18″ 46 cm x 46 cm 45
18″ x 24″ 46 cm x 61 cm 34

Common tile sizes for flooring and wall applications in inches and centimeters and the amount needed to cover a 100 ft2 area

Hiring a Professional

Tiling can be a fun DIY project. But an experienced tile contractor can make the difference between a “good” outcome and a “professional” outcome.

Another advantage in hiring a contractor is that you needn’t worry about miscellaneous expenses like renting a tile cutter, what type of mortar and trowel to use, or how many spacers you need. We can help you find local tile installation professionals who can give you project cost estimates for your project.

To estimate other flooring materials, visit our carpet or flooring calculators.

Frequently Asked Questions

The 3, 4, 5 rule for laying tile refers to making sure your tiles are laid square even if the walls are not.

Make a grid of chalk lines on the floor, and measure one chalk line 3 feet out from center, and the intersecting chalk line 4 feet out from the center, now measure a straight diagonal line between the two marks; if it measures 5 feet, you have a right angle.

This method uses the Pythagorean theorem based on the rules for right triangles.

this depends on many factors, from the size of the tile to the manufacturer. You may have anywhere from 10 tiles to 90 tiles in one box.

There is no single standard tile size. Tiles may be in any measurement from ⅜” to 48” square, with many rectangular, diamond, and even circular measurements in between.

For the average installation, 10% extra is usually fine. For a pattern, 20% extra is recommended.

Linear Feet to Square Feet Calculator

Linear Feet to Square Feet Calculator

Enter linear feet and the material width to calculate the total square footage of material. If you want to calculate linear feet, enter the square footage and the material width.

  • By
    FindPros

    FindPros connects consumers with professionals in over 600 different categories.

  • Reviewed by
    Jacky L.

    FindPros connects consumers with professionals in over 600 different categories.

This field is required.
Value should be positive.
This field is required.
Value should be positive.
This field is required.
Only numbers are allowed.
This field is required.
Value should be positive.

Result:

{{square_feet}}
{{linear_feet}}

Learn how we calculated this below

Add this calculator to your site

How to Convert Linear Feet to Square Feet

When ordering or installing many types of material, you may find that some are sold by the linear foot and some by the square foot. And some of these materials may even be designed to be used together.

Before doing any calculations, it’s important to understand what linear feet and square feet are. Linear footage is a measure of length or distance, while square footage is a measure of area.

Because these are different types of measure, some additional information will be needed to convert between the two. For the calculator above, the material width is used in conjunction with the length to calculate the area.

To convert linear footage to square footage, use the following area formula:

area = length × width

To use the formula, insert the linear feet measurement for length and material width for the width. If you’re stuck on how to find this, learn more about how to find linear feet.

For example, let’s find how many square feet of a flooring border you’ll need for a 6″ wide border measuring 12 linear feet.
Start by converting the width measurement to feet so we have common units of measure.

width = 6″ / 12 = 0.5′

Now use the area formula to convert to square feet.

area = 12′ × 0.5′
area = 6 sq ft

So, if you wanted to subtract the square footage of the border from the rest of the flooring, you would subtract 6 square feet from the total area.

How to Convert Square Feet to Linear Feet

To find the length of a material in linear feet needed to cover a space with a measurement in square footage, you need to reverse the area formula above to solve for length. Start by converting the material width to feet if it’s in inches. Then, use this formula to convert to linear feet.

To convert linear footage to square footage, use the following area to length formula:

length = area ÷ width

For example, if you were using 3 x 6 tiles as a border, and there are 8 square feet in a box, 8 square feet divided by the width of the material (6″) gives us 16 linear feet of 3 x 6 tile in one box.

If you’re unsure how to find the area of a space, try using our square footage calculator.

For example, let’s find how many linear feet of hardwood flooring will be needed to cover a 120 sq. ft. room if the boards are 3″ wide.

Convert the width measurement to feet.

width = 3″ / 12 = 0.25′

Now convert to linear feet.

length = 120 sq. ft. ÷ 0.25′
length = 480 linear feet

Frequently Asked Questions

Square feet are a measurement of area (length x width), while linear feet are a measurement of length alone. To determine the square footage, you would need the width of the area you are measuring in linear feet as well as the length.

Linear footage in regard to flooring generally refers to things like borders or baseboards. Most flooring is sold and installed by the square foot, but borders are sold by the linear foot, or the length of the border in 12-inch increments.

A linear foot is a 12-inch measurement of length; other types of feet may include square feet (area) and board feet (lumber measurements). Think of a baseboard running along the wall – its length is measured in linear feet.

No, linear feet only refers to the length of something, such as a border or a piece of trim. Board feet refers only to the area measurement for lumber, and it’s the measurement of a board that is 12″ long by 12″ wide and 1″ thick, or 144 cubic inches.

Flooring Calculator

Flooring Calculator

Calculate laminate, vinyl, or hardwood flooring quantity and cost by entering your room dimensions and the material cost. We also have calculators for carpet and tile.

  • By
    FindPros

    FindPros connects consumers with professionals in over 600 different categories.

  • Reviewed by
    Jacky L.

    FindPros connects consumers with professionals in over 600 different categories.

This field is required.
Value should be positive.
This field is required.
Value should be positive.

Optionally enter the price per square yard

$
Please enter valid price.
Flooring Material Estimate:
{{sq_foot}}
{{sq_yards}}
{{sq_meters}}
{{sq_meters}}

Estimated Price

{{cost}}

Learn how we calculated this below

Add this calculator to your site

How to Estimate Flooring

Installing a new floor covering can add new life to the room and value to your home. Whether you choose to install hardwood, vinyl, or laminate, the first step to a successful installation is determining the amount of material you need.

All of these flooring materials are generally sold and installed by the square foot, making estimations simple for most projects. Keep reading to learn how to estimate and calculate how much material you’ll need for your flooring project.

Step One: Measure for Flooring

The first step to calculating floor material is to determine the size of the area you want to cover. Most manufacturers and contractors price flooring installations and material by the square foot, so we recommend measuring room lengths and widths in feet when possible.

In our experience, however, rooms are rarely ever perfect in size and shape; they commonly have bump outs, closets, or other areas that are better measured in inches. It’s also extremely like that your walls measure between full one-foot lengths.

Therefore, to get the most accurate measurements, measure space in inches using a tape measure, then convert them to feet.

Occasionally, flooring is available by the square yard, be sure to convert square feet to square yards if needed.

Here are a few tips to keep in mind for professional measurements.

  • Use a good tape measure and keep it level while measuring. For large areas, a laser measuring tool may help.
  • Measure wall to wall, not baseboard to baseboard. Flooring will go under the baseboard, so when possible, measure above the baseboard.
  • Always measure the widest parts of the room. If there is a bump-out or any other irregularity that creates additional width, measure at that point, even if most of the room is not that wide.
  • If the floor plan is complex or there are multiple rooms, break it up into smaller, regularly shaped sections. Then add the square footage together. For example, separate an L-shaped room into two rectangles that are easier to measure.

For more tips, we have some great information explaining how to measure an irregular room for flooring.

Step Two: Calculate the Amount of Flooring You Need

For vinyl, laminate, or hardwood, plug your lengths and widths into the calculator above. To calculate yourself, multiply the length times the width in feet to find the square footage. We suggest adding 10% extra material to allow for waste, placing seams, and matching patterns.

Keep in mind that many retailers will sell their material by the box; you may need to round up to the nearest full box when purchasing. It is always recommended to have a few pieces of material left over after installation.

This gives you material that can be used in the future for repairs if needed, as well as loose pieces you can take with you when choosing paint or furniture colors.

If you are installing your flooring in a pattern that is not straight or offset, you will need to add 20% to your total rather than 10%.

For example, laying your material on a diagonal or in a herringbone or parquet pattern. All of these designs require additional cuts, which will increase the amount of material needed to complete the job.

Floor Area Formulas

You can also calculate the square footage or square yardage manually. For a typical rectangular room, make sure your measurements are in feet, then multiply the length by the width to find the total square footage.

For other types of rooms, use these formulas to find the flooring area. Enter your measurements in feet into the formulas, then solve to find the amount of flooring needed.

Rectangle
sq ft = l × w

l = length
w = width

You can also use our rectangle area calculator.

Rectangular Border
sq ft = (l – (2 × b)) × (w – (2 × b))

l = outer length
w = outer width
b = border width

Keep in mind that some borders are sold by the linear foot. In this case, instead of multiplying to find the area, measure the perimeter of the border area and add the four sides together.

Circle
sq ft = πr2

r = radius
π = 3.14159265359
If you know the circle’s diameter, you can find the radius by dividing the diameter in half.

Triangle

s = 1/2(a + b + c)

sq ft = s(s – a)(s – b)(s – c)

If your room is a right triangle, it is easier to multiply length times width, then divide by 2 to get the total square footage of the area.

Use our are calculator to find the area of more shapes.

How to Estimate New Flooring Cost

The flooring calculator can estimate the cost of material by entering the price per sq ft of materials. If you’re calculating cost manually, start by multiplying the room’s square footage by the cost per sq ft of the flooring you’ve selected.

After you have an estimated price for major materials, it’s time to estimate additional material needed. Depending on your space, you may need thresholds, base trim, or special edging. Some types of flooring also require an underlayment.

Estimate how many additional parts you need for your type of floor and find the cost for those parts. To find your total material cost, add the flooring cost to the cost of the additional parts.

Keep in mind that trim and edging are sold by the linear foot; measure these areas in inches, and divide by 12 to find the total linear feet; round up to the nearest whole foot, and add one to the total for waste.

Thresholds may be sold in standard sizes and cut to fit on-site, or they may be custom-made to your doorway measurements. Always measure your threshold length in inches to find the best fit.

If you are installing a material that requires adhesive, such as sheet vinyl flooring, you will need to estimate this as well. Generally, adhesive is sold by the container; check the amount of the container for coverage to determine how many will be required to cover a specific area.

It also pays to research costs of the various materials as they vary widely. For instance, laminate flooring can range from $0.75 to $5 per sq ft, and hardwood flooring can range from $4 to $30 per sq ft.

Color, finish, quality, and origin will all impact your costs. For example, an engineered hardwood floor that has been prefinished and that uses an exotic wood species will have a higher cost than a solid, unfinished wood floor that uses a local hardwood.

The higher the quality of a material, the higher its costs. However, in the case of some materials like luxury vinyl, higher-quality materials will outlast lower-quality materials by several years, which can make them a better investment long term.

Some flooring materials require specialized underlayment or treatment for various subfloors. When using the calculator, you can input these prices to obtain a cost estimate.

Estimating Labor and Tools

If you’re a DIYer, you most likely won’t need to hire a contractor to complete the project, but you’re not done yet!

At this point, consider any tools that may need to be rented or purchased, such as power nailers, floor rollers, or sanders. The tools required will vary based on the type of flooring you choose, and its installation style.

Do your research and equip yourself with the list of tools you’ll need and the costs to rent or purchase. In some cases, this, plus the time it takes to do the installation, can begin to approach the cost of a professional install.

If you’re not planning on doing the project yourself, give your contractor the quantity for an estimate. They may want to take additional measurements themselves and order the materials needed as well.

An advantage of hiring a contractor is that you needn’t worry about miscellaneous expenses like renting a nailer or sander, buying the proper glue or nails, or having the necessary equipment.

You can find a flooring professional who will discuss options with you and give you a final installed price. If you are installing it yourself, remember to add these additional costs to your project budget.

Whether you do it yourself or hire someone, start with the calculator above to get areas and rough cost estimates. You can read more about laminate flooring costs and find more flooring resources.

Carpet Calculator and Price Estimator

Carpet Calculator and Price Estimator

To estimate carpeting quantity and cost, enter the dimensions of the area you want to cover. Optionally, estimate the cost of the carpet and padding you would like to use by adding the price.

  • By
    FindPros

    FindPros connects consumers with professionals in over 600 different categories.

  • Reviewed by
    Jacky L.

    FindPros connects consumers with professionals in over 600 different categories.

This field is required.
Value should be positive.
This field is required.
Value should be positive.

Optionally enter the price per square foot

$
Please enter valid price.
$
Please enter valid price.
Carpet Estimate:
{{sq_ft}}
{{sq_yds}}
{{sq_meters}}

Estimated Price

{{carpet_cost}}
{{padding_cost}}
{{carpet_padding_cost}}

Learn how we calculated this below

Add this calculator to your site

How to Estimate Carpeting

Installing beautiful new carpet can add value and comfort to your home. Carpet comes in many types in varying levels of quality and cost.

New carpeting can represent a significant investment in your home. Installing it can also be challenging for DIYers to take on themselves. Compared to other flooring options, however, carpet adds exquisite warmth and sound cushioning to your home.

When planning any new flooring project, you will need to determine how much flooring you need. Stay tuned, we’ll show you how to easily estimate carpeting for your flooring project.

If you are considering an alternative flooring option, such as tile, try our tile calculator.

Step One: Measure the Room

The first step to any new flooring installation is to determine how large of an area you want to cover. It’s critical to measure the space accurately before ordering.

Most manufacturers sell carpet by the square yard, which is equal to 9 square feet. It will be easiest to measure your area in feet, then convert to square yards later.

As with any flooring material, it is important to measure accurately. Using a tape measure, measure the room wall-to-wall, not baseboard-to-baseboard, since baseboards are installed on top of your carpet.

If the floor plan is complex or there are multiple rooms, break the space up into smaller, regularly shaped sections. Measure each independently, and after you calculate the square footage of each, add them together to get the total amount for the area.

Visit our tutorial on how to measure irregular rooms to learn more.

If you need to measure in units other than feet, then you can use our length calculators to convert them to feet. In the next step, you’ll calculate the total area in square feet

Step Two: Calculate Carpet and Padding Needed

Plug the total lengths and widths into the calculator above to find the quantity of carpet and pad required in square feet and square yards.

To do this calculation yourself, multiply the floor width by length in feet to get the square footage. If you measured multiple sections, do this for each one, then add the square footage of each section together to get the total square footage.

Then, to get the area in square yards, divide this by 9, since there are 9 square feet per square yard.

You can use our square yards calculator to calculate this too.

In our experience, it’s a good idea to order some additional material to account for cuts. If you want to order some additional, then you can multiply the result by 1.1 to add an extra 10%, for example. Use the result to estimate your cost by multiplying it by the carpet and padding cost per square yard.

Keep in mind that while carpet and padding are sold by the yard, some brands will offer the costs in square footage, as most people are generally aware of the rough square footage of a space. This enables the customer to get a rough estimate of costs.

However, because yards are larger, you may find that you need to order slightly more carpet in some cases, which makes getting your estimates in square yards more accurate than in square feet.

For example, let’s estimate flooring for a living room that is 12′ x 15′. You want to use carpeting that costs $54/sq yd and padding that costs $4.50/sq yd.

Find the total square footage to order:

12′ × 15′ × 1.1 (10% extra) = 198 sq ft
198 sq ft ÷ 9 = 22 sq yds

Calculate costs:
Carpet: $54/sq yd × 22 sq yds = $1,188
Padding: $4.50/sq yd × 22 sq yds = $99
Total material cost: $1,188 + $99 = $1,287

How Much (More) Carpet Do I Need?

Unlike some other flooring materials, carpet comes in standard widths. The most common size is 12′ widths, but occasionally you can find widths of 13′ 6″ and 15′.

Usually, you must buy the entire width for as long a length as you need, no matter your room size. This can vary by supplier, though, with some suppliers selling partial rolls or remnants as well.

You need to take this into consideration when determining how much to buy. It is especially important when your room is wider than 12′.

Pattern and Nap in Different Directions

This example will show how to estimate carpet when the nap can be installed in a different direction. Ideally, the nap or the pattern of the carpet should all run in the same direction. Changing direction at a cut or at the end of a run may result in an unprofessional look, depending on the material used.

For example, if your room is 14′ x 14′, that is 196 sq ft. However, 12′ wide material will not cover the entire width. So, you will need to add extra length to get sufficient carpet for the extra width.

Depending on the pattern and nap type, you may want to use one 12′ x 14′ length of carpet and either a single 4′ x 12′ length or two 2′ x 12′ lengths, one on either side of the large section.

For most carpets, a single large piece and a single smaller piece will be enough, but if you have a repeating pattern, you may need to get additional carpet in order to make the pattern match up properly across the floor.

Pattern and Nap in the Same Direction

If you want the nap to run in the same direction or if the selected carpet has a pattern that you need to align at the seam, you would need TWO 12′ wide x 14′ long sections (336 sq ft) to cover a 14′ x 14′ room, nearly doubling the material you need to buy if the supplier does not allow partial rolls, cuts, or remnants.

Illustration showing how to estimate carpet for a room that is wider than a roll of carpet when a pattern needs to be matched
Illustration showing the waste for a 14′ x 14′ room when using carpet with a repeatable pattern.
Keep in mind that many sellers offer remnants, so you will not need to double your square footage each time.

However, style and pattern flooring can change the amount you need to order, and the waste can vary from 10% to 90%, depending on the room and carpet style, as well as by the carpet supplier and how they supply their carpeting.

If you are unsure, some suppliers will make the measurements and calculations for you, even if you plan on doing the installation yourself.

Carpeting is stretched tightly into place when it is installed. This can also sometimes lead to additional waste. Depending on where doorways are located and the shape of the room, this may change the direction the carpet is installed in.

Seams should not be located in the center of a doorway or in high-traffic areas.

How to Estimate Costs

Besides the carpet itself, nearly all carpets require padding underneath. Padding is sold in the same manner as carpet but is much less expensive. Padding ranges from 10 cents to 60 cents or more per square foot, or $0.90 to $5.40 a square yard.

Costs for carpet can vary widely from $9/sq yd ($1/sq ft) for apartment-grade material to over $90/sq yd ($10/sq ft) for luxury natural materials. To help you estimate your cost, you can optionally enter the cost of the carpet and/or the padding you want into the calculator above.

This will give you an estimate of the material costs for your project. For budgeting purposes, you can add $4.50 to $18 per sq yd ($0.50 to $2 per sq ft) to cover labor costs.

If you are installing your own carpet, you will need other materials (floor tape and tackless strip) and specialized tools (e.g., knee-kicker, power stretcher, and binder bars) as well. Usually, you can rent the necessary equipment.

Keep in mind that purchasing and renting these items will increase the cost of your DIY project. However, most people pay professionals to install their flooring since it’s a skilled job that usually takes professionals less than a day to complete.

You can find experienced carpet installers in your area here who will come to your house to discuss your project and provide you with free estimates. And soon, you will be on your way to enjoying your new floors!

Consult our carpet cost calculator and price guide to learn more about estimating the cost of flooring.

Fence Calculator

Fence Calculator

To estimate the fence posts, rails, pickets, and hardware you need, enter your fence length, number of rails, and picket dimensions. You’ll also get a cost estimate for pressure-treated wood, cedar, and redwood.

See below for information on various types of fences to help you and to learn how to calculate wood fence materials.

  • By
    FindPros

    FindPros connects consumers with professionals in over 600 different categories.

  • Reviewed by
    Jacky L.

    FindPros connects consumers with professionals in over 600 different categories.

This field is required.
Value should be positive.
This field is required.
Value should be positive.

Pickets

This field is required.
Value should be positive.
This field is required.
Value should be positive.

Material Estimate:

{{posts}}
{{rails}}
{{pickets}}
{{bags_concrete}}
{{small_screws}} lbs
{{large_screws}} lbs

Estimated Material Cost:

${{total_pressure_treated_min_cost}} – ${{total_pressure_treated_max_cost}} $
${{total_cedar_treated_min_cost}} – ${{total_cedar_treated_max_cost}} $
${{total_redwood_treated_min_cost}} – ${{total_redwood_treated_max_cost}} $

Installation Overview:

{{total_length}}
{{number_post}}
{{post_centers}}
{{rails_per_section}}
{{picket_width}}
{{picket_spacing}}

*Estimates only – costs vary by location/vendor, selected material, and quantities.

Learn how we calculated this below

Add this calculator to your site

How to Estimate Privacy Fence Materials

Fences are a great way to add privacy, security, and decor to your property. They can be constructed from a variety of materials, including wood, metal, vinyl, and stone.

Wood is one of the most common fence materials. Wood fences come in many styles, and can be built from several types of wood, including pressure-treated lumber, and softwoods like cedar or redwood.

This calculator will help you determine the amount of materials you’ll need to build a wood fence without relying on readymade panels.

Interested in installing a vinyl fence? Our vinyl fence calculator can help calculate materials.

When building a wood fence, you need to determine the amount of lumber and hardware you’ll need before you begin. For most wood fences, you need posts, rails, pickets or boards, and nails or screws.

You may also need gate hardware, post caps, stain or paint, lighting, or other materials depending on the style you choose.

Some concrete and the tools to mix and pour it will also be needed to set the posts. Use our post concrete calculator to estimate the amount of concrete you need to set your fence posts.

The amount of material you need to build your fence depends on the style. Wood fences come in many types, including stockade, dog-ear, and shadowbox.

Some styles, such as a board-on-board fence, offer superior privacy but require more material. Others, like a side-by-side fence, use less material and can be oriented vertically or horizontally.

Once you’ve chosen a style, you can enter your total length and rail and picket or board specs into the wood fence calculator above to get an estimated bill of materials.

The calculator will estimate how much lumber you need to construct your fence, including the number of posts, rails, pickets, concrete, and nails/screws.

Continue reading to learn how to make the calculations yourself.

How Many Fence Posts Do You Need?

The first step in figuring out how much wood is needed to build a fence is to measure the length of the total fence run in feet. Given the total length, you can estimate the number of posts you need.

Posts for wood fences are typically 8 feet apart; if you are using other materials, keep in mind that posts can be placed up to 25′ apart. To calculate the number of posts for a wood fence, divide the length by 8′ and round up to get the number of sections. Then, add 1 to account for the last post.

For example, let’s find how many posts are needed for a fence with a planned length of 100 feet.

(length in ft. ÷ 8′) + 1 = posts
(100′ ÷ 8′) + 1 = posts
(12.5) + 1 = 13.5 posts

Round up to get 14 posts needed.

How Many Fence Rails Do You Need?

Rails are the horizontal boards that run between the posts that the fence boards or pickets are affixed to. To calculate rails, decide the number of rails you want.

This will vary by the style and height of the fence, but there should be at least two. Privacy fences are generally at least 6′ tall, but may go as high as 12′. The general rule of thumb for rails is to have one rail for every 24″ of height in your fence.

For a 6′ high fence, this means 3 rails. For a 12′ high fence, this means 6 rails. If you are building a shorter fence, you may only need 2 rails.

Multiply the number of sections by the number of rails per section to find the total rails needed. The number of sections is equal to the number of posts in the previous step, minus 1.

For example, let’s find how many rails will be needed for a 100′ fence with 14 posts that is 6′ high. There will be three rails per section.

14 posts – 1 = 13 sections

13 sections × 3 rails = 39 total rails

How Many Pickets Do You Need?

Depending on the style of fence you are building, you may need pickets or boards to complete the fence. Pickets or boards can be spaced closer together to create a privacy fence, or spaced more widely for decorative fences.

A fence board is completely flat and typically 5-½” wide, while a picket is often much thinner at around 2-½” wide. Stockade fences are a good example of a fence using pickets, while a board-on-board fence will usually use flat boards.

Both are calculated the same way: you need the width of the picket or board and any spacing between them.

For example, stockade and dog ear fences have no spacing between the pickets or boards. But a picket-style, decorative fence will space the pickets a few inches apart from one another.

To calculate the number of pickets or boards, add the width of the board and the space between them. For some fences, this will only be the width of the board.

Change the length of your fence to inches to match the picket/board measurements. Divide the fence length by the total picket/board width to get the number of pickets needed.

For example, let’s find the number of pickets needed for a 100′ fence using a 5-½” picket with a 2″ spacing.

5.5″ picket width + 2″ spacing = 7.5″ combined width

100′ length × 12″ = 1200″ length

1200″ length ÷ 7.5″ combined width = 160 pickets

Tips For Estimating Fence Lumber

We recommend ordering 10% extra lumber to account for cutoffs and waste. Posts are commonly constructed using 4×4 dimensional lumber, and rails are often 2×4.

Plan on ordering lumber to build gates as needed, including additional posts and hardware. Gate posts are usually 4×4 or 6×6 dimensional lumber.

How to Estimate Fence Price

The average fence costs $2000 to $8000 to install, depending on material, style, and length. Wood is often chosen for its durability, aesthetics, and affordability.

To determine a solid price estimate, decide on the fence style and type of wood you want and accurately estimate the amount of material needed. Common wood choices are pressure-treated wood, cedar, or redwood, and they vary in price considerably.

Use the calculator above to estimate quantities and costs for all three materials at once.

A home center or lumberyard can provide you with your local material costs. Ask for prices on 4×4s, 2×4s, and pickets or boards in each wood you are considering. Also, don’t forget to check the price of exterior screws and post-setting concrete.

Multiply the prices by the amount of material needed, then add them together to get a total estimated cost. We also suggest finding a local contractor to get a professional estimate for your project to find out precisely what it will cost.

Types of Lumber Needed For a Wood Privacy Fence

The types of lumber needed for a wood privacy fence will vary by type and style. Board-on-board fences typically use more lumber, while side-by-side fences use less. Use the following measurements for quick estimations of lumber amounts.

Estimate Solid Board Privacy Fence Material

A solid board privacy fence consists of at least 3 rails connected to posts with attached pickets or boards with no gaps between them. Boards are usually 5-½” wide (thinner pickets are called “stockade” style; see below).

All the boards are installed on one side of the rails. So, you can see the rails on one side of the fence but not the other. The rail side is usually installed facing in. The other side is smooth and is usually public facing.

The exception is the framed style, where the rails are located at the very top and bottom to “frame” the boards. These rails are usually public facing. See popular solid board styles.

Use the following values for the form above to estimate:

  • Length: fence length
  • Rails per Section: 3 or more
  • Picket Spacing: 0
  • Picket Width: 5.5″
  • See popular solid board styles.

Estimate Shadowbox Fence Material

A shadowbox fence is similar to the solid-board style, except the pickets are installed on both sides of the rails with a gap between them. The pickets from one side are spaced so that they cover the space between the pickets from the other side. This creates a solid visual barrier.

Shadowbox fences are a subtype of the board-on-board style of fencing, and need more lumber to complete. Because pickets are mounted on both sides, the shadowbox style looks the same on each side.

Use the following values for the form above to estimate:

  • Length: fence length
  • Rails per Section: 3 or more
  • Picket Spacing: -1″
  • Picket Width: 5.5″

Estimate Stockade Fence Material

A stockade style fence is a style of side-by-side solid privacy fencing, using pickets that are 2-½” to 3-½” wide to achieve the stockade look. Like all solid-board fences, you will want to consider on which side you want the railings to show.

Use the following values for the form above to estimate:

  • Length: fence length
  • Rails per Section: 2 or 3
  • Picket Spacing: 0
  • Picket Width: 2.5″

Estimate Picket Fence Material

A spaced picket fence consists of posts with 2 rails and 2-½”-wide pickets that are spaced evenly with a gap. The gap is usually the width of a picket, though this can vary. All pickets are installed on the same side of the rails, typically on the public-facing side. There are many patterns for picket styles and spacing. See popular picket styles.

Use the following values for the form above to estimate:

  • Length: fence length
  • Rails per Section: 2 or 3
  • Picket Spacing: 3.5″
  • Picket Width: 3.5″

Estimate Rail Fence Material

Rail fences are wood fences that are used mostly for boundaries or livestock. They do not provide any privacy or security for pets or children.

They consist of horizontal rails between posts, with no vertical boards or pickets. The number of rails will increase as the height of the fence increases, but you can also add additional rails if you want to make the fence more secure for livestock.

There are two general types: a standard rail fence uses milled lumber between the posts. The lumber is usually nailed into place, but if using round milled rails, they may be inserted into the posts using pegs.

A split-rail fence uses non-milled lumber between the posts, and has a more rustic appearance. The lumber may be irregular, or can be made up of split tree branches.

Because there are no boards or pickets, these fences are usually cheaper to install.

Use the following values for the form above to estimate:

  • Length: fence length
  • Rails per Section: 3
  • Picket Spacing (inches): 0
  • Picket Width (inches): 0

Next Step – After estimating materials, it’s time to begin laying things out. Learn how to lay out a fence safely and efficiently to get the best results.

Frequently Asked Questions

For most wood, vinyl, and metal fences, 8 feet is the standard spacing, but depending on the fence type, posts can range from between 8 and 25 feet apart.

For most fences, 8 feet is the standard spacing, although, for some chainlink and wire fences, the spacing can be much longer. Divide the total length of fencing you need by the space between the posts – 8′ being average – to get the number of posts needed.

The typical fence post should be set at least ⅓ the height of the fence in the ground. This means that if your fence is 6′ high, you’ll need 8′ long posts so that they can be set 2′ in the ground.

For a privacy fence, the standard height is 6′, but may go as high as 12′ in certain circumstances. For decorative fences and pet fences, 4′ is generally standard.

A linear foot is a horizontal measurement of the fence, or the total length of the fence, measured in feet. Learn more about how to calculate linear feet.

The square footage of a fence is equal to the total length in linear feet times the height in feet.

Note that most fences are sold and installed by the linear foot, or the length of the fence in feet. However, when estimating paint, stain, or other finishing, you may need to measure the area of the fence in square feet.

Post Hole Concrete Calculator

Post Hole Concrete Calculator

Calculate how many yards or how many bags of concrete you’ll need for a set of post holes by entering the post diameter and hole size.

If you’re not sure what size hole to dig, a rule of thumb is to use a hole diameter three times the post diameter and ⅓ as deep as the post height.

  • By
    FindPros

    FindPros connects consumers with professionals in over 600 different categories.

  • Reviewed by
    Jacky L.

    FindPros connects consumers with professionals in over 600 different categories.

Post Dimensions

This field is required.
Value should be positive.

Hole Dimensions

This field is required.
Value should be positive.
This field is required.
Value should be positive.
This field is required.
Only numbers are allowed.

Optionally enter the price per cubic yard

$
Please enter valid price.

Results:

{{concrete_volume_cb_ya}}
{{concrete_volume_cb_m}}

Pre-mixed Bags

{{bags_50lb}}
{{bags_60lb}}
{{bags_80lb}}

Estimated Concrete Cost

{{ cost }} $

Learn how we calculated this below

Add this calculator to your site

How to Use the Post Hole Calculator

Fence posts must be sunk into the ground and secured using concrete in order to create a stable and long-lasting fence. Concrete can be purchased ready to pour in large amounts or in dry bags for smaller amounts.

To calculate the amount of concrete you will need to set fence posts, use this post hole estimator. Enter your post and hole dimensions in any units, and the calculator will give you the results in cubic yards and the number of pre-mixed, dry bags of concrete needed.

Fence posts must be set into the ground at a depth that is a minimum of ⅓ the total height of the fence. For a 6′ fence, this would mean the hole must be a minimum of 2′ deep. The width of this hole should be three times the width of the post. If your fence posts are made of 4″ x 4″ boards or are round with a 4″ diameter, these have an actual width or diameter of 3-½”. This would make the width or diameter of the hole 10.5′.

It’s a good idea to order roughly 10% additional material to account for settling and spillage. If you don’t have many posts to set, it may be more cost-effective to purchase dry concrete, mix it with water, and set the posts yourself.

If, however, you need a cubic yard or more of concrete total, you may find it easier to have it delivered pre-mixed and ready for pouring.

Concrete contractors can provide estimates for delivering and installing cement for your post project.

Illustration showing a post hole with a diameter that is three times the post’s diameter and with a depth that is 1/3 the height of the post.

How Much Concrete Do You Need Per Fence Post?

Concrete is sold ready-mixed (and usually delivered) by the cubic yard or in dry, pre-mixed bags by weight.

To calculate how much concrete you need, you need to know the post size you are going to use and how many posts you are installing. Your post diameter if it is round, or length and width if it’s square, and height determine how big each hole needs to be.

As stated above, fence post holes should be three times the diameter or width of your post and ⅓ as deep as your fence is tall.

First, you need to calculate the volume for the post hole. Then calculate the volume for the part of the post that will be submerged in the hole. Make sure all your units of measurement are the same, meaning that if you measure the width in inches, you should also measure the length and depth in inches.

To easily use the table above, convert your units to feet if they aren’t already. Use our calculators to quickly convert inches, yards, or meters to feet.

Or, if you are using inches for your calculations, you can convert to cubic yards by dividing the inches by 46,660 – the number of cubic inches in a cubic yard.

Post Hole Volume Formulas

Your post holes may be round, meaning cylindrical, or they may be rectangular, depending on how the post hole is dug. Likewise, your post itself may be round or square in shape.

Depending on the shape of the post and the hole, this may change the formula used to calculate the volume. Use the following formulas to calculate volume. For other types of round holes, use our cylinder cubic yardage calculator.
Rectangle:

volume = length × width × depth

Cylinder:

volume = radius2 × π × depth (π = 3.14)
Calculate Concrete Volume

Unlike a typical concrete pier, you need to account for the space that the post takes up in the hole when estimating. So, with the volume of the submerged post and the volume of the hole figured out, subtract the post volume from the hole volume, and you will have the volume of concrete needed for each hole.

Simply multiply that amount times the number of posts to get the total quantity. Don’t forget to add in some extra for spillage and waste.

If you have multiple different size post holes to fill, calculate each set with matching dimensions separately, then add the totals together.

Example Fence Post Concrete Calculation

Let’s use an example to illustrate what we covered above. Let’s assume you’re installing a 6-foot high fence, where 2 feet of the post will be in the ground, and you will need twenty (20) 4″ nominal round posts.

Note that 4″ posts are actually 3 ½ in diameter. Use the formulas above for volume.

Calculate the post volume
Divide by 12 to convert the post diameter to feet:

3.5″ ÷ 12 = 0.2917′

Next, find the radius (½ of the diameter):

0.2917′ ÷ 2 = 0.1458′

Finally, use the cylinder formula to find the volume of a round post:

(0.1458′)² × π × 2′ = 0.1336 cubic ft.

Calculate the hole volume
Find the hole radius (3x post radius):

3 x 0.1458′ = 0.4374′

Find the volume of the post hole using the cylinder volume formula:

(0.4374′)² × π × 2′ = 1.2026 cubic ft.


Calculate concrete volume

To find the concrete needed, start by subtracting the volume of the post from the volume of the hole:

1.2026 – 0.1336 = 1.069 cubic ft. per post

Then multiply by the number of posts to find the total amount of concrete needed for the project:

1.069 cubic ft × 20 posts = 21.38 cubic ft.

Finally, convert it to cubic yards:

21.38 cubic ft. ÷ 27 = 0.79 cubic yards

Hint: you can also use a concrete calculator for this step.

Most people find it easier to find cubic feet first, then convert it to cubic yards; if so, divide the cubic footage by 27.

If you are using square posts of the same measurements, the formula will look like this:

Divide by 12 to convert the post width to feet:

3.5 ÷ 12 = 0.292 feet

Take the length and width of the post and multiply those times the depth of the post to get the cubic volume of the post:

0.292′ × 0.292′ × 2′ = 0.17 cubic feet

Calculate the hole volume using 3 times the width of the post or 10.5″ or 0.88 feet:

0.88′ × 0.88′ × 2′ depth = 1.55 cubic feet

Subtract the post volume from the hole volume:

1.55 – 0.17 = 1.38 cubic feet per post hole

Multiply times the total number of posts:

1.38 × 20 posts = 27.6 cubic feet

Add 10% for waste = 30.36 cubic feet

Divide by 27 to get the number of cubic yards – 1.12 cubic yards of concrete needed.

How Many Bags of Concrete Do You Need Per Fence Post

Most concrete suppliers will not sell fractions of a yard of concrete, though it is worth asking about. So, in many cases, you will need to purchase bags.

For the first example above, we can use the table below, to find the number of bags. In this case, you would need to buy at least eight 80 lb. bags and one 40 lb. bag (yielding a total of 5.1 cubic feet) of concrete to allow enough for extra.

Dry, Pre-Mixes Bag Concrete Yield

The following table shows the approximate yield of mixed concrete for common bag weights.

Bag Concrete Weight Mixed Concrete Yield (approximate)
40 lb (18.1 kg) 0.30 cu ft (8.5 L)
60 lb (27.2 kg) 0.45 cu ft (12.7 L)
80 lb (36.3 kg) 0.60 cu ft (17 L)

Approximate yield for various bags of concrete

Tips For Ordering Concrete

Consider these tips to ensure your concrete installation goes smoothly.

Type of Concrete and its Proper Installation

The type of concrete you use and its application will vary depending on your climate. Colder temperatures need longer curing times; sandy soils need different shaped holes; more extreme freeze/thaw cycles need higher strength concrete than more temperate regions.

Your concrete supplier can advise you on the proper mix to use for your project and region.

Additional Costs

For ready-mix concrete delivery, there are typically additional fees for delivery, weekend service, small loads, and overtime for long unloading times. Discuss these issues with your concrete supplier ahead of time so that you have a clear understanding of costs and can plan accordingly.

Additional Concrete

Order extra concrete (overage) for your project. The amount of overage you plan for will vary based on your quantity, but plan for at least 10% overage to accommodate spillage, settling, and grading inconsistencies.

This will save you from a bad pour (concrete installed in parts resulting in a separated, weak mass) in the event that your estimates are even slightly off.

Allocate Enough Time

Finally, digging can be hard, time-consuming work. Allow plenty of time to dig all the post holes for the project before the concrete is delivered or mixed.

Mixed concrete that must sit before being poured into place can partially or even fully set. This can result in significant waste from hardened, unused concrete or create air pockets and compromised strength from pouring concrete that is too thick.

Fence Stain Calculator

Fence Stain Calculator

Use the calculator below to estimate how much material you’ll need to paint or stain a fence.

  • By
    FindPros

    FindPros connects consumers with professionals in over 600 different categories.

  • Reviewed by
    Jacky L.

    FindPros connects consumers with professionals in over 600 different categories.

Fence Size

This field is required.
Value should be positive.
This field is required.
Value should be positive.

Picket Layout

This field is required.
Value should be positive.
This field is required.
Value should be positive.

Paint or Stain Details

This field is required.
Value should be positive.
This field is required.
Value should be positive.
Paint/Stain Estimate:
{{stain_needed}}
{{stain_needed_per_quote}}
{{total_sq_ft_area}}

Learn how we calculated this below

Add this calculator to your site

How to Estimate Paint or Stain for a Fence

Over time, a wooden fence can become weathered and dull, and you’ll need to paint or stain it to restore its beauty and protection. Both paint and stain need to be reapplied periodically to help protect your fence from the elements and UV rays. Stain ideally needs to be reapplied every other year, while paint may last three to five years, although there is some flexibility for both.

Before you start the painting or staining process, it’s crucial to estimate how much paint or stain you’ll need to complete the project.

There are a few things you need to do to estimate paint or stain.

Step One: Measure the Fence

Measure the length and height in feet of each fence panel, then multiply them together to find the total square footage of the fence. Repeat this process for each section of the fence, remembering to measure the gates as well.

If you’re finishing both sides of the fence, you’ll need to double your square footage measurement. Keep in mind that your fence style can influence the amount of paint.

Picket fences with a lot of spaces between the pickets will require less paint than a solid fence, while fences that have a lot of extra posts, rails, and decorative areas may require more paint.

Because paint and stain can have a range of coverage, keep in mind that for fences that have more surface area to cover, you will be at the lower end of the coverage range, while fences with less area to cover may be at the higher end.

Step Two: Note the Type of Wood

The type of wood you’re trying to finish will determine how much paint or stain you need to cover it fully. Softwoods, such as pine or cedar, will absorb more paint or stain than hardwoods, such as oak or mahogany.

Most fences are made of softwoods, with the most common materials being redwood, cypress, pine, and cedar. However, some fences can be made of oak, teak, or mahogany. It is important to know the material of your fence, if possible, as it can affect not only how much paint or stain it absorbs, but also whether a primer is necessary as well.

A new fence constructed using new, unfinished lumber will also absorb more finish than one that has already been finished, painted, or primed. Some fence installers recommend letting your fence weather for a season before applying stain or paint for this reason.

The age of the fence will also play a role. Significant weathering causes the grain of the wood to open and will require much more paint or stain to get full coverage than wood that is not heavily weathered.

Most experts also suggest using a semi-transparent or solid stain for wood that is weathered to avoid a blotchy, uneven look that results from using clear or translucent stains.

If there are any sections of the fence that are beyond repair, then it’s best to replace them before you apply the new finish so they blend with the rest of the fence. Learn more about how much it costs to repair a fence.

Step Three: Choose a Paint or Stain Product

The color and type of paint or stain you use also affects how much is needed to fully cover the fence. For example, very light or very dark colors may require additional coats to evenly and completely cover the fence.

This is particularly true if you are changing the color of the fence. Going from dark to light or light to dark may require additional coats of paint or stain.

Each type of paint or stain varies in how much square footage it will cover per coat. Check the can to find the coverage rate for the specific product you intend to use.

Typically, one gallon of paint or stain covers 250-350 square feet of fence. Your coverage rate will vary depending on the type of wood, its condition, and the type and style of fence. Fences that have more surface area to cover, such as a shadowbox fence will need more material to cover than a panel fence, for example.

Step Four: Calculate the Amount of Paint or Stain Needed

Once you have the measurements of the fence and the coverage rate for the product you’re using, it’s time to calculate how much paint or stain you need.

Start by dividing the square footage of the fence from step one by the coverage rate of the product you’re using.

Then, multiply that by the number of coats you want to apply. Typically, two coats are required to get a good finish, but keep in mind that very light or dark colors may require an additional coat.

If the wood is new and has not been finished before, or if it’s very weathered, then you’ll need to account for this and add a bit to your estimate.

You should also consider adding an extra 10% of additional paint or stain to account for spillage, overspray, etc.

In general, refreshing a fence with a few coats of paint or stain is a cost-effective way to restore its beauty and protect it from the elements. Over time, these costs can add up, however, which is an important consideration when choosing a new fence, and why many choose to install a vinyl fence instead of wood.

You might also be interested in calculating the amount of stain needed for a deck.

Concrete Driveway Calculator

Concrete Driveway Calculator

Estimate the concrete, rebar, gravel, and form material needed for a concrete driveway installation and get a price estimate by planning the location on a map or entering the length and width.

  • By
    FindPros

    FindPros connects consumers with professionals in over 600 different categories.

  • Reviewed by
    Jacky L.

    FindPros connects consumers with professionals in over 600 different categories.

This field is required.
Value should be positive.
This field is required.
Value should be positive.
This field is required.
Value should be positive.

Optionally enter the price per ton or cubic yard

$
Please enter valid price.
Material Estimate:
{{concrete}} yds³
{{forms_stakes}}
{{rebar}} ft
{{crushed_stone_base}} yds³
{{forms}} ft

Estimated Material Cost:

${{concrete_cost}}
${{rebar_cost}}
${{crushed_stone_base_cost}}
${{forms_cost}}
${{forms_stakes_cost}}

${{total_cost}}

Installation Overview:

{{driveway_area}} ft²
{{driveway_perimeter}} ft

Learn how we calculated this below

How to Estimate Material for a Concrete Driveway

Concrete is a beautiful, long-lasting, and maintenance-free choice for a driveway. There are many steps in preparing for a driveway project, and one of the most important is having the right materials ready for the job.

Of course, you need to order the right concrete for your driveway, but before that, you also need to have a proper base prepared, a rebar grid installed, and forms ready to contain the concrete while it hardens.

All of these materials need to be ordered in the correct amounts for the project to be completed successfully. Concrete, in particular, must be poured at once; if you don’t order enough for the single pour, your driveway may not last.

How Much Concrete Do You Need for a Driveway?

Concrete is sold by the cubic yard, which is a measure of volume. To find the amount of concrete needed for a driveway, you simply find the volume of the space to fill in cubic yards.

Start by finding the area of the driveway in square feet. Multiply the length by the width in feet to find the square footage.

Next, multiply the area in feet by the depth of what you want the concrete to be in feet. Since the depth of a driveway is commonly measured in inches, divide the inch measurement by 12 to find the depth in feet.

Multiply the square footage by the depth in feet to find the volume in cubic feet. You can find the volume by measuring length × width × depth.

Finally, divide the cubic footage by 27 to find the volume in cubic yards. This is the amount of concrete needed.

Let’s illustrate this using an example of a driveway that is 20’ wide by 50’ long and has a depth of 8″.

20 × 50 = 1000 ft2
8” ÷ 12 = .66666667′
1000 × .66666667’ = 666.67 ft3
666.67 ÷ 27 = 24.69 yds3

Our concrete calculator makes it easy to estimate concrete, and you can use it instead of the equations above.

How Much Rebar Do You Need

When installing a new concrete driveway, it is essential to add reinforcement to prevent major cracking as the driveway shifts. You can do this by adding a grid of rebar or by adding wire mesh to the concrete mix.

Mesh is used if your driveway is 4″ to 5″ thick, while rebar is needed for driveways that are 5″ thick or thicker. If you choose to use rebar, most professionals recommend using a #3 or #4 rebar installed in a grid spaced 12″ apart.

Estimating Rebar for a Rectangular Driveway

To estimate rebar for a regular driveway that is a standard rectangle, you’ll need to know the length and width. You’ll need a row or column every 12″ of the driveway, spaced about 3″-6″ from the edge. Subtract 6-12″ from the length and width measurements to get the length and width of the rebar grid.

To find the rows of rebar in the grid, find the length of the grid in feet to find the number of rebar pieces, and they should be equal to the width of the grid in length. To find the columns of rebar in the grid, find the grid’s width in feet to find the number of pieces of rebar, and the length of the grid is the length of the rebar pieces.

Estimating Rebar for an Irregular Driveway

To estimate rebar for an irregular driveway, you’ll need to know the area of the driveway in square footage and the perimeter of the driveway in feet. The perimeter is the measurement around the driveway and is taken in linear feet, meaning that you only need the total length around the driveway and no other measurements.

Multiply the square footage by 2 and add that to the perimeter divided by 2.

(square feet × 2) + (perimeter ÷ 2) = rebar length in feet

How Much Base Gravel do You Need

Most concrete contractors recommend installing a base of compacted gravel that is 4″ to 12″ deep below the driveway. It is essential to add a base to prevent settling and erosion and assists with drainage beneath the driveway.

Most driveways will use around 6″ of crushed, compacted gravel beneath the concrete.

Gravel is often sold by the cubic yard, so you can use the method we showed above for finding the cubic yards of concrete to find the yards of gravel. Use our cubic yardage calculator to find the amount of gravel needed for your driveway project.

Keep in mind that compacted gravel takes up less space than loose gravel. To ensure you have enough gravel, always order about 20% more than the loose gravel amount.

Planning Forms for Concrete Driveway Pour

When installing a concrete driveway, it will be important to set up forms to contain the concrete while it cures. A form is commonly a board secured to stakes that are driven into the ground and installed in the shape of the driveway.

For straight sections, you can use 2×4 or 2×6 pieces of dimensional lumber. For curved areas, hardboard siding makes a nice flexible form and is easily attached to wooden stakes. The amount of form material needed is equal to the perimeter of the driveway.

Measure the perimeter in feet, and round up to the nearest whole foot if between measurements. You will order this many linear feet of dimensional lumber to create the form.

There are two forms of stakes that can be used to secure the forms to the ground. Most professionals use steel concrete pins, which are basically large metal stakes with nail holes and are intended to be reused on many projects. A second and more cost-effective option is to use long wooden stakes, which can usually be used only once.

As an Amazon Associate, we may earn commissions from qualifying purchases from Amazon. Learn more

Summary

Installing a concrete driveway usually costs $4,000 – $8,500 and requires several materials that you’ll need to plan out in detail before starting the project. Use our calculator above to help plan out your driveway project.
See our gravel driveway calculator if you are exploring using gravel as an alternative option for your project.